Have you ever opened your closet doors in the morning, only to feel a wave of stress wash over you? Many of us struggle with cluttered racks, hidden shoes, and clothes stuffed into dark corners where we completely forget they even exist. It makes getting dressed feel like a chore instead of the creative, fun ritual it should be. When your wardrobe is messy, it’s incredibly hard to feel confident in what you’re wearing. The good news is that you don’t need a massive budget or a mansion to build a stunning, organized space.
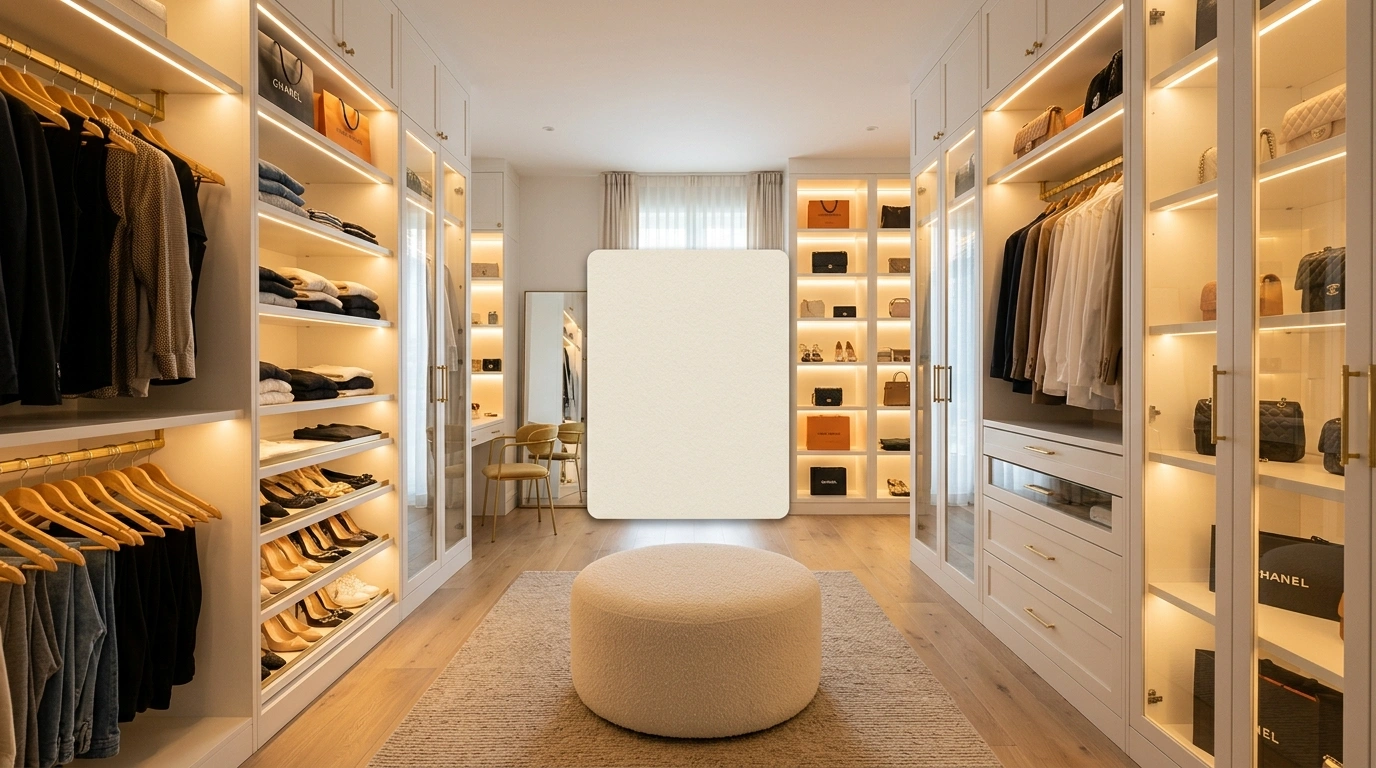
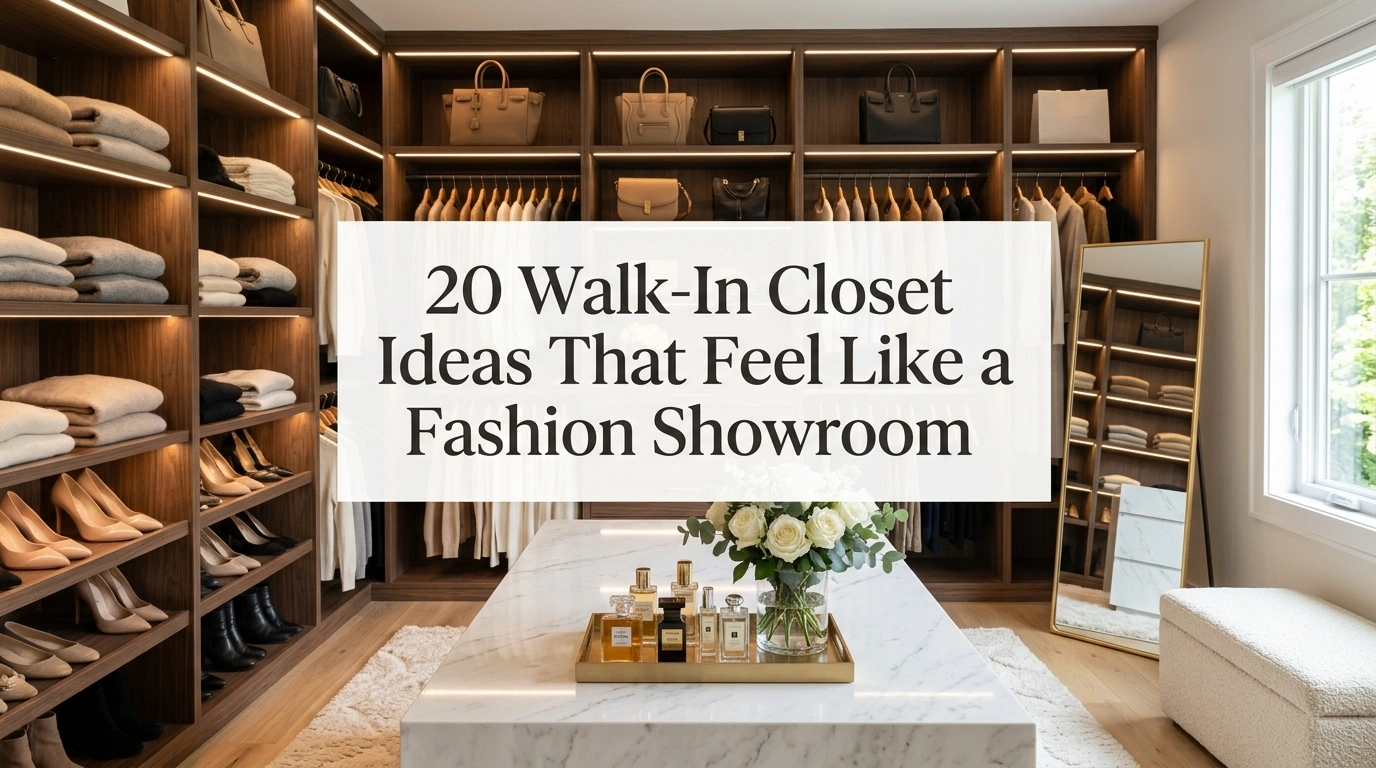
By using smart design choices, you can easily implement 20 walk-in closet ideas that feel like a fashion showroom right in your own home. In this guide, we will look at how clever lighting, thoughtful layouts, and simple styling tricks can turn your daily routine into a beautiful, inspiring experience. You’ll learn exactly how to display your favorite pieces so they look like they are sitting in a high-end boutique, making it simple to put together outfits that make you feel amazing every single day. Let’s dive into the practical design strategies that will completely change the way you look at your clothes.
1. The Boutique-Style Center Island
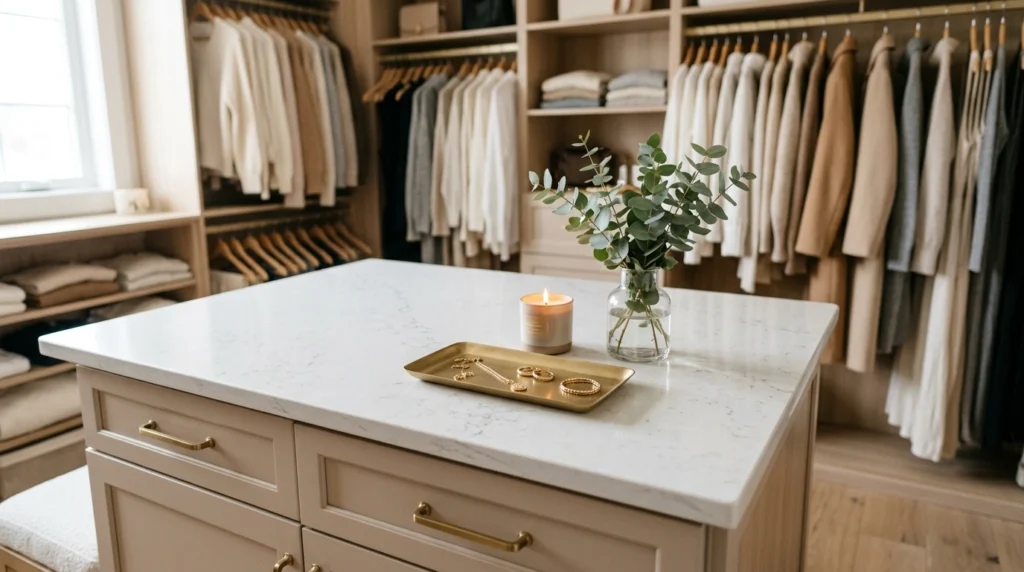
Imagine walking into your closet and seeing a beautiful central counter that anchors the entire room. It instantly gives you a place to lay out your accessories, place a fresh vase of flowers, or set down your morning coffee while you decide what to wear. The polished surface catches the light, creating a calm, high-end atmosphere where every piece of jewelry has a home. It feels less like a storage room and more like a private shopping experience designed just for you.
To recreate this look, I always recommend starting with a small dresser or a slim kitchen island console if you have the floor space. You want to leave at least two to three feet of walking space all around it so you don’t feel cramped. If a custom built-in island is out of your budget, you can easily repurpose a wooden sideboard cabinet and paint it a crisp white or soft beige. Add a beautiful stone or faux-marble contact paper to the top surface, and place a small tray on top to hold your daily essentials.
Estimated cost: $150 – $800 depending on DIY vs. pre-built cabinets.
2. Backlit Floating LED Shelves
There is something incredibly magic about soft, warm light shining from behind your sweaters and shoes. It removes all the dark, dusty shadows that make closets feel small and uninviting, making your clothes look vibrant and clean. The glowing shelves draw your eye to your favorite knits and bags, creating a beautiful focal point that feels expensive and intentional. It makes even the simplest t-shirts look like they are part of a curated collection.
A lot of people overlook this detail, but adding lighting is actually very simple and doesn’t require complex electrical work. I always suggest using adhesive, rechargeable LED light strips with motion sensors that stick directly underneath each shelf. Look for “warm white” tones (around 2700K to 3000K) rather than harsh, blue-toned white lights, which can make your closet feel like a sterile hospital room. Hide the wire runs along the back corners of your cabinetry using small, paintable cable covers.
Estimated cost: $30 – $150 for DIY wireless LED light kits.
3. Floor-to-Ceiling Glass-Front Cabinets
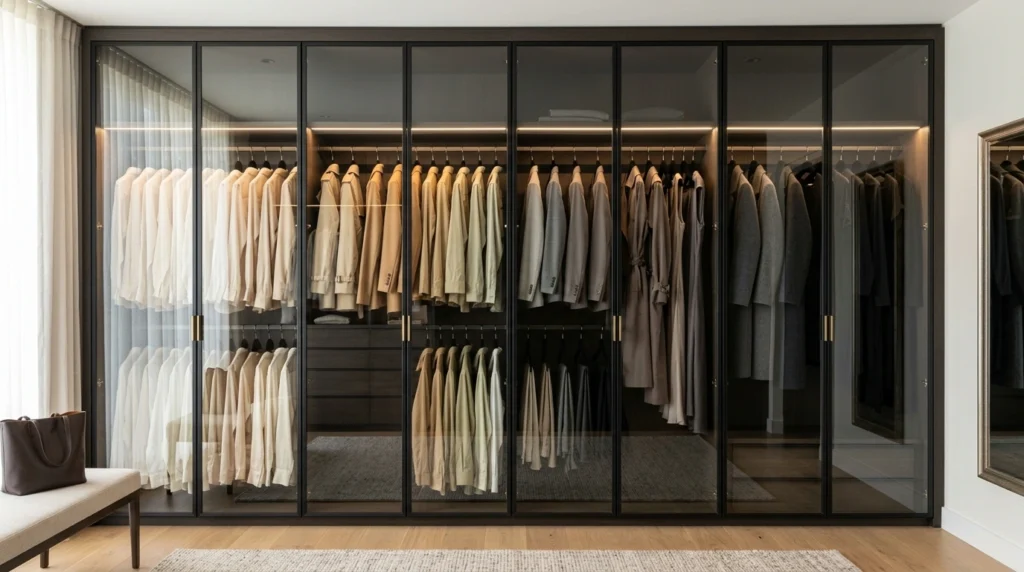
There is a distinct beauty in being able to see all of your clothes while still keeping them protected from dust and pet hair. Glass-front cabinet doors reflect the natural light in the room, making your entire walk-in closet feel twice as large and incredibly airy. When you look through the glass, your coats, dresses, and blouses look like art pieces on display, encouraging you to keep everything neatly hung and organized.
If you want to achieve this without spending thousands on custom cabinetry, look into modular wardrobe systems with glass door options. If you already have open wooden shelves, you can hire a local glass cutter to create custom doors, or simply opt for acrylic panels as a lightweight, budget-friendly alternative. In my experience, the biggest mistake people make here is forgetting to use matching hangers behind the glass—using mismatched plastic hangers instantly ruins the clean, uniform look.
Estimated cost: $400 – $1,800 for modular glass-door wardrobes.
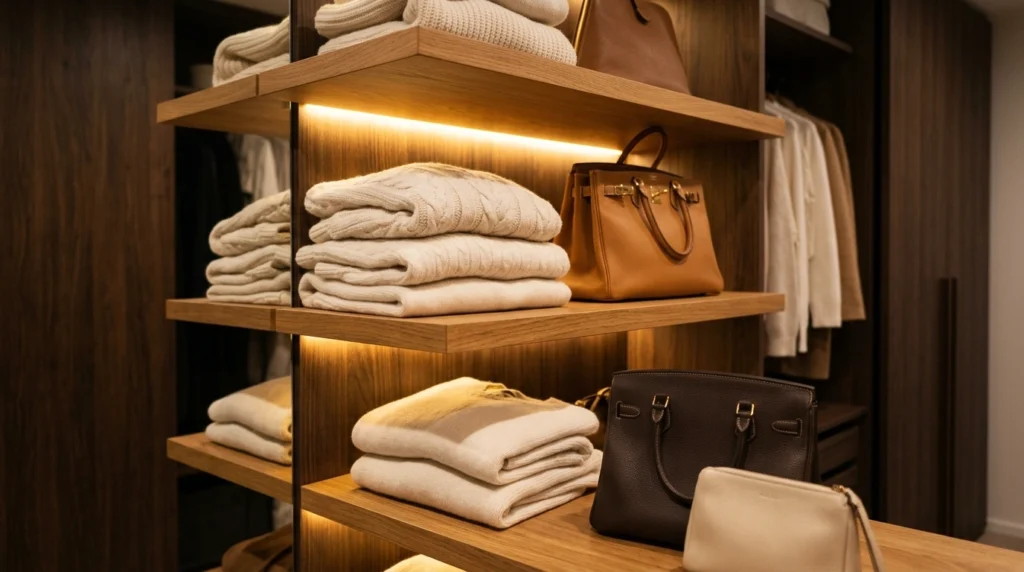
4. The Dedicated Accessory & Handbag Gallery
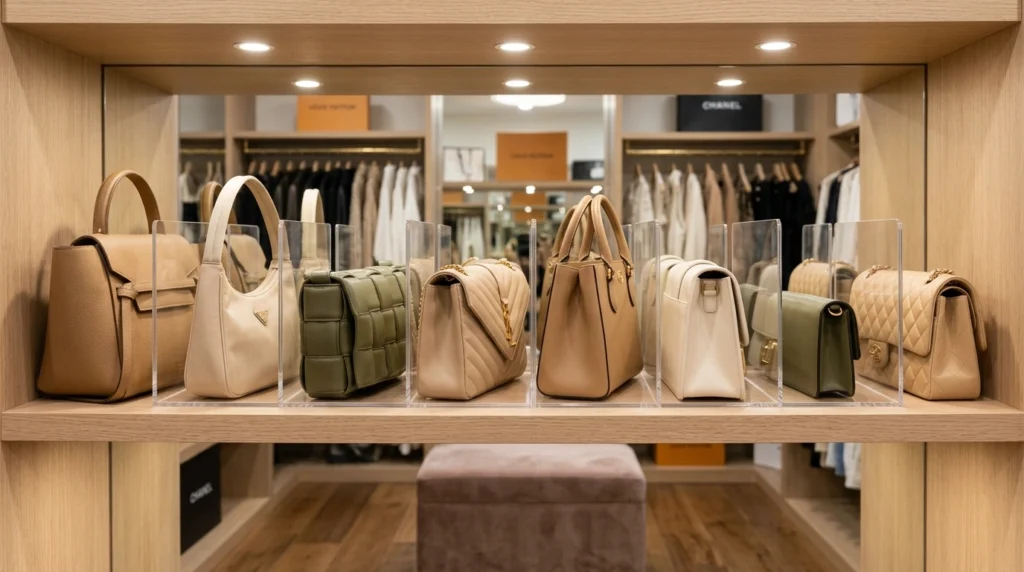
Your handbags and small accessories shouldn’t be stuffed into dark bins or piled on the floor where they lose their shape. Creating a dedicated shelf display where each bag has room to breathe turns your accessories into beautiful design elements. It gives you that exciting feeling of browsing a luxury boutique, and it helps you quickly grab the perfect bag to finish your outfit before heading out the door.
To set this up, clear out a eye-level shelf and use clear acrylic dividers to keep your bags upright and organized. Fill slouchy leather handbags with acid-free tissue paper or bubble wrap so they maintain their shape over time instead of collapsing. This works especially well if you group your bags by color or size, placing your most-used everyday totes within easy reach and your formal clutches on the higher shelves.
Estimated cost: $15 – $50 for acrylic organizers and bag inserts.
5. Valet Rods for Weekly Outfit Planning
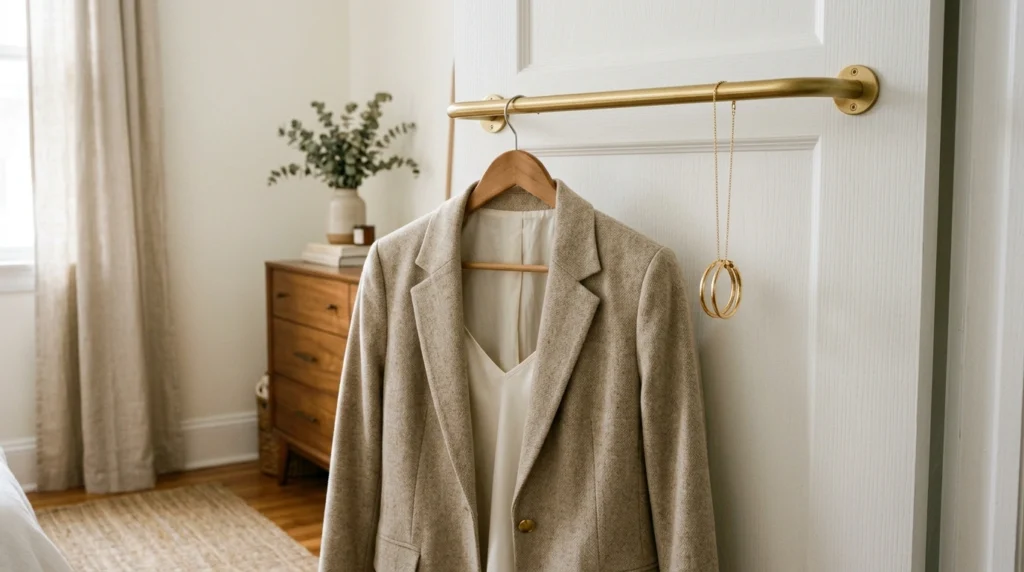
Having a small, pull-out metal rod on the side of your wardrobe completely changes how you plan your weekly outfits. It gives you a dedicated spot to hang your clothes for the next day, try out new color combinations, or steam a wrinkled dress without hanging it from a door frame. It makes your morning run much smoother because you’ve already taken the time to arrange your look the night before.
You can easily purchase a retractable valet rod online and screw it directly into the side of your existing wooden closet panels. If you are renting or don’t want to drill into your walls, a stylish, free-standing metal clothing rack placed in the corner serves the exact same purpose. I always recommend placing this near your mirror so you can easily hold up pieces and see how they look together.
Estimated cost: $20 – $80 for a high-quality metal valet rod.
6. Monochromatic Color Blocking with Velvet Hangers
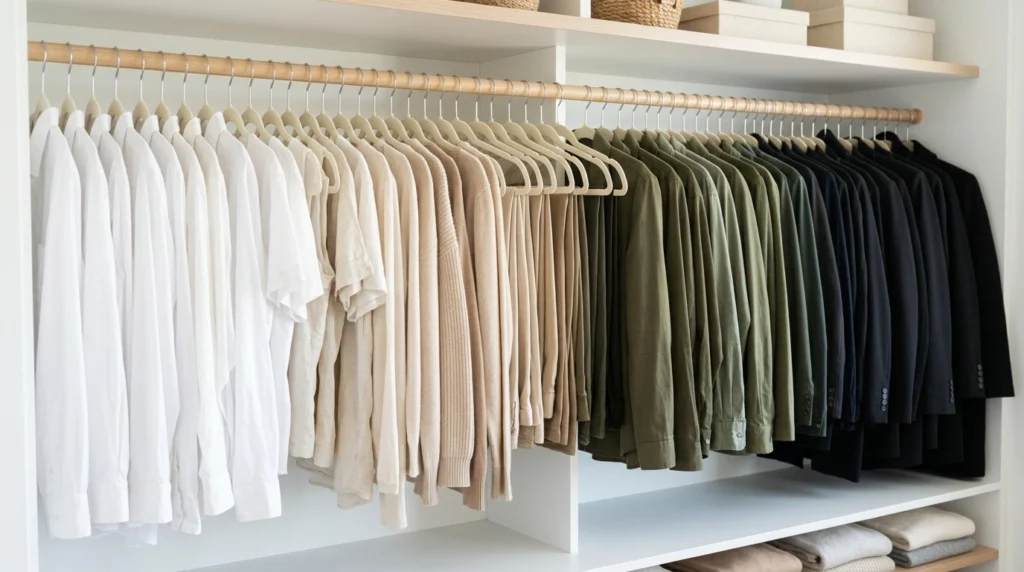
What I personally love about this look is how incredibly satisfying and calming it is to look at. When you group your clothes by category (like shirts, pants, and dresses) and then arrange them by color from light to dark, the visual clutter instantly disappears. Pairing this organization with matching non-slip velvet hangers makes the entire wardrobe look uniform, clean, and professional.
Start by donating any clothes you haven’t worn in the past year, then invest in a bulk pack of thin velvet hangers in a single neutral color like black, ivory, or taupe. Avoid bright, neon-colored hangers, as they distract from the actual colors of your clothing. Hang all your garments facing the same direction, and work your way from white and cream, through pastels, and finally to deep navy, brown, and black.
Estimated cost: $20 – $60 for a set of 50 to 100 velvet hangers.
7. A Cozy Velvet Accent Chair Seating Area
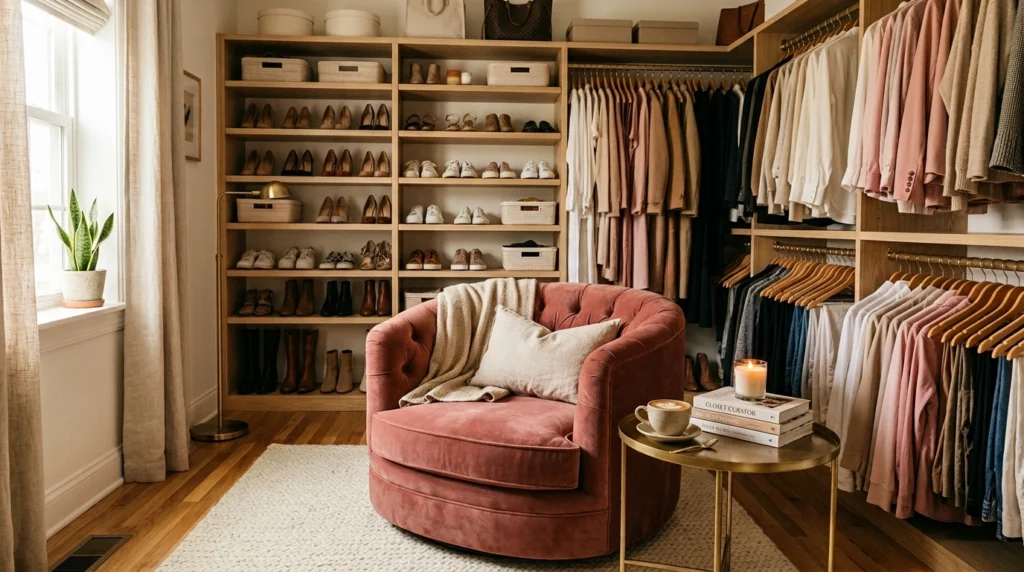
Every great showroom has a comfortable place to sit, think, and try on shoes. A plush, velvet accent chair or a soft tufted ottoman in the center of your walk-in closet adds a layer of warmth and luxury. It invites you to slow down, take your time, and enjoy the process of getting ready, rather than rushing through it on your feet.
If your closet is on the smaller side, a small round stool or a narrow bench pushed against the wall works wonderfully without blocking your walkways. Opt for rich fabrics like velvet, boucle, or linen to add physical texture to the space. You can easily find budget-friendly seating at local thrift stores and give it a fresh look with a quick fabric cleaning or a simple slipcover.
Estimated cost: $50 – $250 for an accent chair or vanity stool.
8. Full-Length Three-Way Mirror Station
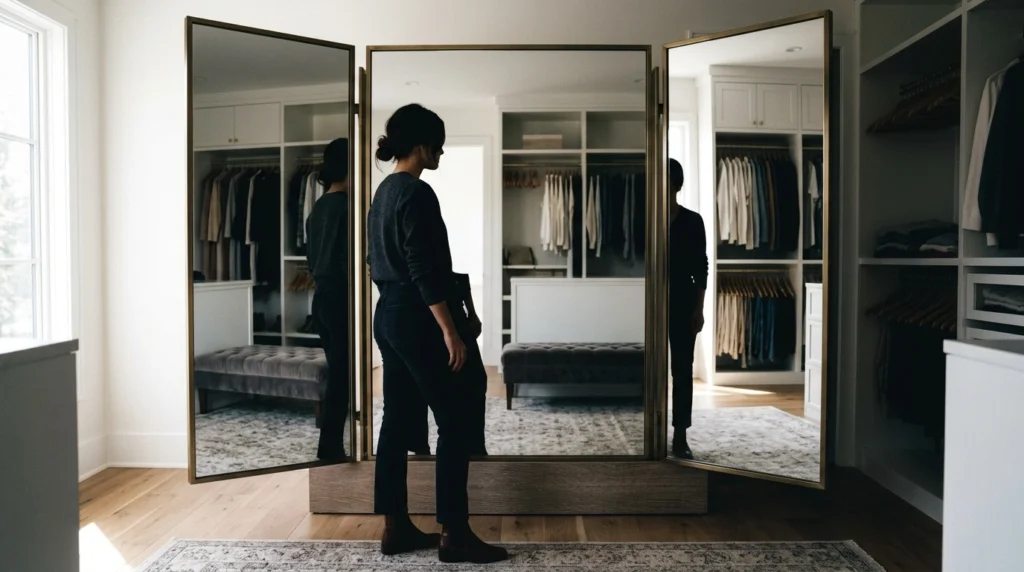
To truly feel like you are standing in a high-end fitting room, you need a mirror that lets you see your outfit from every angle. A three-way mirror station allows you to check your hemline, see how a jacket fits across your shoulders from behind, and ensure your shoes match the silhouette of your pants perfectly. It builds instant confidence before you walk out the door because there are no surprises.
You can create your own three-way mirror by purchasing three inexpensive, full-length framed mirrors from a home goods store and mounting them adjacent to each other on a flat wall or corner. Attach the two outer mirrors with sturdy hinges so you can swing them inward to adjust the viewing angle. Make sure you place this setup near a good light source so you can see the true colors of your outfits.
Estimated cost: $100 – $300 for DIY framed mirror setups.
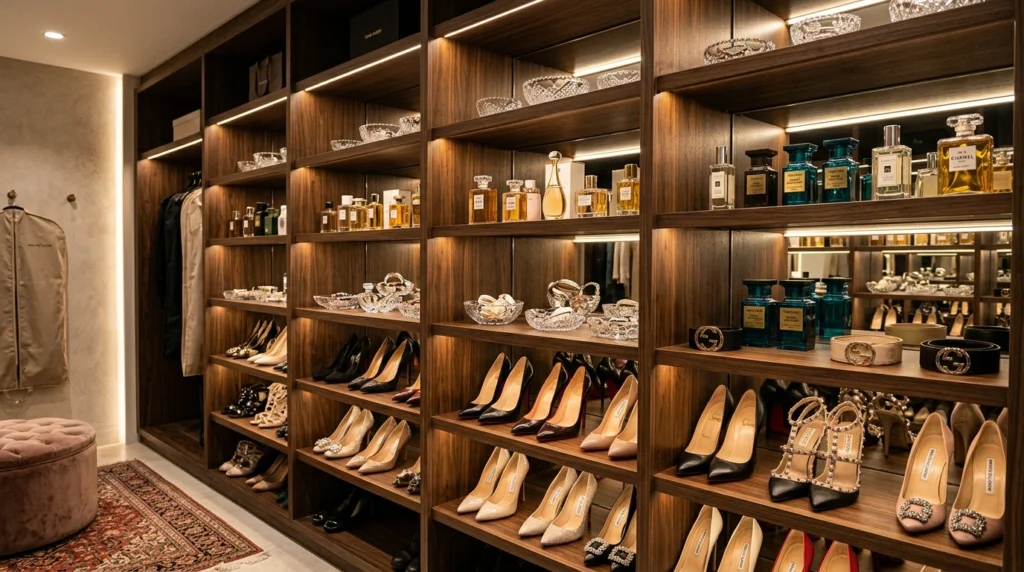
9. Exposed Shoe Library with Angled Shelves
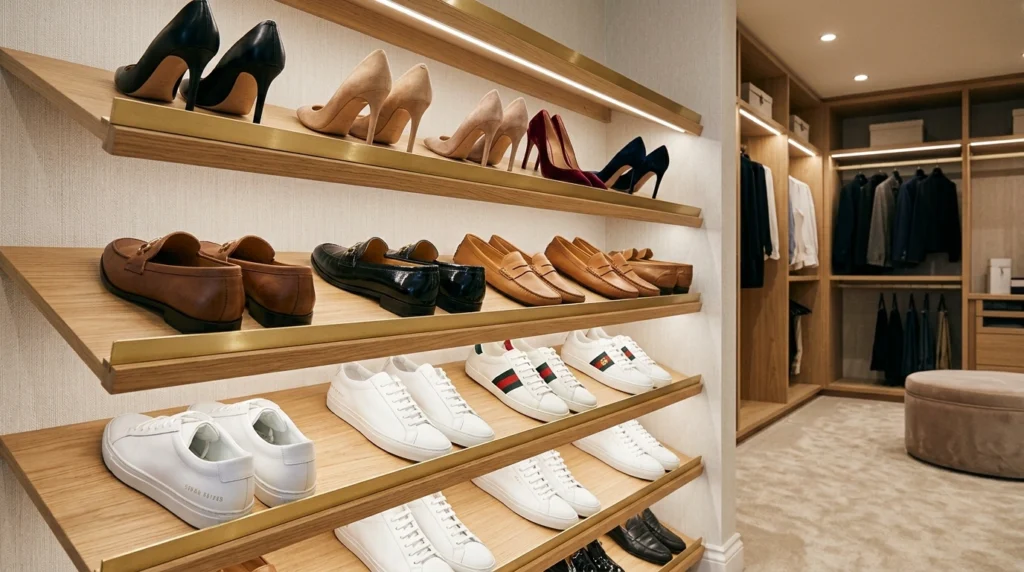
Storing your shoes on flat shelves often makes it hard to see what you actually own, leading you to wear the same two pairs over and over. Angled shoe shelves with a small front lip allow you to see the entire design of your heels, flats, and sneakers at a glance. It makes your footwear look like a gorgeous collection, making it incredibly fun to pick out the perfect pair for the day.
If your current shelves are flat, you can easily buy angled wooden or plastic inserts to elevate the heel of your shoes. Arrange them by style—heels on one shelf, sneakers on another, and boots at the bottom where there is more height. I always recommend placing one shoe facing forward and the other facing backward on the shelf; this works especially well if you want to see both the toe design and the heel height at the same time.
Estimated cost: $40 – $200 for shoe shelf inserts or custom racks.
10. Brass Hardware and Custom Pulls
The smallest details often make the biggest difference when you want to make basic furniture look expensive. Swapping out plain chrome or plastic drawer knobs for heavy, brushed brass pulls adds a beautiful touch of warmth and shine to your closet cabinetry. It’s an incredibly easy upgrade that instantly elevates simple white or black flat-pack dressers into looking like custom designer pieces.
Take a quick inventory of all the drawers and cabinet doors in your walk-in closet, and measure the distance between the existing screw holes. You can find beautiful, affordable brass, matte black, or leather loop handles online. Installing them only takes a simple screwdriver and a few minutes of your time, but it completely changes the physical feel of opening your drawers every morning.
Estimated cost: $15 – $60 for a full set of replacement hardware.
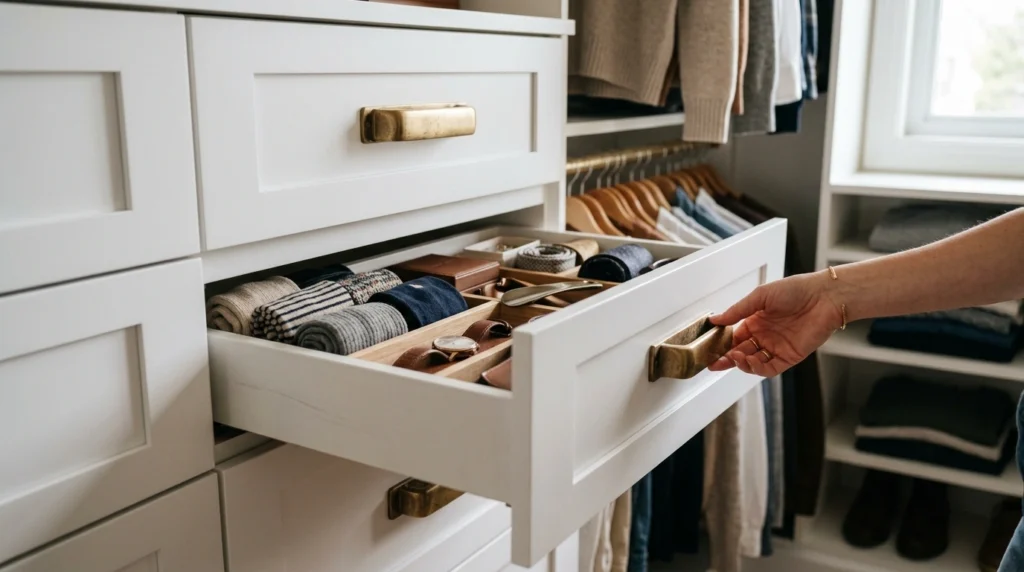
11. Pull-Out Jewelry Drawers with Felt Dividers
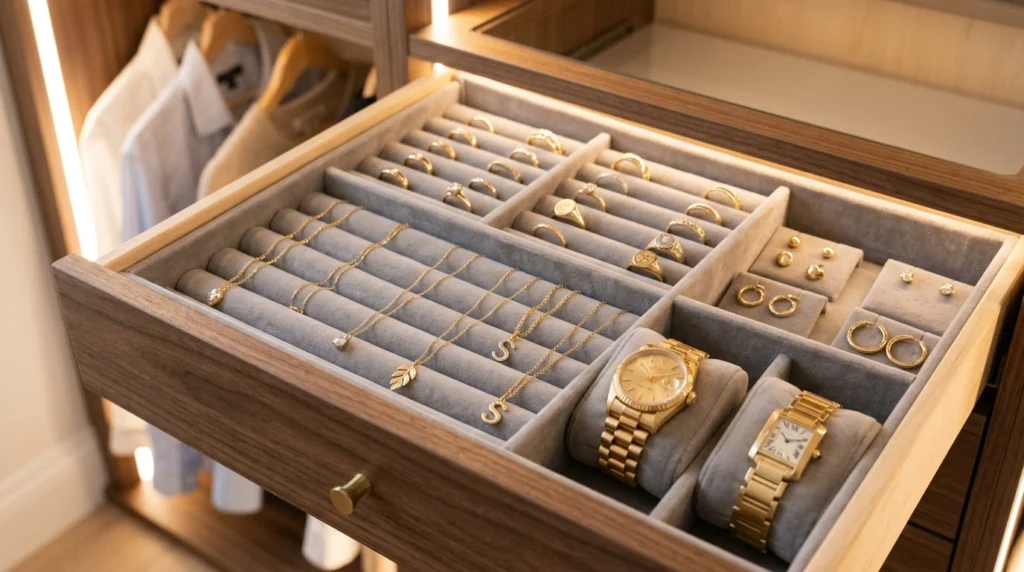
There is nothing more frustrating than spending ten minutes untangling a knot in your favorite gold necklace when you are trying to leave the house. A shallow drawer fitted with soft felt or velvet jewelry trays keeps your rings, watches, earrings, and necklaces laid out perfectly flat and dust-free. When you slide the drawer open, everything sparkles against the dark fabric, making it easy to find exactly what you need.
You don’t need to buy a brand-new dresser to get this luxury experience. Simply measure the inside dimensions of your current dresser drawers and purchase modular velvet jewelry organizer trays that slide right inside. Look for trays with different compartment sizes—long slots for necklaces, small square grids for earrings, and soft rolls to keep your rings securely in place.
Estimated cost: $15 – $40 for velvet drawer inserts.
12. Accent Wallpaper Backing for Open Shelves
If your walk-in closet has simple white open shelving, it can sometimes feel a bit cold and plain. Adding a beautiful peel-and-stick accent wallpaper to the back walls of your shelving units adds instant depth, color, and personality. It creates a stunning backdrop for your clothes, highlighting your favorite neutral sweaters and making the entire room feel custom-designed.
Choose a subtle pattern like a soft watercolor stripe, a textured grasscloth, or a delicate floral print that won’t clash with the colors of your clothing. Peel-and-stick wallpaper is incredibly easy to apply yourself and can be removed without damaging the paint underneath, making it perfect for renters. In my experience, applying it just to the back panels of your central shelving unit creates the most balanced visual impact.
Estimated cost: $35 – $80 per roll of peel-and-stick wallpaper.
13. Statement Chandelier or Pendant Lighting
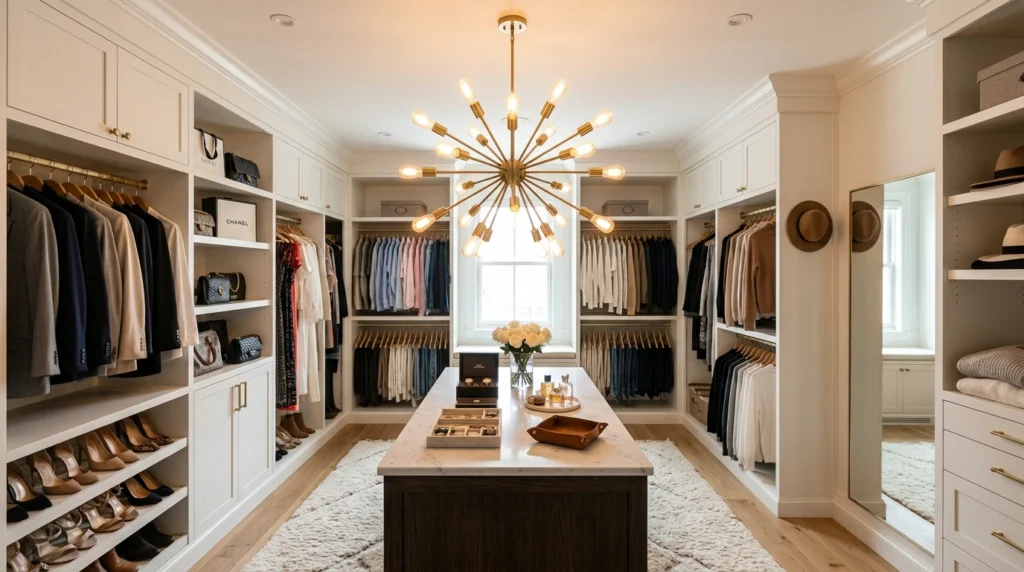
Lighting is the ultimate secret tool of professional interior designers and boutique store owners alike. Replacing a basic, boring flush-mount ceiling bulb with a beautiful statement chandelier or a modern brass pendant completely changes the mood of the space. It casts a warm, even glow across the room, highlighting the textures of your clothes and making the entire closet feel incredibly special and grand.
Make sure to select a fixture that matches the scale of your closet; a massive chandelier will overwhelm a small space, while a tiny pendant will get lost in a larger room. I always recommend using dimmable LED bulbs so you can adjust the brightness depending on the time of day. If you don’t have hardwired ceiling access, you can find gorgeous plug-in pendant lights with stylish fabric cords that drape beautifully from a ceiling hook.
Estimated cost: $60 – $250 for a statement light fixture.
14. Hidden Laundry Hampers and Storage Bins
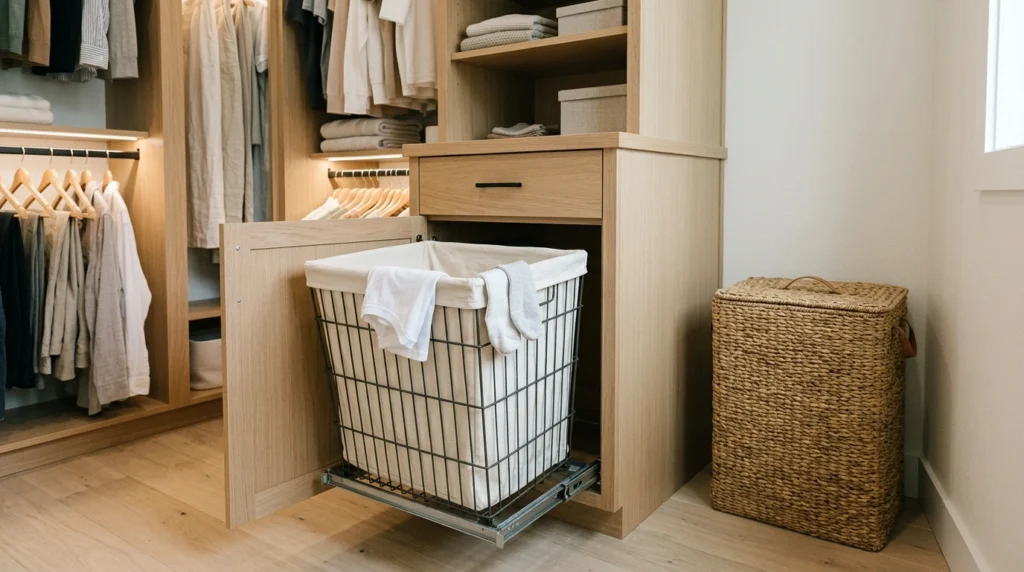
Nothing ruins the sleek, beautiful look of a gorgeous walk-in closet faster than a pile of dirty clothes overflowing on the floor. Integrating hidden, pull-out laundry hampers directly into your cabinetry keeps your dirty laundry completely out of sight until wash day. It keeps the air smelling fresh and maintains the clean, organized look of a high-end fashion showroom.
You can easily set this up by dedicating a lower cabinet shelf to a deep, slide-out wire basket or a stylish canvas laundry bag on tracks. If you are working with open shelves, look for beautiful, matching woven or fabric hampers with lids that sit neatly in the corner of the room. This works especially well if you use a dual-compartment hamper to separate your darks and lights as you throw them in.
Estimated cost: $30 – $100 for slide-out hampers or decorative baskets.
15. Integrated Beauty Vanity and Makeup Station
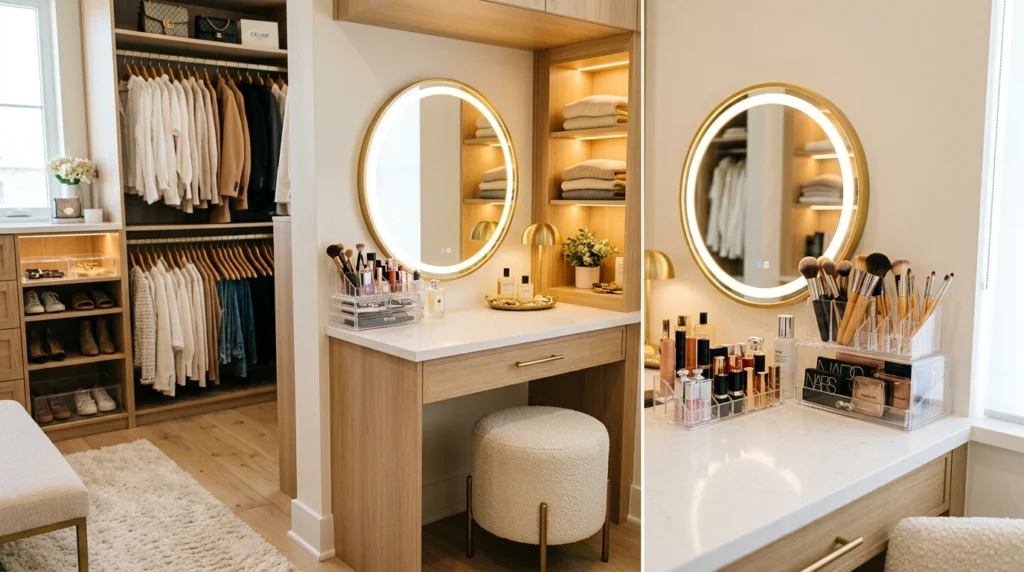
Combining your closet and your morning beauty routine into one single space makes your daily preparation incredibly smooth and relaxing. A small, built-in vanity table with a lighted mirror and a comfortable stool gives you a dedicated spot to apply your makeup, style your hair, and put on your jewelry. It keeps all your daily cosmetics organized in one place, leaving your bathroom clean and clutter-free.
To build your own vanity station, look for a slim desk with drawer storage that fits into an open wall nook in your closet. Mount a high-quality mirror with built-in daytime LED lighting on the wall above it to ensure your makeup looks natural in any light. Keep your daily skincare and makeup products neatly arranged in acrylic organizers on top of the desk to maintain the clean visual aesthetic.
Estimated cost: $120 – $400 for a vanity desk, mirror, and stool.
16. Hat Wall Display Using Aesthetic Hooks
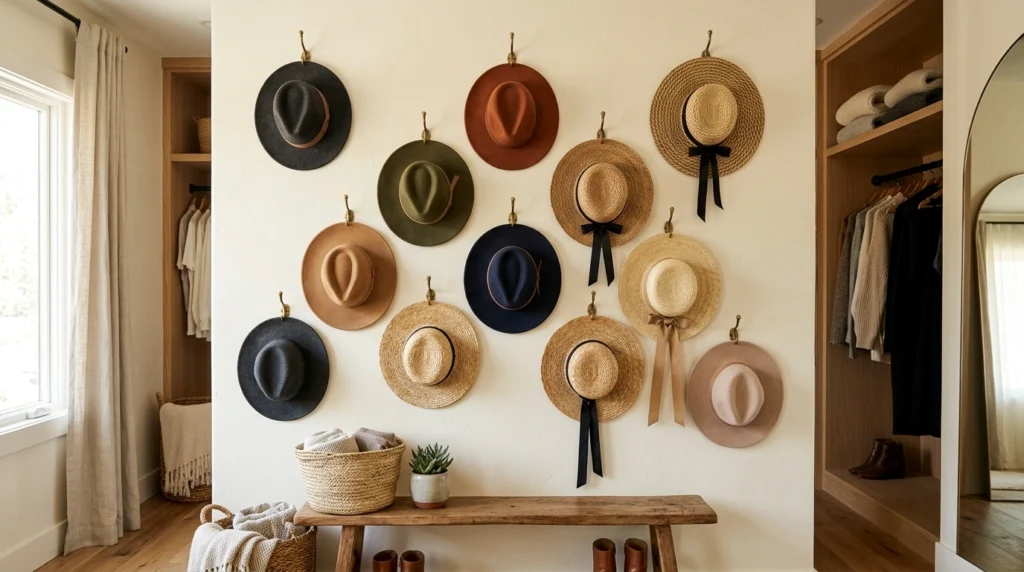
Hats are notoriously difficult to store without crushing their brims or taking up massive amounts of valuable shelf space. Hanging your wide-brim fedoras, sun hats, and structured caps on a blank wall turns your headwear into a stunning, three-dimensional art installation. It protects their shapes, keeps them dust-free, and adds a beautiful, organic texture to your closet walls.
You can easily create this look by mounting wooden peg hooks, vintage brass hooks, or even simple matte black adhesive hooks in a staggered pattern on a blank wall. Arrange your hats by color and size, leaving a few inches of space between each one so they don’t overlap. This not only saves precious shelf space but also makes it incredibly easy to grab the perfect hat as you walk out the door.
Estimated cost: $10 – $40 for a set of decorative wall hooks.
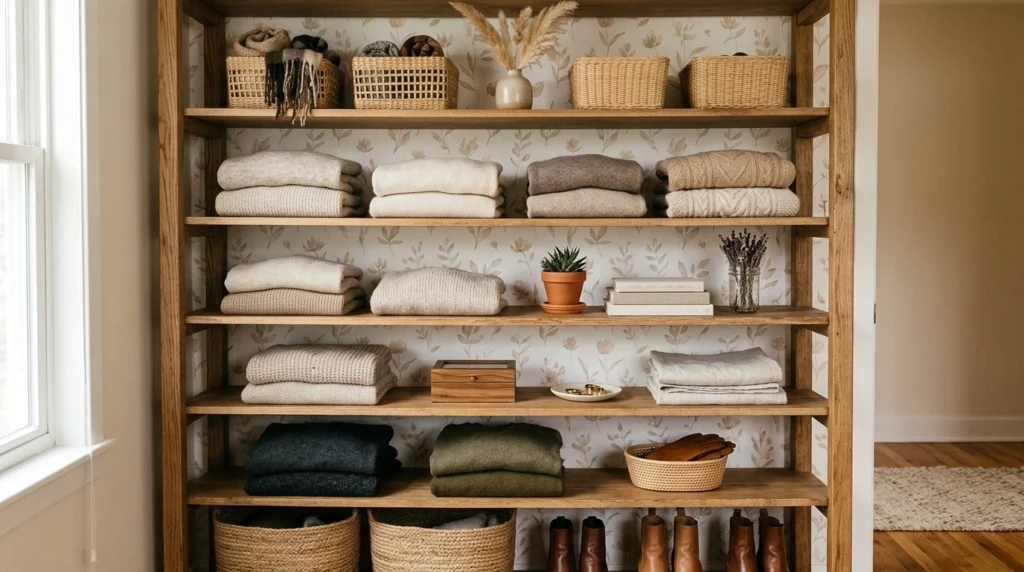
17. Coordinated Canvas and Rattan Storage Baskets
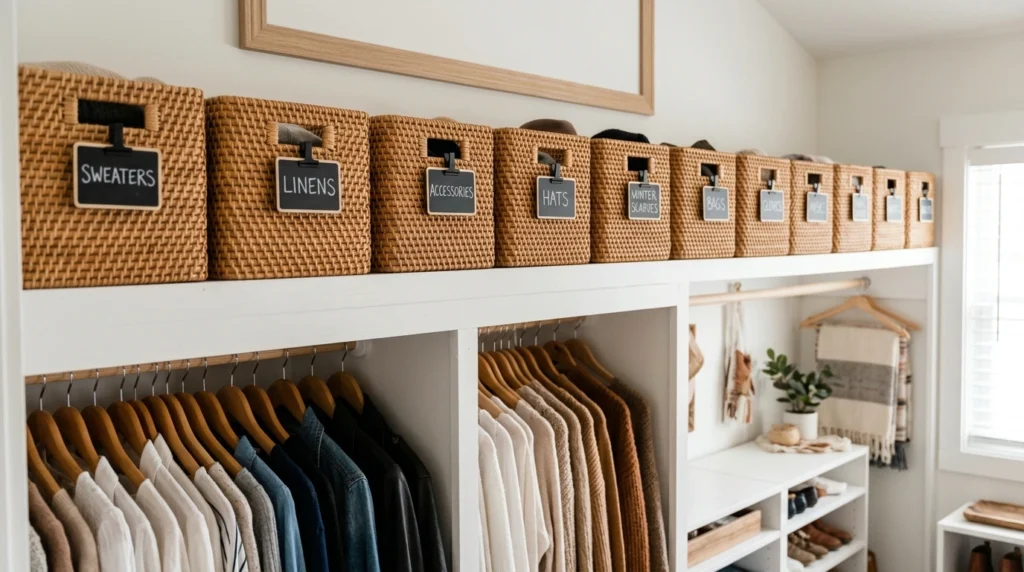
For seasonal items, swimsuits, winter accessories, and extra linens, open shelving can quickly look messy if things aren’t contained. Using a coordinated set of high-quality canvas bins or natural rattan baskets keeps these less-frequently used items tucked away neatly. The consistent texture of the baskets creates a clean, calm look along the top shelves of your closet, hiding any clutter from view.
Avoid buying mismatched baskets in different colors, sizes, and materials, as this creates visual noise. Instead, choose one style of basket—such as warm woven seagrass or clean cream fabric—and buy them in bulk to fit your shelf dimensions perfectly. Add small, stylish clip-on labels to the front of each basket so you always know exactly what is inside without having to pull them down.
Estimated cost: $30 – $90 for a matching set of 4 to 6 storage baskets.
18. Acrylic Shelf Dividers for Neat Sweater Stacks
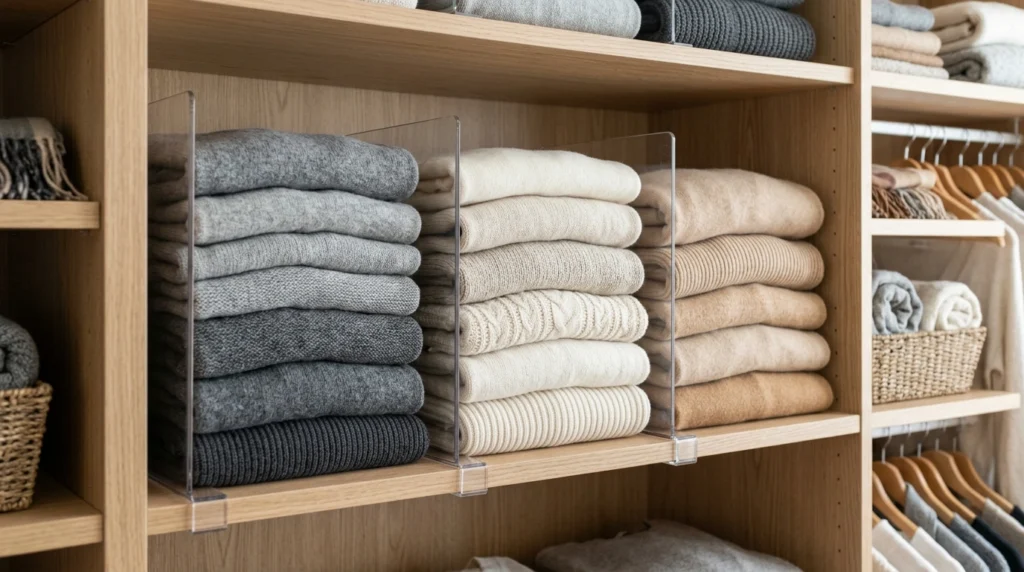
Sweaters and heavy knits are best stored folded to prevent them from stretching out on hangers, but tall stacks of knitwear have a habit of tipping over and turning into a messy pile. Clear acrylic shelf dividers slide directly onto your shelves to keep your stacks of sweaters, jeans, and t-shirts perfectly upright and separated. It gives your shelves a crisp, structured look where every item stays in its designated lane.
Look for slide-on acrylic dividers that match the thickness of your wooden or wire shelves for a tight, secure fit. I recommend keeping your stacks to about three to four sweaters high so they are easy to pull out without disrupting the rest of the pile. Arrange them by weight—thick cable-knits at the bottom of the stack and lightweight cardigans at the top.
Estimated cost: $15 – $35 for a pack of 4 to 6 acrylic dividers.
19. Mirror-Backed Open Shelving for Added Depth
If you have a deeper shelving unit or a dark corner in your closet, it can often feel heavy and closed off. Installing mirror panels along the back walls of your open shelves reflects light into the deep recesses, instantly making your clothes and shoes pop. It creates a beautiful illusion of endless space and depth, giving your walk-in closet that signature, bright look of a luxury department store.
You can easily achieve this look by measuring the back panels of your shelves and ordering custom-cut lightweight acrylic mirror sheets online. They are highly reflective, shatterproof, and incredibly easy to attach using heavy-duty double-sided mounting tape. Once installed, place your favorite perfumes, designer shoes, or crystal jewelry dishes on these shelves to maximize the beautiful reflection.
Estimated cost: $40 – $120 for acrylic mirror sheets and mounting tape.
20. Seasonal Rotation Hanging Zones
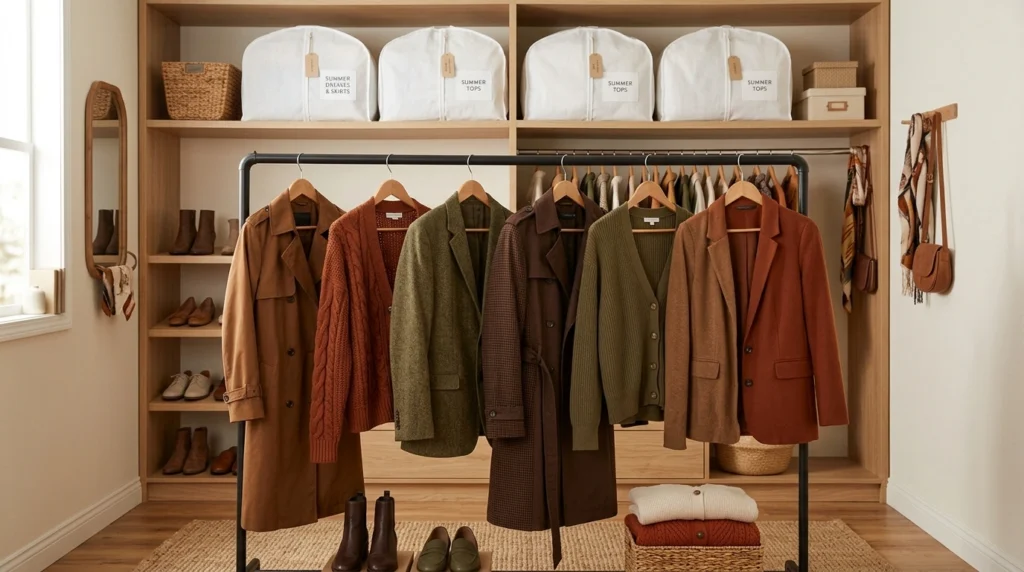
One of the easiest ways to make your closet feel cramped and overwhelming is trying to keep your entire wardrobe for all four seasons in one spot. Creating a dedicated seasonal hanging zone allows you to display only the clothes that are relevant to the current weather, while storing off-season pieces in garment bags on higher shelves or under-bed bins. It gives your closet a fresh, seasonal feel and makes deciding what to wear incredibly simple.
Designate your most accessible, eye-level hanging rods for the current season’s wardrobe, keeping lightweight dresses and linens front and center in summer, and heavy coats and wool blazers in winter. Use breathable cotton garment bags to pack away your off-season clothes to protect them from dust and moisture. This keeps your daily closet space light, open, and incredibly easy to navigate.
Estimated cost: $10 – $30 for breathable cotton garment bags.
Simple Ideas to Start Transforming Your Closet Today
Designing a closet that feels like a professional fashion showroom doesn’t require a massive budget or a team of contractors. It is all about focusing on organization, consistent details, and intentional lighting. When you take the time to arrange your wardrobe beautifully, you are investing in your own daily confidence and peace of mind. By starting with just one or two small changes—like switching to matching velvet hangers or adding simple LED light strips—you will instantly see a massive difference in how your space looks and feels.
Remember, the goal of a great closet is to make your life easier and your clothes more accessible, so focus on creating a system that actually works for your personal daily routine. You deserve a space that makes you feel excited to get dressed and step out into the world looking and feeling your absolute best.
Which of these walk-in closet ideas would you actually try out in your own home first? I’d genuinely love to know in the comments below!
Frequently Asked Questions
How do I make basic closets look more expensive on a budget?
The easiest way to make a basic closet look expensive is to swap out mismatched plastic hangers for uniform velvet hangers, add stick-on LED lighting under your shelves, and replace basic drawer knobs with brushed brass hardware. These simple, low-cost upgrades instantly elevate the visual appeal of any space.
What is the best lighting color temperature for a walk-in closet?
I always recommend using a warm white color temperature between 2700K and 3000K for closet lighting. This temperature mimics natural sunlight, making the colors of your clothing look accurate and vibrant while keeping the overall atmosphere cozy and inviting.
How can I keep my folded sweaters from falling over on open shelves?
Using clear acrylic shelf dividers is the best way to keep your folded sweaters, sweatshirts, and jeans perfectly upright and organized. They slide directly onto your shelves to create structured columns, preventing tall stacks of clothes from tipping over.
What wardrobe basics should I hang versus fold?
You should always hang delicate fabrics like silk, linen, structured blazers, coats, and dresses to prevent stubborn wrinkles. Heavy knits, sweaters, t-shirts, and activewear should be folded and placed on shelves or in drawers to prevent them from stretching out and losing their shape on hangers.
How do I organize a walk-in closet with very little drawer space?
If you lack drawers, utilize hanging fabric shelf organizers, use beautiful matching canvas storage baskets on your open shelves, and add jewelry trays to a central counter or vanity table. This allows you to tuck away folded items and accessories neatly without needing a built-in dresser.