Having a tiny kitchen can feel like a daily battle against clutter. You go to chop a single onion, and suddenly you are shifting the toaster, the fruit bowl, and yesterday’s mail just to find a clear square foot of counter space. It is incredibly frustrating when the heart of your home feels more like an overcrowded closet than a place where you actually want to spend time cooking and hanging out. But in my experience, the biggest mistake people make is thinking they need a massive, open-concept floor plan to have a beautiful, functional space.
You do not need a sledgehammer and a $20,000 renovation budget to make your kitchen feel like a place you love. Creating a kitchen that feels both highly practical and deeply personal comes down to small, deliberate styling choices and clever organization tricks. By changing how you store your daily tools, choosing materials that reflect light, and being smart about your layout, you can make even the smallest galley kitchen feel open, airy, and full of life. In this guide, we are going to walk through 20 practical, highly visual design ideas that you can easily bring into your own home to maximize every inch without sacrificing style.
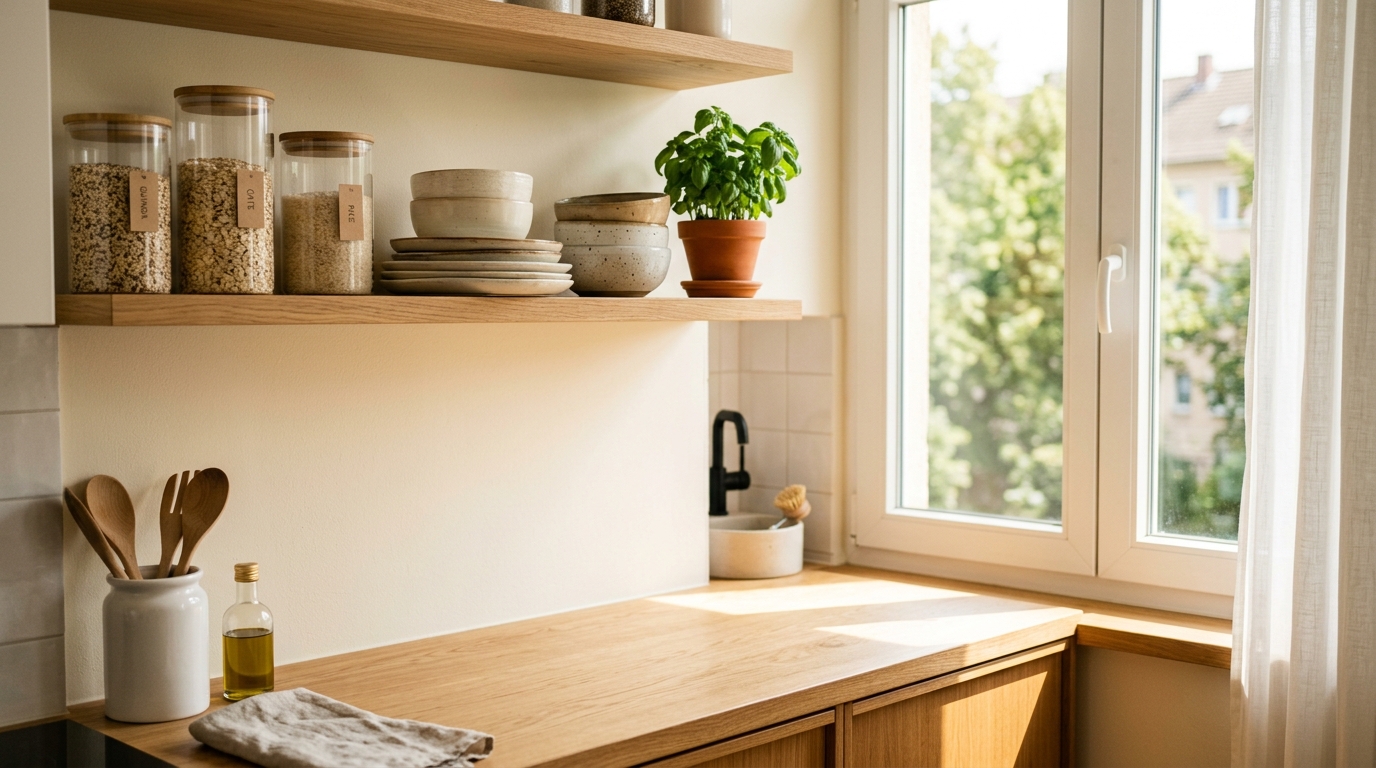
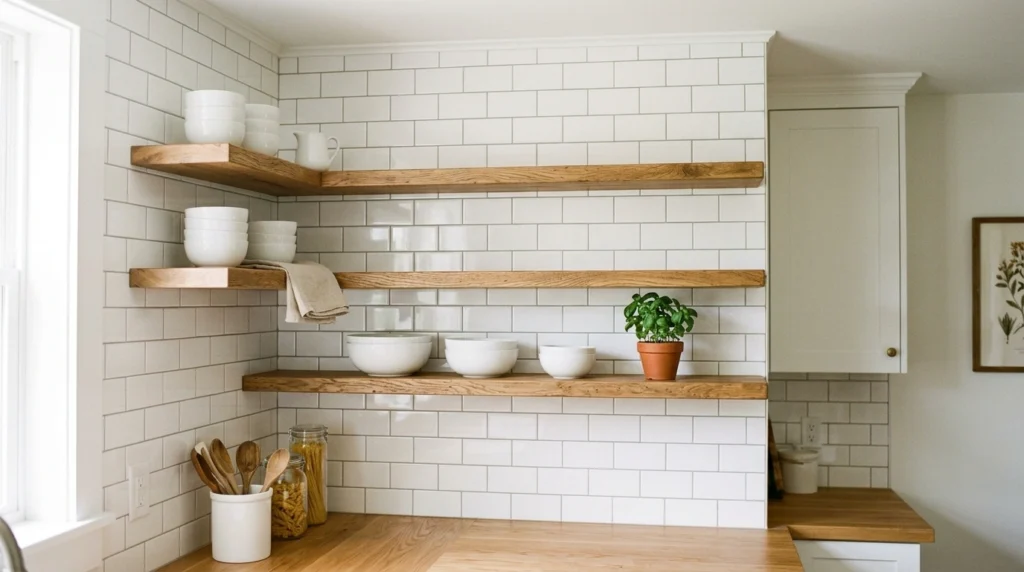
1. Ditching Upper Cabinets for Open Warm Wood Shelves
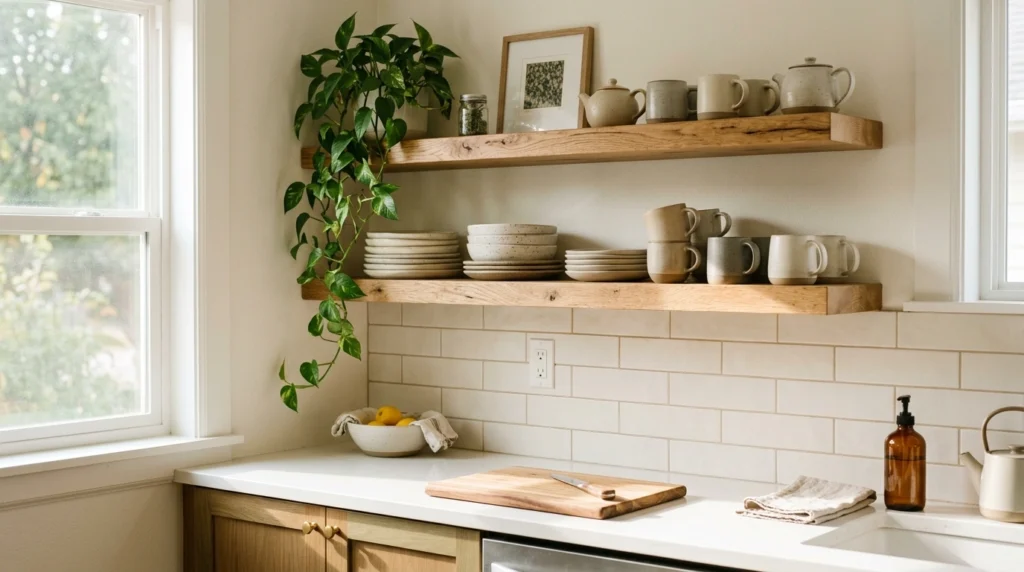
What I personally love about this look is how instantly it takes away that heavy, boxed-in feeling that makes small kitchens feel like a narrow hallway. Instead of staring at flat, bulky cabinet doors while you make your morning coffee, you get to look at beautiful ceramic mugs, a stack of textured bowls, and natural wood grain. It feels incredibly open, airy, and inviting, especially when the morning sun hits the wood. It turns your daily essentials into a cozy, living display rather than hiding them away behind laminate doors.
To make this work practically, I always recommend starting with solid white oak or thick reclaimed wood shelves that are at least two inches thick for a sturdy, grounded look. A lot of people overlook this detail, but if you do not bracket them securely into wall studs, they will sag under the weight of your everyday plates. Keep your styling simple by only displaying items you use every single day—this naturally keeps dust from settling on them because they are constantly in rotation. A pair of well-made wood shelves with simple matte black or brass brackets will generally cost between $80 and $150, which is far cheaper than buying new cabinets and looks ten times more intentional.
2. The Magnetic Knife Strip and Hanging Rail Setup
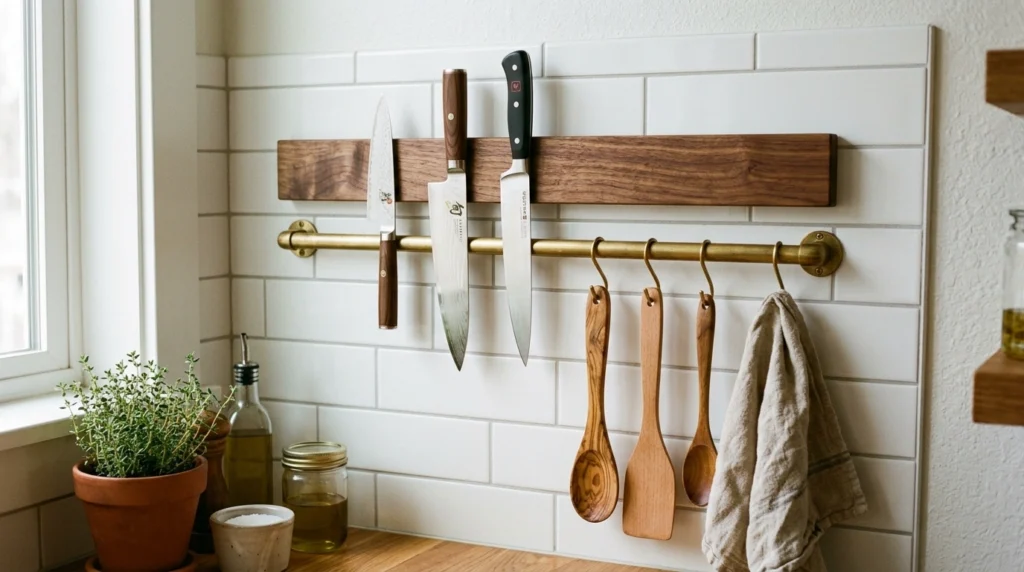
This setup has a raw, functional beauty that makes your kitchen feel like a cozy, working chef’s space rather than a sterile showroom. There is something so satisfying about seeing your most-used knives, copper measuring cups, and a bundle of dried herbs hanging neatly within arm’s reach against a clean tiled or plaster wall. It brings a lot of texture and life to the room, making it feel like a place where real cooking happens, while also freeing up precious drawer and counter space.
To recreate this, look for a high-quality walnut or bamboo magnetic knife strip and a matching brass or matte black utility rail with S-hooks. The biggest mistake people make here is hanging the rail too high; it should sit comfortably about 12 to 15 inches above your countertop so you do not have to stretch to grab a spatula. Hang your prettiest tools—like wooden spoons, a small cast-iron skillet, and linen dish towels—to keep the look cohesive. You can easily find a great magnetic strip and rail combination for around $40 to $60, making this a highly affordable way to clear off your countertops.
3. A Drop-Leaf Wall Table or Fold-Down Prep Station
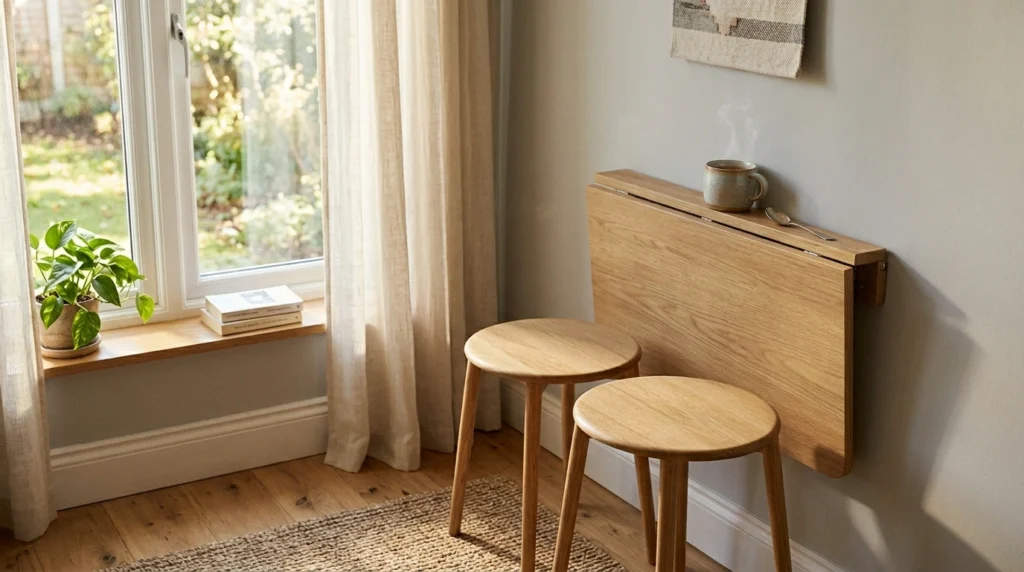
This idea is a lifesaver for tight layouts where a traditional kitchen island or dining table would completely block the walkway. When it is folded down flat against the wall, it completely disappears, giving you all the floor space you need to move around while cooking. But when you pop it up, it instantly becomes a sunny spot to drink your morning tea, prep vegetables, or answer a few emails. It feels incredibly clever, cozy, and highly intentional, turning a useless blank wall into a functional zone.
When choosing a fold-down table, look for one made of solid wood or high-pressure laminate that matches your existing countertops to keep the visual flow consistent. The key to making this feel stylish rather than cheap is pairing it with a couple of beautiful, low-profile wooden stools that can easily slip underneath or tuck into a corner when not in use. Avoid flimsy plastic mounting brackets; instead, spend a little extra on heavy-duty steel folding brackets to ensure the table does not wobble when you are using it. A sturdy, wall-mounted drop-leaf table typically runs between $100 and $250 depending on the wood type.
4. High-Contrast Two-Tone Cabinets
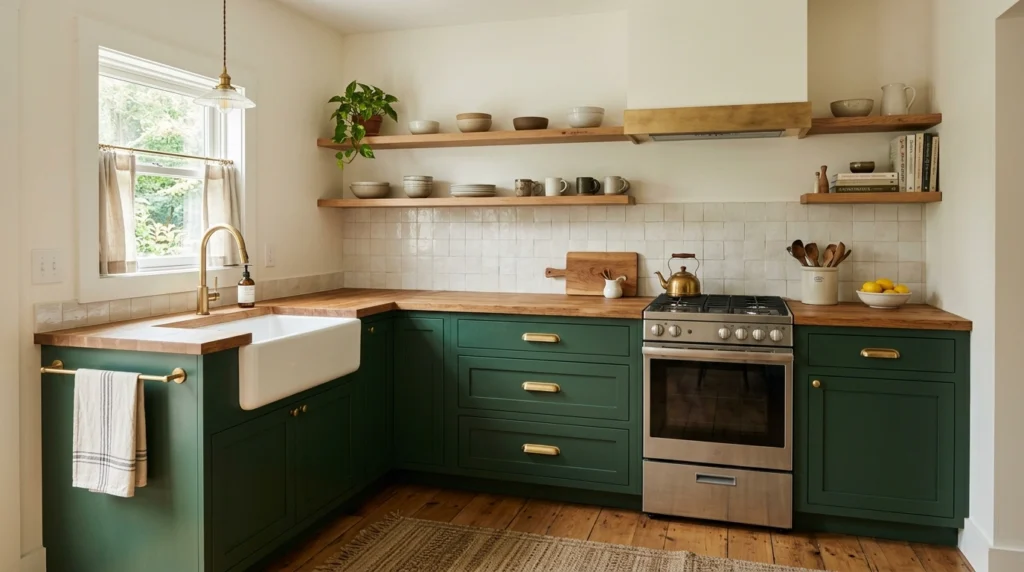
This is one of my favorite visual tricks because it physically tricks your eyes into thinking the room is much larger and taller than it actually is. By painting your lower cabinets a rich, deep color and keeping your upper cabinets or walls a bright, reflective white or cream, you anchor the bottom of the room while letting the top half breathe. It adds a wonderful sense of drama and architectural interest to a plain, boxy kitchen, making the space feel incredibly custom and thoughtfully designed.
To make this work in your own home, go for a deep forest green, navy blue, or warm charcoal gray on the base cabinets, and a soft, warm alabaster or milk white on top. The mistake I see most often is using a cold, stark white on the upper cabinets, which can make the contrast feel jarring and clinical. Instead, stick to warm undertones to keep the kitchen feeling cozy and inviting. If you are DIY-painting your existing cabinets, a couple of cans of high-quality cabinet enamel paint will run you about $80 to $120, giving you a massive design upgrade for very little cash.
5. Pegboard Wall Storage for Ultimate Flexibility
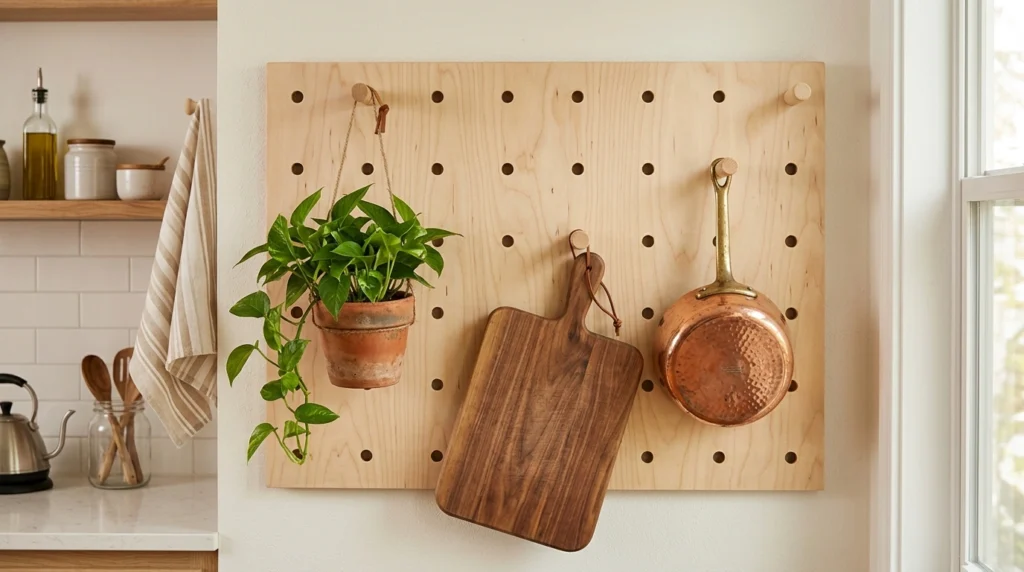
There is a wonderful, relaxed utility to a wall-sized wooden pegboard that makes a kitchen feel incredibly personal and adaptable. It allows you to constantly rearrange your pots, pans, colanders, and small shelves as your cooking habits change over time. It looks like a creative workshop for food, bringing a beautiful mix of shapes, metallic finishes, and wood tones directly onto the wall, which adds immense character and keeps your countertops entirely clear of clutter.
I highly recommend choosing a thick birch plywood pegboard with sturdy wooden pegs rather than the cheap, thin metal or fiberboard ones you find in garages. The thick wooden dowels look incredibly clean, modern, and warm. When styling it, mix in a few small hanging plants like pothos or English ivy alongside your pans to soften the hard edges of the kitchenware. You can buy a beautiful, furniture-grade wooden pegboard kit online for about $120 to $200, or make your own with a sheet of plywood and a dowel rod for under $50.
6. Rolling Kitchen Carts That Double as Work Space
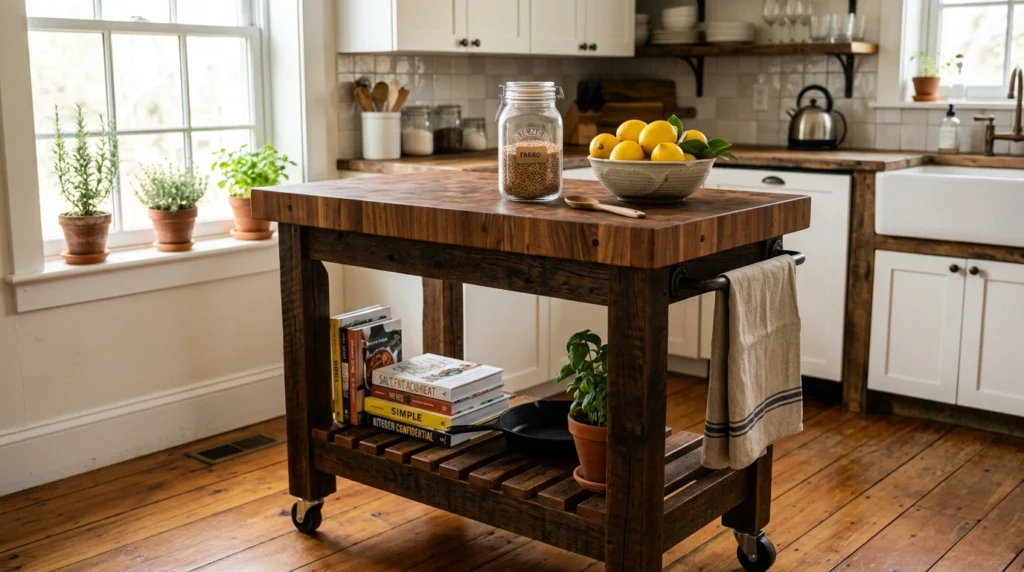
What I love about a rolling cart is its sheer versatility; it is a prep island when you need it, a coffee bar when you have guests, and a storage rack that you can easily tuck away in a corner when you are done. The sight of a sturdy cart stocked with fresh linens, a wooden cutting board on top, and glass jars of grains below feels incredibly cozy and lived-in. It breaks up the rigid lines of standard built-in cabinetry, giving your kitchen a more casual, collected-over-time atmosphere.
When shopping for a rolling cart, look for one with heavy-duty locking casters and a solid wood or stainless steel top that can handle chopping and hot pots. A common mistake is buying a cart that is too lightweight, which will shake and wobble every time you try to cut a loaf of bread. Opt for something with a bit of weight to it, featuring at least one shelf and a drawer for utensils. A high-quality, durable rolling kitchen cart will usually cost between $150 and $350, serving as a much cheaper and more flexible alternative to a permanent island.
7. Integrated Appliance Garages to Clear Counter Clutter
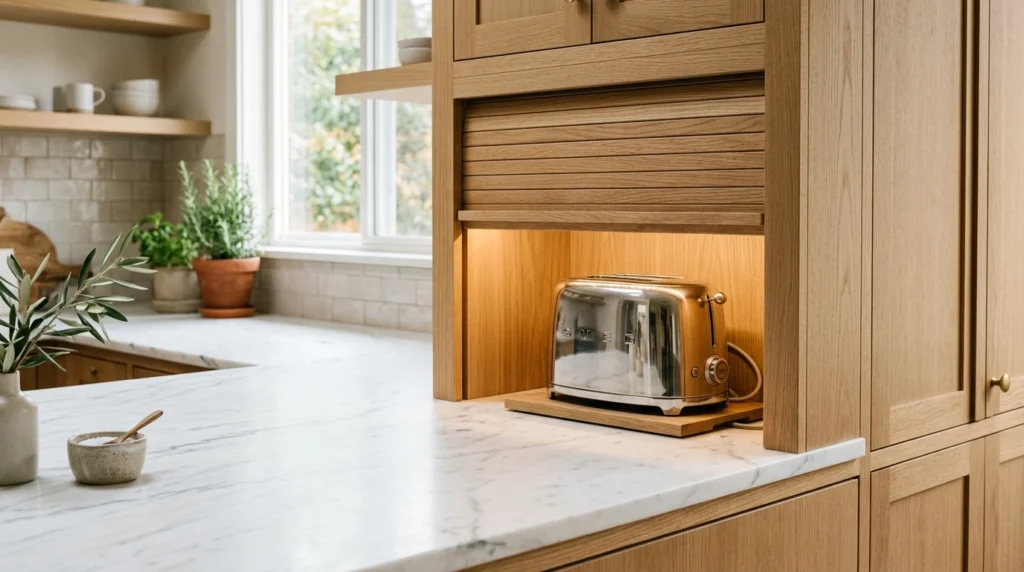
There is nothing that ruins the peaceful, stylish vibe of a kitchen faster than a chaotic jumble of cords, toasters, blenders, and coffee makers taking over every flat surface. An appliance garage—a small cabinet that sits directly on the countertop with a roll-up or pocket door—hides all of that necessary visual noise in an instant. Slide the door down, and your kitchen suddenly looks incredibly clean, serene, and spacious, allowing the beauty of your countertops and backsplash to actually stand out.
If you are planning a kitchen refresh or cabinet update, request an appliance garage that features an electrical outlet built directly inside the cabinet. This way, you never have to drag your heavy stand mixer or coffee maker out onto the counter to use it—you just open the door, turn it on, and slide it back when you are finished. If you are retrofitting an existing kitchen, you can find freestanding wooden appliance garages that slide right under standard upper cabinets for around $100 to $200.
8. Moody Dark Paint on Base Cabinets
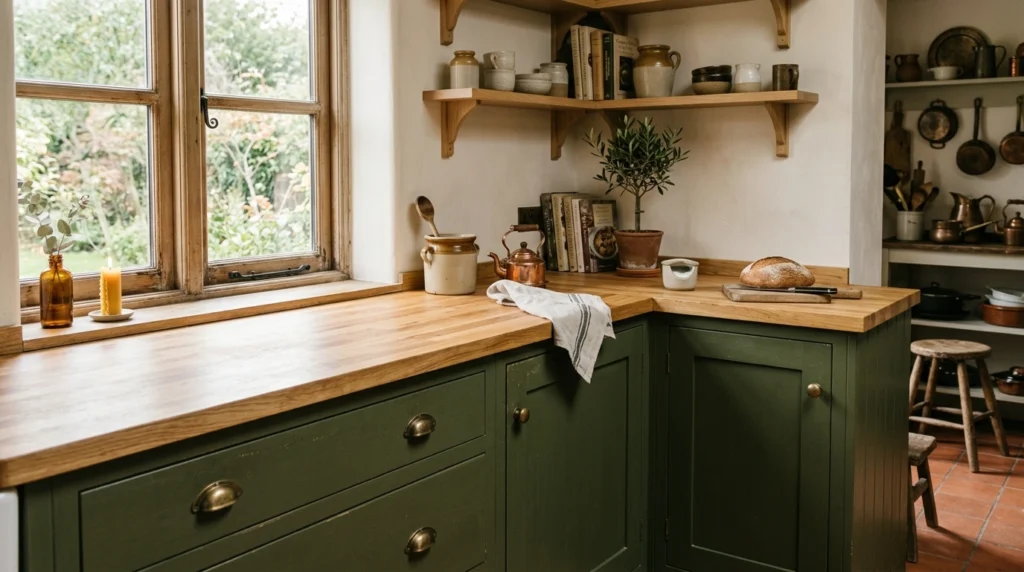
A lot of people think that small spaces must be painted stark white to feel open, but that often just makes them look cold and unfinished. Embracing a rich, dark paint color like a moody olive green, deep espresso, or chocolate brown on your base cabinets creates an incredibly cozy, high-end look. It gives the kitchen a sense of weight and permanence, making the small footprint feel like an intentional design choice rather than an inconvenience, especially when paired with warm brass details.
When going dark on the bottom, I always recommend keeping the countertops lighter—think a warm white quartz, honed light marble, or a light-toned butcher block—to keep the workspace bright and functional. The biggest mistake is using a high-gloss dark paint, which shows every single smudge, fingerprint, and scratch. Instead, opt for a satin or semi-gloss finish that stands up to daily scrubbing while diffusing light beautifully. A couple of cans of premium cabinet paint in a rich, earthy tone will cost you about $90.
9. Exposed Slat Wood Accent Backsplashes
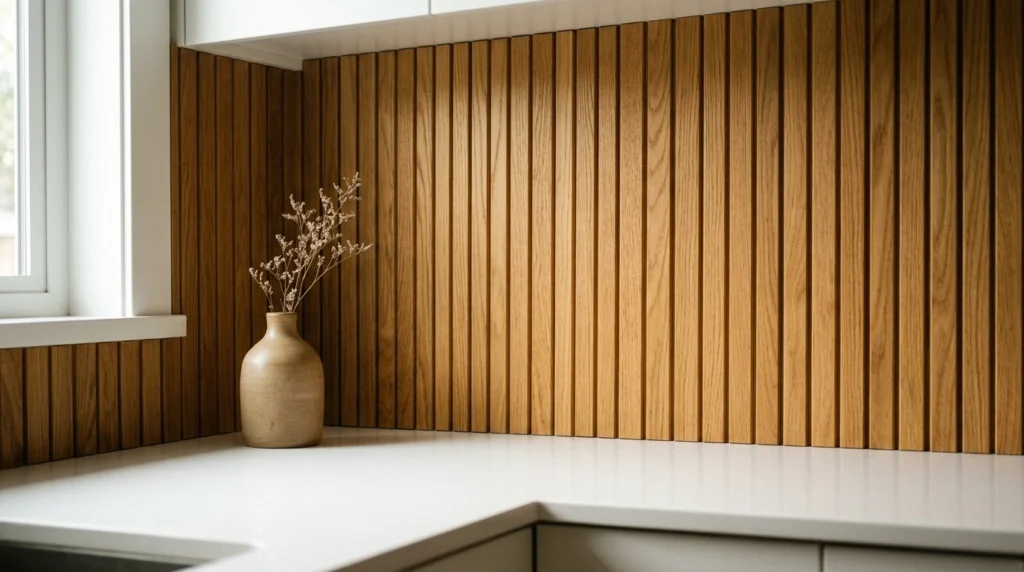
Adding a vertical wood slat backsplash brings an incredible amount of texture, warmth, and organic depth to a small kitchen. The clean, vertical lines of the wood slats draw the eyes upward, making your ceilings feel significantly taller than they are. It softens the cold, hard surfaces of stoves, refrigerators, and stone countertops, wrapping the kitchen in a rich, natural texture that feels like a cozy modern cabin in the woods.
To make this practical for a working kitchen, you must seal the wood with a high-quality, water-resistant matte polyurethane to protect it from water splashes and grease. Avoid placing wood slats directly behind a high-heat stovetop; instead, use them on adjacent walls or run them behind a sink area with a small protective barrier. If you are on a budget, you can buy pre-made wood slat panels that screw directly into the drywall for about $150 to $300, which completely changes the mood of the room in a single afternoon.
10. Under-Cabinet LED Strip Lighting
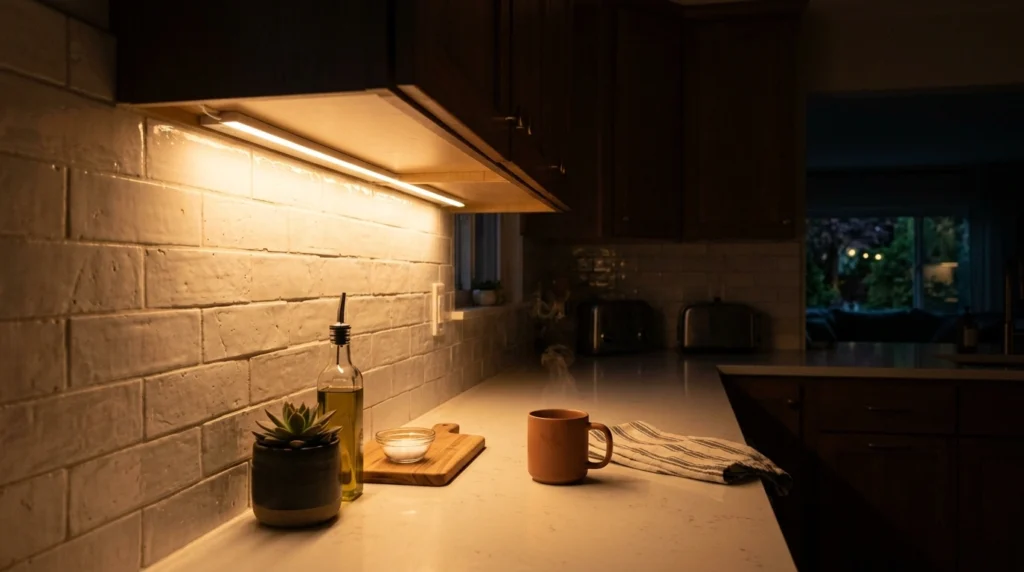
A dark, shadow-filled kitchen will always feel cramped and uninviting, no matter how clean it is. Adding warm, glowy under-cabinet LED lighting completely washes away those dark corners, highlighting your backsplash and making your countertops look twice as wide. It creates a beautiful, soft ambiance in the evening, allowing you to turn off the harsh overhead ceiling lights and enjoy a warm, calm glow while winding down for the night.
I always recommend choosing “warm white” LED strips (around 2700K to 3000K) rather than “cool white,” which can make your kitchen look like a sterile convenience store. Opt for dimmable, plug-in LED strips that you can easily hide behind the front lip of your upper cabinets. A lot of people make the mistake of mounting the lights too far back against the wall, which creates harsh glares on the backsplash; instead, mount them right at the front edge pointing down. You can get a high-quality, plug-in smart LED kit for just $30 to $50.
11. Oversized Statement Hardware on Simple Cabinets
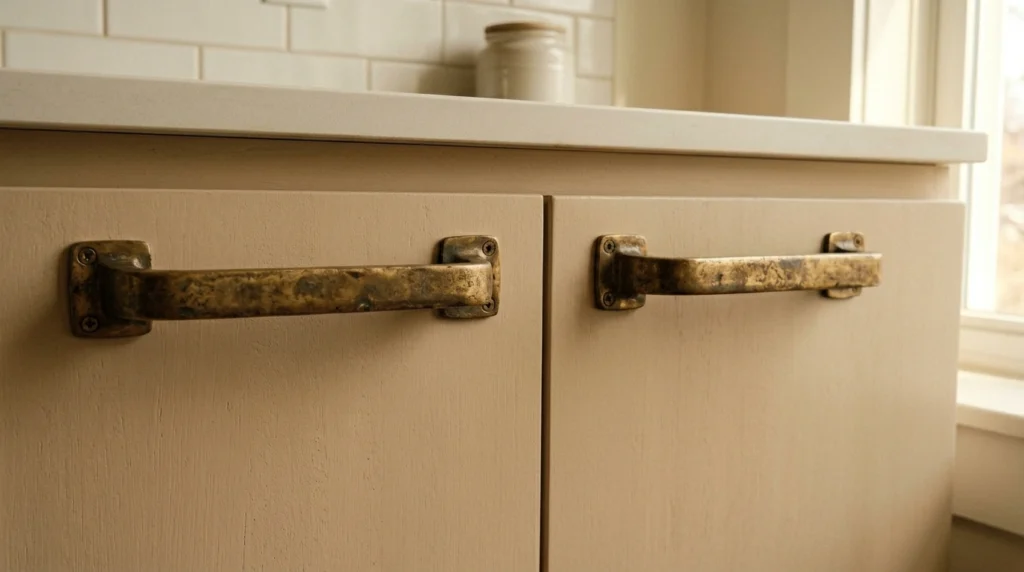
If you have plain, basic, or outdated cabinets, changing out the hardware is the absolute fastest and cheapest way to make your kitchen look custom-designed. Choosing oversized, substantial handles or solid unlacquered brass knobs gives your hands something heavy and satisfying to touch every day. It acts like jewelry for your cabinets, drawing the eye to beautiful, tactile details and making standard, budget-friendly cabinetry look incredibly expensive and thoughtful.
The key to this look is scale: do not be afraid to go slightly larger than you think you should. A long, heavy brass pull on a simple flat-panel cabinet door looks modern and incredibly intentional. Avoid cheap, hollow metal pulls that feel light and plasticky in your hand; spend a few extra dollars on solid brass, iron, or hand-carved wood handles. Replacing all the hardware in a small kitchen typically costs between $50 and $150, and you only need a screwdriver to completely upgrade the entire look of the room.
12. Corner Sink Design with a Custom Cutting Board Fit
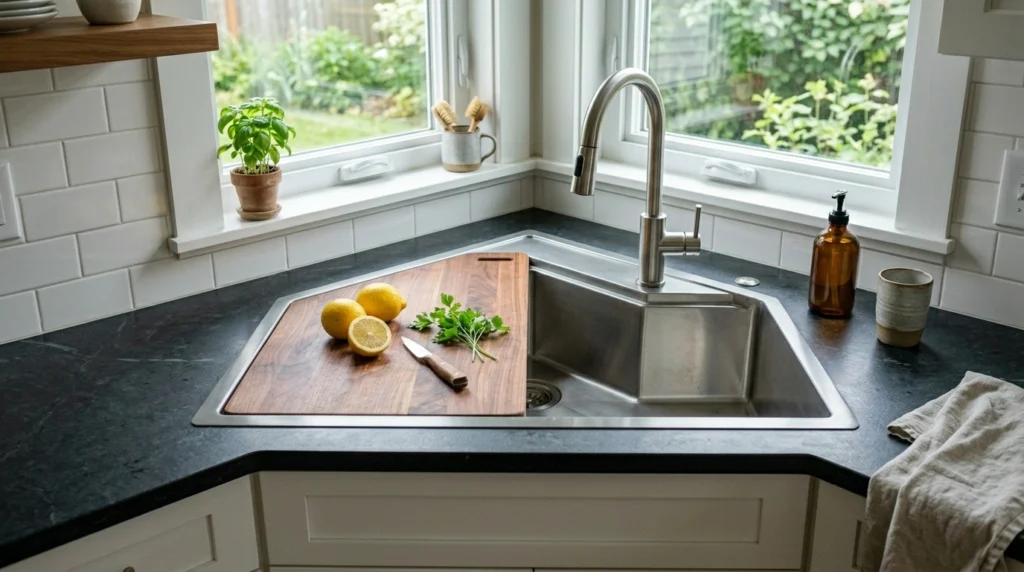
In a small kitchen, counter space is your most valuable currency, and the corner of a counter is often dead space that is hard to reach. Moving your sink to the corner utilizes that awkward spot beautifully, freeing up long, continuous stretches of counter space on either side for food prep. When you pair this with an over-the-sink cutting board that sits flush over the basin, you instantly gain extra square footage of work surface whenever you need it.
When choosing a corner sink, opt for a deep, single-basin under-mount sink rather than a double-basin, which takes up too much flat surface area and makes it hard to wash large pans. Look for an “appliance-style” sink that comes with built-in ledges to hold a sliding wood cutting board and a drying rack. This works especially well if you want your kitchen to look more put together without trying too hard. Retrofitting a sink layout can be pricey due to plumbing, but adding a custom-fit over-the-sink cutting board to your existing setup costs as little as $30 to $60.
13. Glass-Front Upper Cabinets for Visual Depth
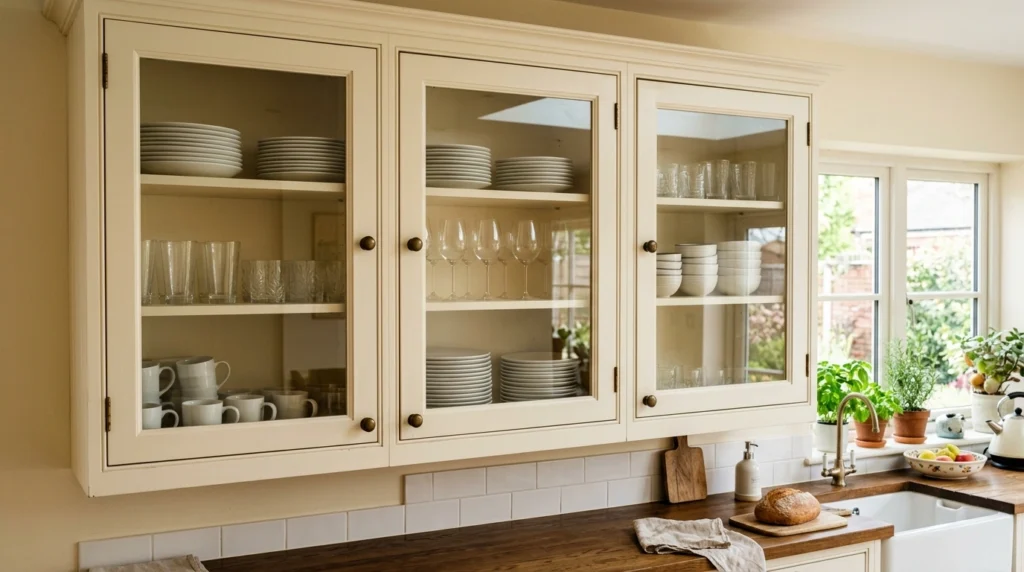
If you are not ready to completely commit to open shelving but still want that light, airy feeling, glass-front cabinets are the perfect middle ground. The glass panels break up the solid, heavy block of wood cabinet doors, allowing your eyes to travel through the doors to the back of the cabinet. This visual depth instantly makes the walls feel further back than they actually are, making the entire room feel much wider and brighter while still protecting your dishes from dust.
To keep this looking beautiful, paint the inside of your glass cabinets the same color as your kitchen walls, or use a soft contrasting color to make your glassware pop. The biggest mistake here is cramming the shelves full of mismatched plastic storage containers; instead, use these cabinets to house your neatest stacks of plates, clear drinking glasses, and ceramic mugs. If you already have solid wood cabinet doors, you can often hire a local carpenter to cut out the center panels and insert glass for about $100 to $200, which is much cheaper than buying brand-new cabinets.
14. A Floating Breakfast Bar Along a Bare Wall
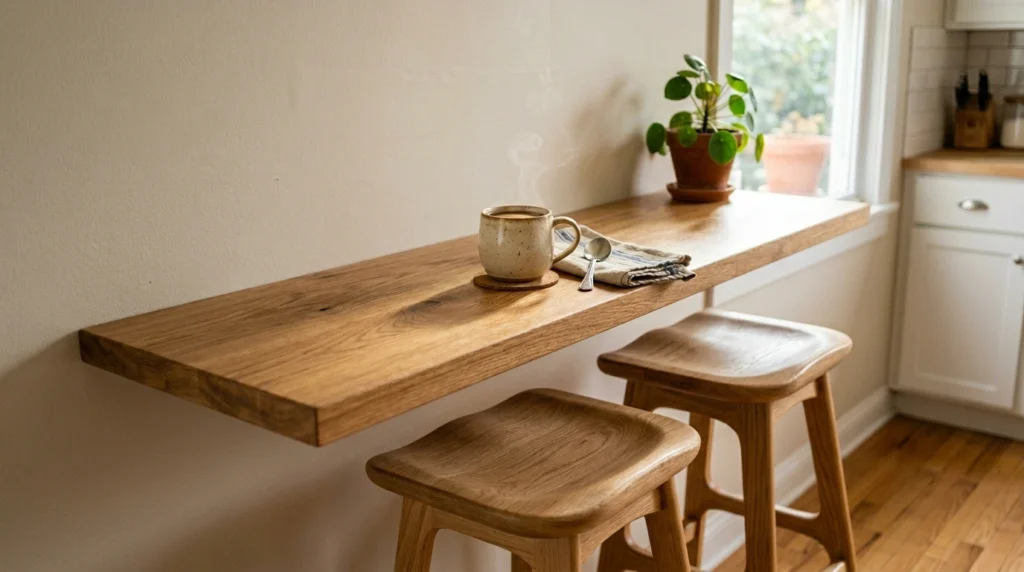
When there is absolutely no room for a kitchen table, a shallow floating counter attached to an empty wall is a brilliant way to create a dining spot. It takes up virtually zero floor space and provides a cozy, cafe-style ledge where you can eat breakfast, chat with whoever is cooking, or work on a laptop. It makes a small kitchen feel incredibly social and highly functional, turning an empty walkway into a lively, usable space.
I recommend keeping the depth of the floating bar between 12 and 15 inches—this is just wide enough for a plate, a coffee mug, and a laptop, but shallow enough to keep your walkway completely clear. Pair it with two sleek, backless barstools that can slide entirely underneath the bar when not in use so they do not block the traffic flow. A simple butcher block or white quartz ledge supported by heavy-duty steel brackets will cost you between $150 and $300, creating an instant dining area out of thin air.
15. Ceiling-Height Tiling (The Subway Tile Illusion)
Running your backsplash tile all the way from the countertop up to the ceiling is a classic designer trick that works wonders in small spaces. Instead of stopping the tile at the standard 18 inches, continuing it up behind your open shelves or surrounding your window draws the eyes all the way to the top of the room. It creates a seamless, clean vertical line that makes your ceilings feel soaring and gives the entire kitchen a cohesive, highly polished look that feels incredibly spacious.
For a timeless, budget-friendly look, use classic white ceramic subway tiles with a light gray grout to highlight the pattern without looking too busy. A common mistake is using dark, heavy grout lines in a small space, which can make the wall look like a grid and feel slightly claustrophobic. By keeping the grout color close to the tile color, you get a clean, textured surface that reflects natural light beautifully around the room. Classic subway tile is incredibly inexpensive, and doing a full-height accent wall in a small kitchen usually costs between $150 and $300 in materials.
16. Concealed Pull-Out Trash and Recycling Bins
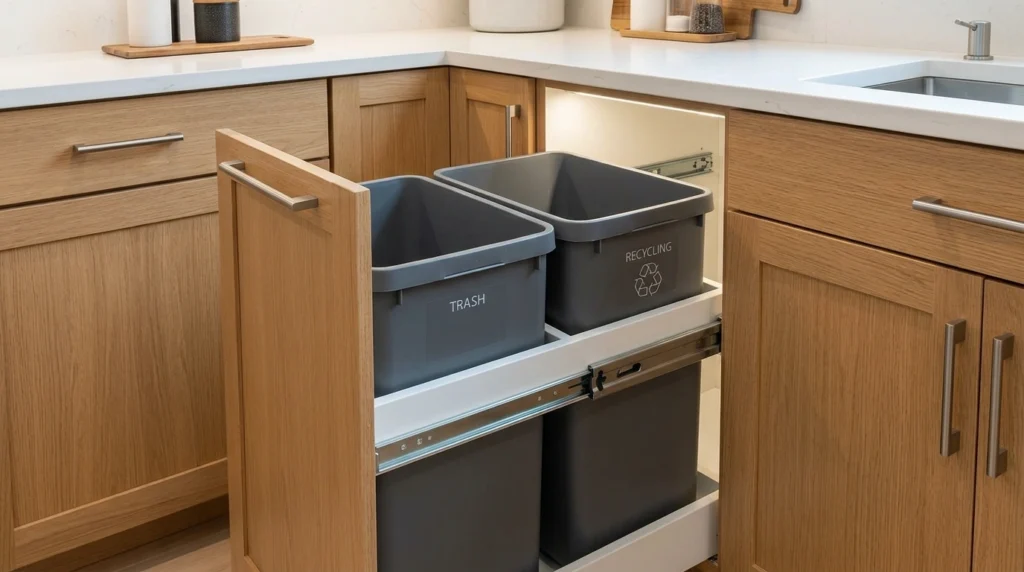
There is nothing quite as unappealing as a bulky, plastic trash can sitting at the end of a counter or tucked awkwardly into a corner where you constantly stub your toe on it. Hiding your trash and recycling bins inside a pull-out cabinet drawer keeps them entirely out of sight, eliminates odors, and frees up valuable floor space. It instantly makes the kitchen feel more streamlined, organized, and clean, ensuring that your beautiful design choices are not overshadowed by a rubbish bin.
You can easily convert a standard base cabinet into a pull-out trash station using a simple DIY retrofitting kit. Look for a heavy-duty, ball-bearing slide-out frame that holds two separate bins—one for trash and one for recycling. Make sure the slide-out mechanism is rated for heavy weight so it glides smoothly even when the bins are completely full. A high-quality pull-out cabinet trash kit costs between $60 and $120 and can be installed in under an hour with a basic drill.
17. Vintage Rugs or Runners to Warm Up the Floor
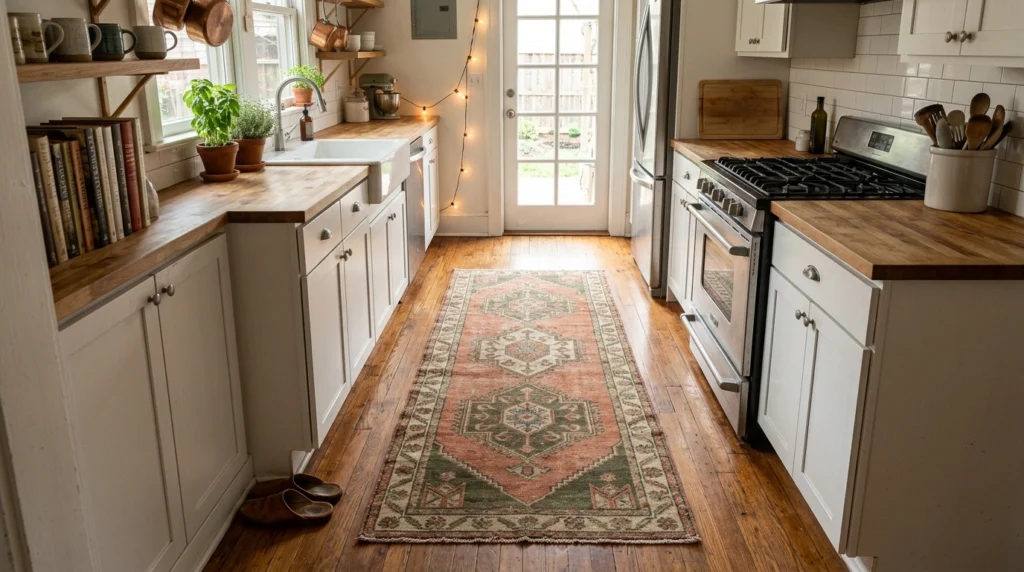
Small kitchens often feel dominated by hard, cold surfaces like tile, stainless steel, and stone. Tucking a vintage-style woven runner rug between your sink and island or along a narrow galley walkway instantly introduces incredible warmth, soft texture, and rich color to the floor. It softens the entire room, making it feel like a cozy extension of your living room where you actually want to stand and cook, while also providing a comfortable cushion for your feet.
I always recommend choosing a low-pile, vintage-style flatweave rug made of synthetic, washable fibers rather than a thick wool rug. A lot of people overlook this detail, but kitchen floors are prone to spills, drops, and grease splatters, so your rug must be easy to clean. A machine-washable runner with a non-slip rug pad underneath will keep the rug firmly in place so you do not slip while carrying hot pots. You can find beautiful, vintage-inspired washable runners online for about $50 to $100.
18. Skirted Sink Cabinets for Soft Texture
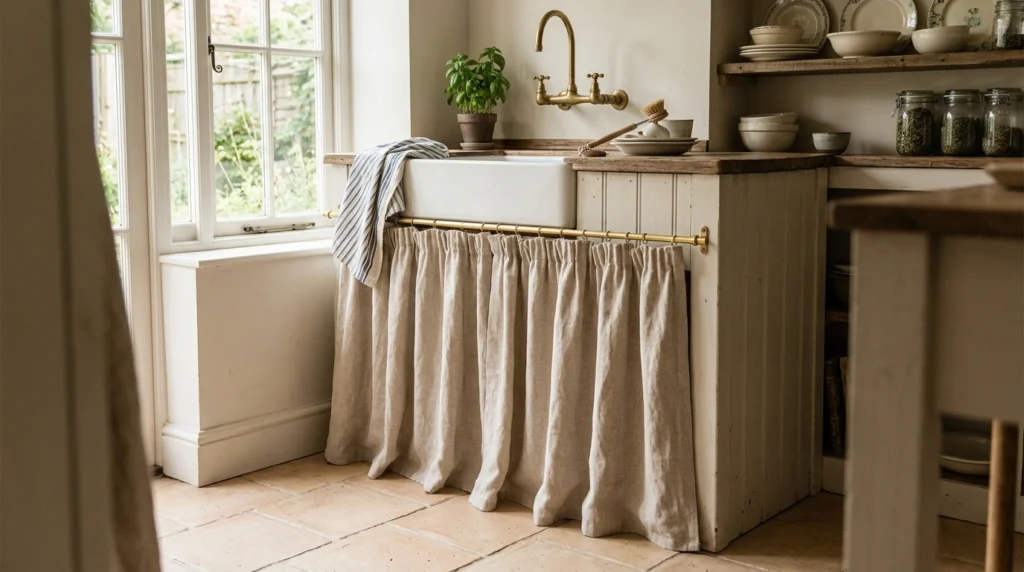
Replacing the solid wooden doors under your kitchen sink with a simple, gathered fabric curtain is a gorgeous way to add a touch of classic, cozy cottage style to a modern home. The soft folds of linen or cotton fabric break up the harsh, heavy wood and metal surfaces of the kitchen, adding a beautiful layer of movement and softness. It feels incredibly sweet, relaxed, and welcoming, while also making it incredibly easy to access the cleaning supplies hidden underneath the sink.
To make this look modern and intentional rather than messy, choose a high-quality, medium-weight linen fabric in a neutral tone like oatmeal, olive green, or a simple ticking stripe. Hang the curtain from a simple brass tension rod tucked neatly inside the cabinet frame so it slides easily. Avoid busy, loud floral prints which can make the space look cluttered. You can easily make a custom sink skirt yourself for under $20 using a yard of fabric and some hem tape, making this one of the most affordable styling upgrades possible.
19. Monochromatic Soft Warm Beige Color Palette
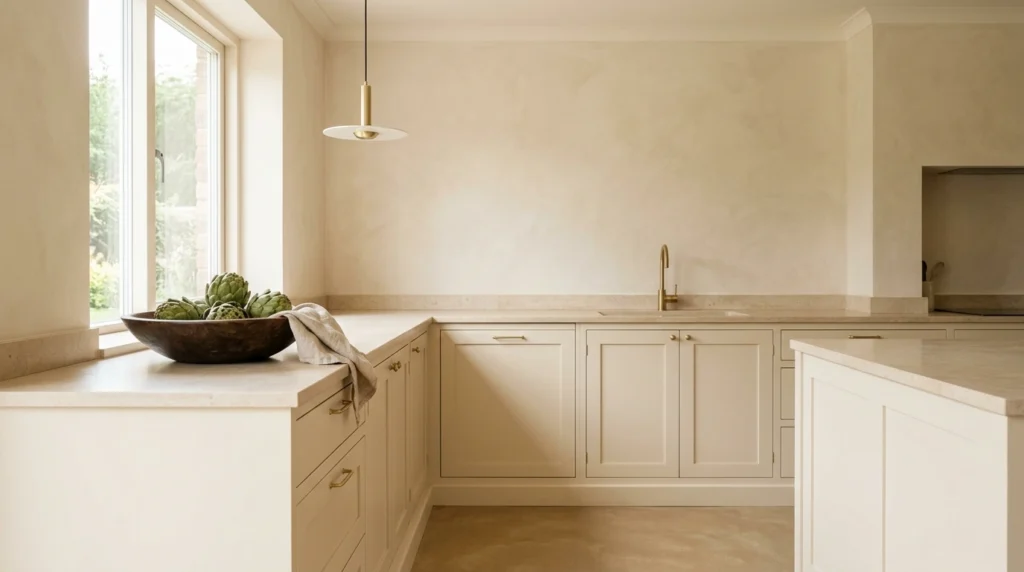
If you want your kitchen to feel incredibly calm, bright, and spacious, try painting everything—the walls, the cabinets, and the trim—in various shades of the same warm, earthy neutral. A monochromatic color palette of soft warm beige, cream, and oatmeal removes all visual boundaries, making the walls feel like they stretch on forever. It creates a soft, sun-drenched atmosphere that feels incredibly expensive, cohesive, and tranquil, especially when paired with natural wood accents.
The key to a successful monochromatic room is layering plenty of different textures so the space does not look flat or boring. Mix in matte plaster walls, textured ceramic dishes, brushed brass hardware, and a raw wood cutting board to give the room depth and interest. Avoid cold gray-beiges; instead, look for warm neutrals with yellow or peach undertones that capture the light beautifully. A full paint refresh in a warm cream palette will cost you about $100 to $150 in paint and supplies.
20. Herb Gardens on Windowsills with Matching Pots
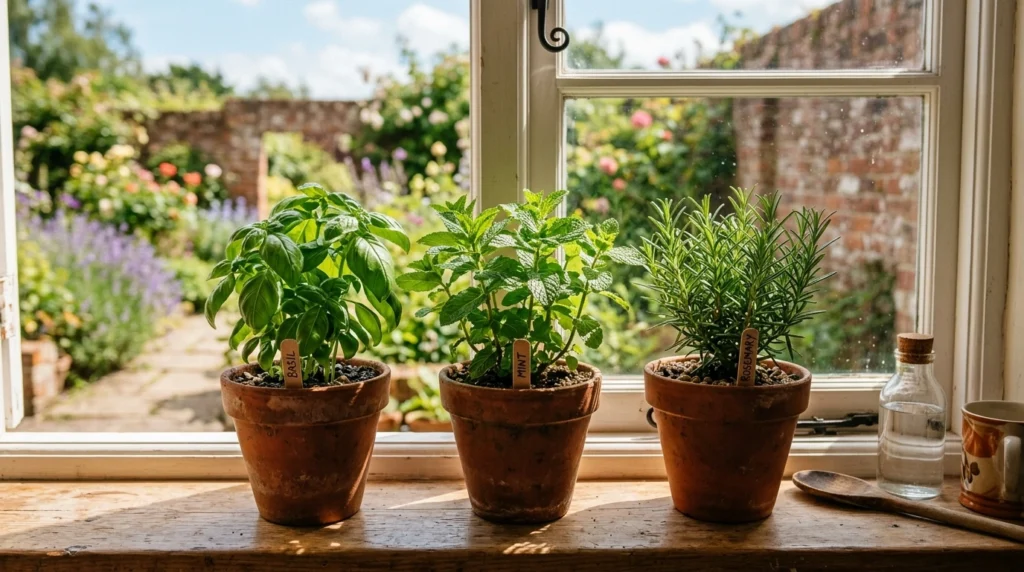
There is nothing that brings life, freshness, and a wonderful scent into a small kitchen quite like a row of living green herbs growing on a sunny windowsill. Seeing pots of fresh basil, rosemary, and mint soaking up the sun right above your sink makes the kitchen feel incredibly cozy, active, and alive. It is a beautiful, natural styling detail that costs next to nothing, and it makes cooking feel ten times more special when you can snip fresh herbs directly into your pan.
To keep this looking beautiful and organized rather than cluttered, choose a set of matching pots—like simple terracotta, matte white ceramic, or small raw concrete planters—with matching saucers to catch water. The biggest mistake is keeping the herbs in the cheap, mismatched plastic pots they came in from the grocery store. Plant them in high-quality potting mix and place them on your brightest windowsill. A set of three beautiful herb planters and organic herb plants will cost you around $30 to $50.
Conclusion
At the end of the day, having a small kitchen is not a design limitation—it is an opportunity to be incredibly intentional with your space. You do not need a massive budget, marble waterfall islands, or a professional construction crew to make your kitchen feel like a place where you love to spend your mornings. True style in a kitchen comes from the thoughtful little details: the texture of a wood shelf, the warm glow of an LED light strip, the weight of a brass handle, and the life that green plants bring to a windowsill.
By starting with just one or two small changes—like clearing off your countertops with a beautiful hanging rail or painting your lower cabinets a rich, warm tone—you can completely change how your entire kitchen feels to walk into. Focus on making the space work beautifully for your daily routines first, and the style will naturally follow.
Which of these small kitchen ideas would you actually try in your own home first? I would genuinely love to know—let me know in the comments below!
Frequently Asked Questions
How do I make basic small kitchens look more stylish?
Start by focusing on high-impact details: swap out boring cabinet knobs for heavy, oversized brass hardware, add warm under-cabinet LED lighting to eliminate dark corners, and clear off your counters by using hanging rails or open shelves for your prettiest daily items.
What paint colors make a small kitchen feel bigger?
Using a monochromatic palette of warm neutrals like cream, alabaster, or soft warm beige on both the walls and cabinets removes visual breaks, making the room feel larger. Alternatively, two-tone cabinets—darker on the bottom and light on top—will draw the eyes upward and make the ceiling feel taller.
How can I get more counter space in a tiny kitchen?
You can instantly increase your workspace by using an over-the-sink cutting board, mounting your knives on a wall-mounted magnetic strip, and adding a rolling kitchen cart with a solid wood top that can easily slide away when you are done preparing food.
Are open shelves a bad idea for a dusty kitchen?
Not if you keep it practical! The key is to only put items you use every single day—like your daily coffee mugs, dinner plates, and cereal bowls—on the open shelves. Because these items are constantly being used, washed, and put back, dust never has a chance to settle on them.
How do I hide ugly kitchen appliances on a budget?
You can use a simple, freestanding wooden appliance garage to slide over your toaster and blender, or use a beautiful linen curtain on a brass tension rod under your sink or counter to conceal bulky appliances and trash bins with soft, cozy texture.