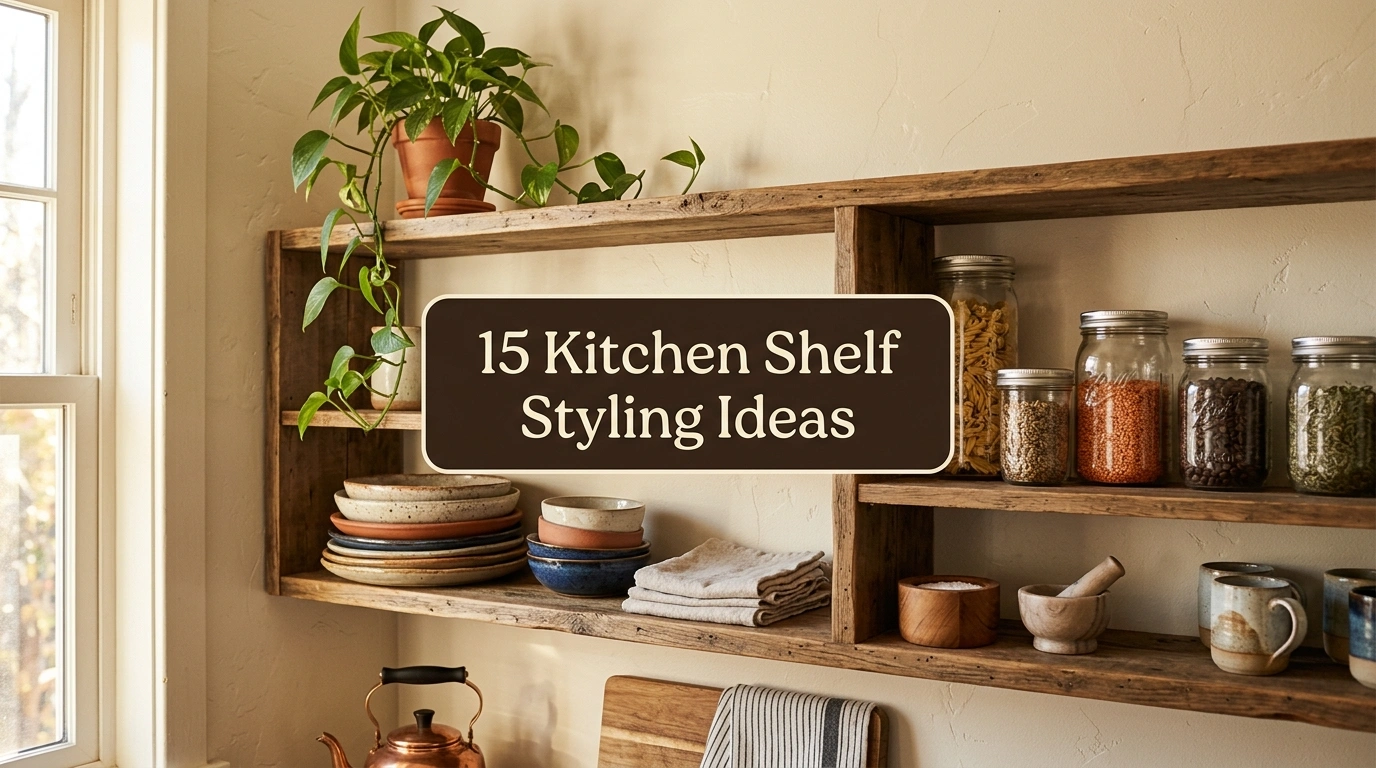
Have you ever looked at open kitchen shelving on Pinterest and felt a wave of instant styling anxiety? We have all been there. You see these perfectly balanced, airy shelves online, but when you try to recreate them in your own home, they either end up looking like a cluttered convenience store shelf or a sterile museum display where you are afraid to touch a single plate. The truth is, open shelving is one of the most practical ways to bring character into a kitchen, but only if you balance functional storage with comfortable visual warmth.
When searching for the perfect 15 kitchen shelf styling ideas for a warm aesthetic look, the biggest secret is to skip the urge to buy matching, sterile sets of everything. True styling warmth comes from layers, varying textures, and pieces that tell a story of a kitchen that is actually used for cooking and gathering. In this guide, we are going to walk through fifteen incredibly simple, practical ways to style your kitchen shelves. You will learn how to play with different materials like warm woods, earthy ceramics, and soft fabrics to create a space that feels deeply inviting, practical for daily cooking, and absolutely beautiful to look at.
1. The Stacked Earthy Ceramic Bowl Setup

What I personally love about this look is how it instantly grounds the room with soft, organic textures. When you stack three or four handmade ceramic bowls in warm, sandy tones, it creates a comforting visual anchor on your bottom shelf. The subtle variations in the glaze catch the morning light beautifully, making your daily breakfast routine feel just a little bit more intentional. This setup works incredibly well for bringing natural clay tones into an otherwise plain white or gray kitchen.
To recreate this look, I always recommend starting with bowls you actually use every single day so they do not just sit there gathering dust. Place the largest bowl on the bottom of the stack and work your way up to the smallest, slightly offsetting them so they do not look too perfect. Stick to warm color palettes like oatmeal, soft terracotta, or speckled cream ceramics. A common mistake is using mass-produced, perfectly identical plastic bowls, which completely kills the warm, handmade feeling. Suggested Budget: $25 – $65
2. Rich Amber Glass Bottles with Fresh Herbs
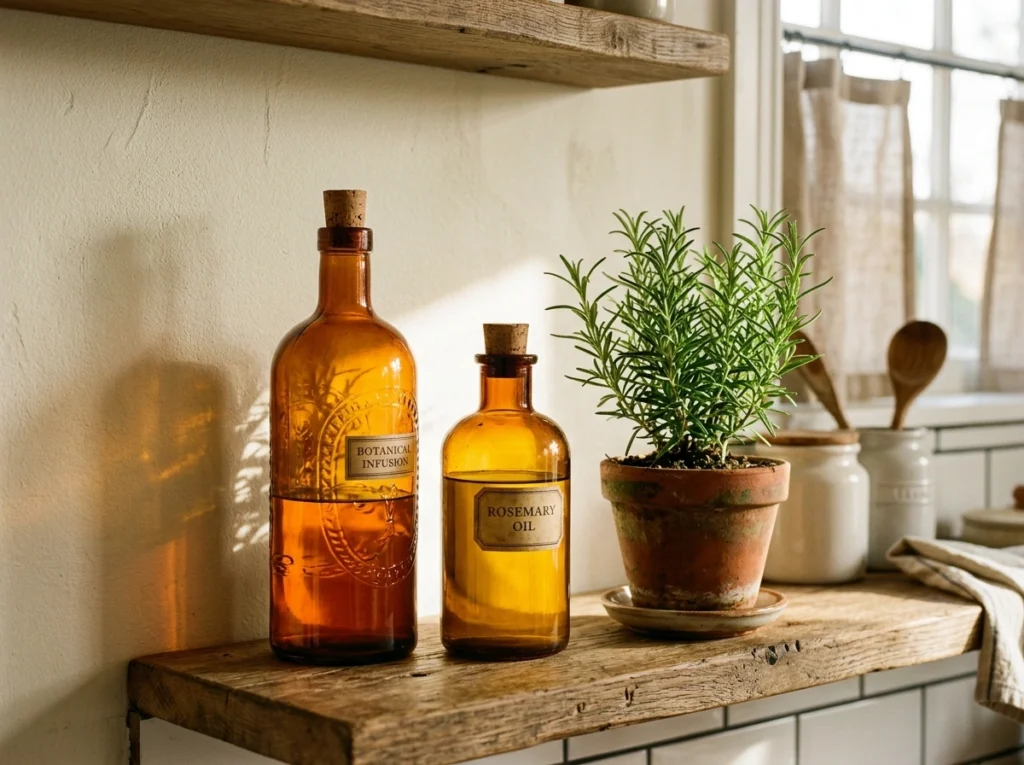
A lot of people overlook this detail, but introducing rich, amber-colored glass to your shelves completely changes the way light interacts with your kitchen. When the afternoon sun shines through deep amber glass bottles, it casts a warm, golden glow across your countertops. Placing a couple of these bottles next to a small, vibrant green herb plant creates a beautiful contrast between the earthy orange tones and the fresh green leaves. It feels alive, practical, and incredibly cozy.
To get this right, collect empty amber bottles from local thrift stores, or reuse beautiful soap and syrup containers after cleaning them thoroughly. Fill one bottle with water and stick a few trimmings of fresh rosemary or mint inside, allowing the leaves to drape casually over the glass. Keep the bottles in groups of two or three of varying heights to create a natural visual flow. Avoid buying bright, neon-colored glass, as it will detract from the earthy, natural atmosphere you are trying to create. Suggested Budget: $5 – $20
3. Layered Flat-Lay Wooden Cutting Boards
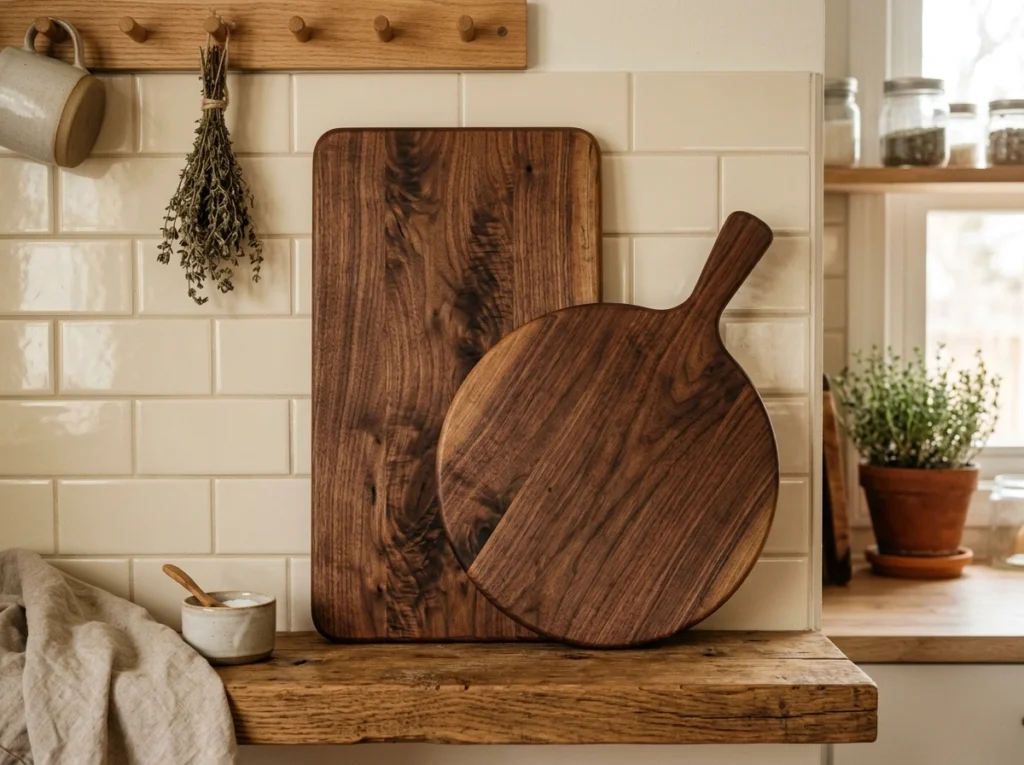
In my experience, the biggest mistake people make with open shelves is placing everything in a straight, flat line against the wall. Layering wooden cutting boards flat against the back of your shelf is the ultimate shortcut to adding instant warmth and depth. The rich grain of natural wood provides a gorgeous, textured backdrop that softens the cold look of tile backsplashes or painted drywall. It makes the entire kitchen feel more grounded and ready for a home-cooked meal.
I always recommend finding two cutting boards of different shapes—for example, one round board with a handle and one tall, rectangular board. Lean the larger board directly against the wall first, and then overlap the smaller board slightly in front of it at a gentle angle. Look for warm woods like walnut, white oak, or maple, and give them a quick rub with food-safe mineral oil to bring out the natural depth of the wood grain. Avoid boards with loud, plastic accents or silicone corners that break the natural look. Suggested Budget: $30 – $80
4. Woven Seagrass Baskets for Clever Hidden Storage
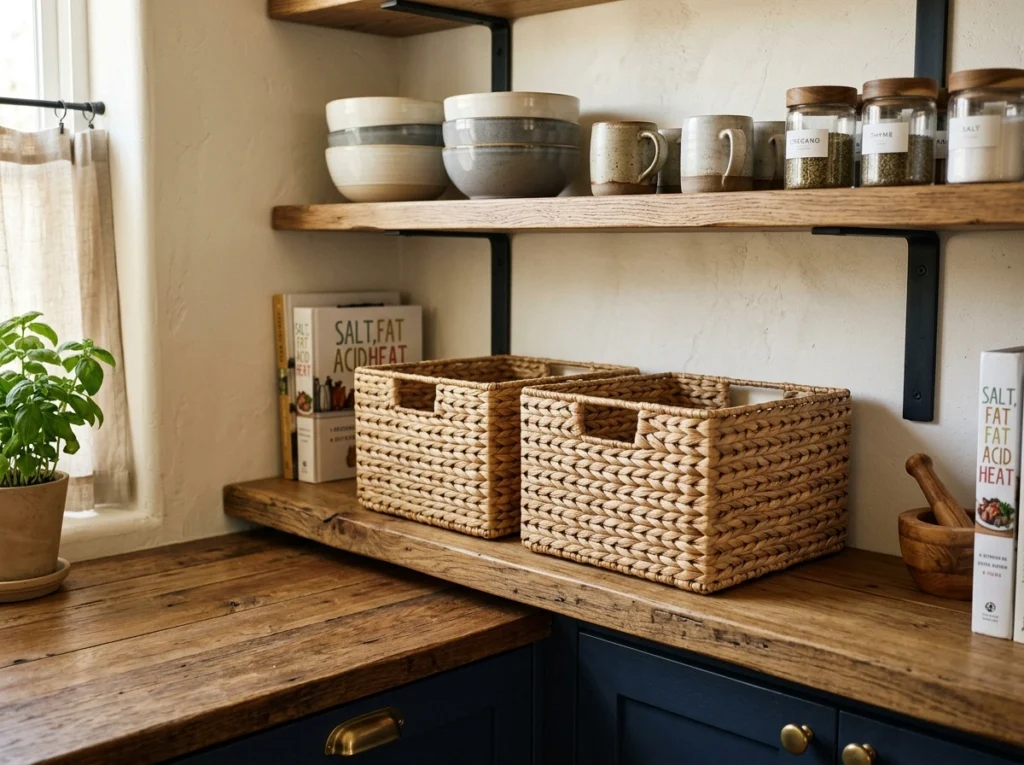
This works especially well if you want your kitchen to look more put together without trying too hard. Open shelves are beautiful, but we all have ugly kitchen items like plastic tea boxes, trash bag rolls, or snack bags that we need close by but do not want to look at. Tucking a couple of matching, small woven seagrass baskets onto your lower shelf gives you the absolute best of both worlds: highly practical hidden storage and a beautiful dose of chunky, natural fiber texture.
When choosing your baskets, measure your shelf depth carefully first so the baskets do not awkwardly hang over the edge. Look for baskets with sturdy woven handles and a tight, neat weave that will not unravel over time with daily use. Place them side-by-side on the very bottom shelf to create a strong, clean base for the lighter decorative items you will place on the higher shelves. Avoid baskets that are dyed in loud, bright colors; stick to natural tan, straw, or light brown shades. Suggested Budget: $15 – $40
5. Vintage Copper Measuring Cups on Brass S-Hooks
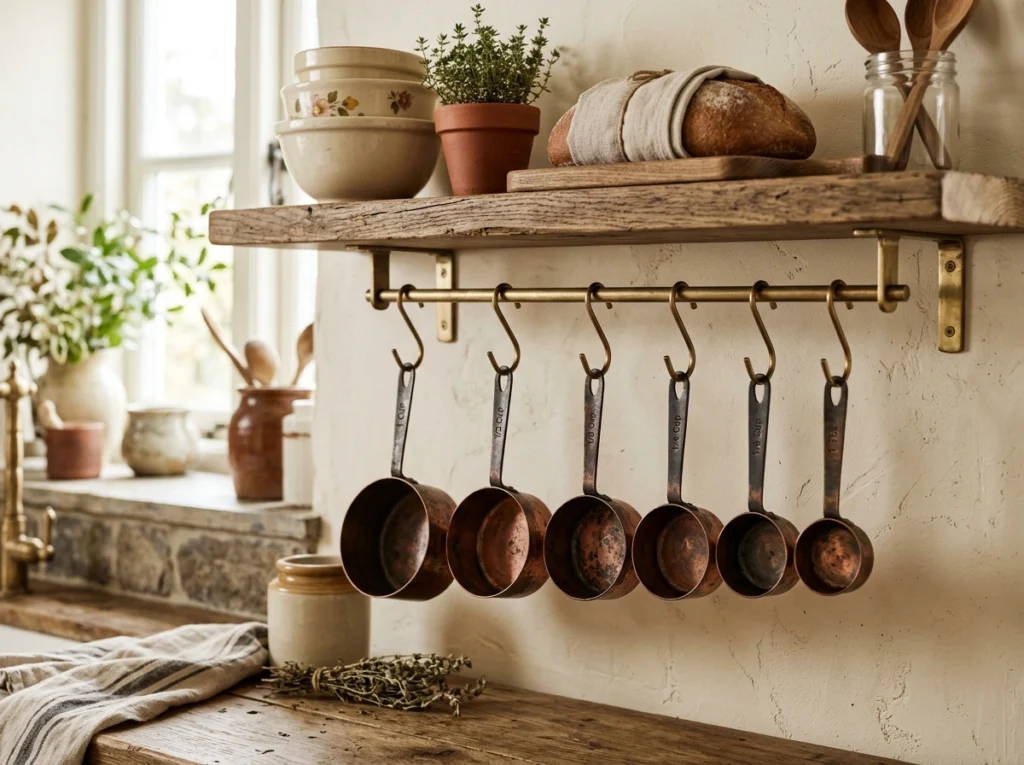
There is something incredibly charming about incorporating warm metals into a kitchen styling setup. Hanging a set of vintage-style copper measuring cups from simple brass S-hooks underneath or along the front of your shelves brings in a lovely, old-world cottage feel. The soft, reflective surface of the copper catches the light without feeling cold or modern like stainless steel often does. It is a highly functional styling choice that keeps your most-used baking tools right at your fingertips.
To style this naturally, install a small brass rail underneath your bottom shelf, or simply loop the S-hooks over the edge of a sturdy shelf bracket. Hang your measuring cups in descending size order, allowing them to overlap slightly for a casual, lived-in look. If you cannot find authentic vintage copper, look for affordable new sets with an antiqued or brushed finish rather than a highly polished, mirror-like shine. Avoid shiny, bright chrome hooks, as they feel too modern and cold for a warm aesthetic. Suggested Budget: $20 – $45
6. Cozy Cookbook Stack with a Brass Weight
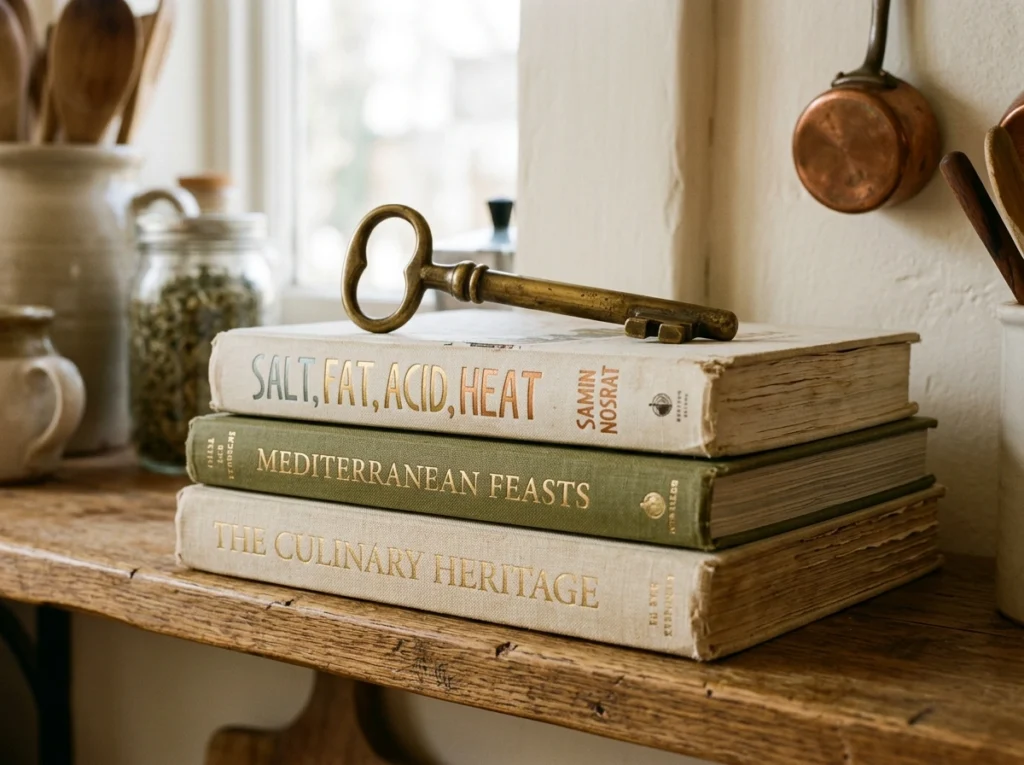
Books instantly make any room in a house feel warmer, and the kitchen is absolutely no exception to this rule. Stacking a few of your favorite, well-loved cookbooks horizontally on a shelf adds immediate height, beautiful paper textures, and a lovely sense of personality. Topping the stack with a simple, heavy brass object—like an old key, a smooth paperweight, or a vintage brass trivet—keeps the books neatly in place while adding a touch of golden metal warmth.
When choosing cookbooks to display, look for covers with warm, earthy tones like cream, forest green, terracotta, or warm brown. Stack them from largest to smallest to create a stable, pleasing pedestal for other decorative objects, like a small candle or a tiny bowl. Avoid books with bright, glossy neon dust jackets; you can easily slide those jackets off to reveal the beautiful, textured fabric hardcover underneath. This is an incredibly budget-friendly styling hack that uses items you probably already own. Suggested Budget: $10 – $35 (assuming you use books you own)
7. Textured Cream Stone Crocks for Utensils
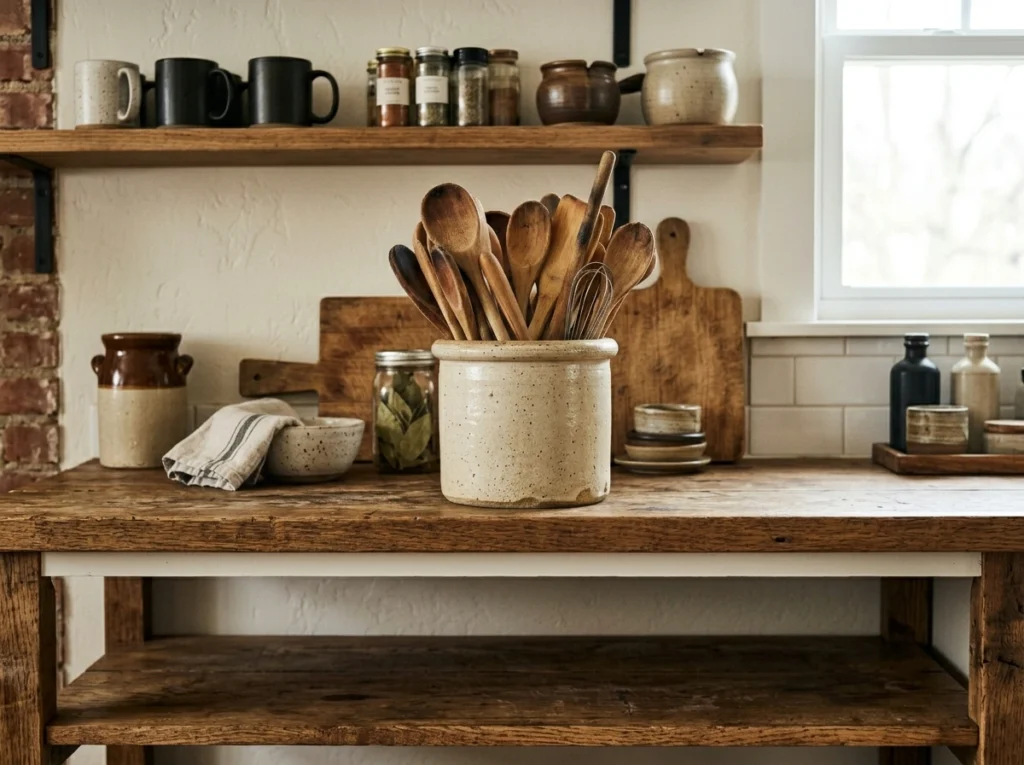
If you want your kitchen to feel cozy, you need to think about utilitarian beauty—making the items you use every single day look gorgeous. Storing your wooden spoons, whisks, and rolling pins in a heavy, textured stone crock on your lower shelf is a perfect example of this. The cool, sandy cream tone of a stoneware crock pairs beautifully with the natural wood tones of your cooking utensils, creating a highly functional and visually pleasing corner that screams “home chef.”
Look for stoneware crocks at flea markets or local craft fairs that have a rough, sandy exterior texture or a beautiful reactive glaze. Place your tallest wooden spoons and spatulas in the back of the crock, and keep the shorter tools in the front so everything is easy to see and grab while cooking. A common styling mistake is cramming too many modern, colorful silicone or plastic utensils into the crock; stick entirely to wood, metal, and neutral-colored tools to keep the look cohesive. Suggested Budget: $15 – $45
8. A Draping Potted Pothos Vine for Fresh Life
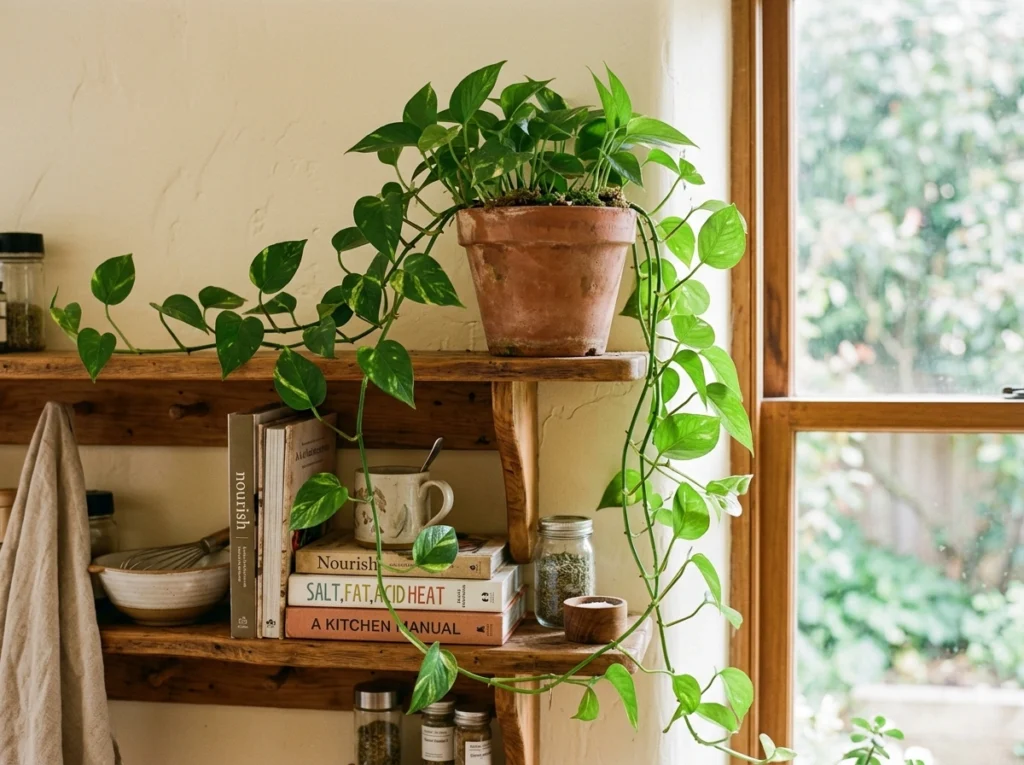
No warm shelf is truly complete without a touch of living green foliage to bring the entire setup to life. A small, potted Pothos plant is the ultimate styling secret weapon because its vines naturally drape downward, softening the harsh, straight lines of wooden shelves. The vibrant green leaves bring an organic energy to the kitchen that instantly breaks up the heavy look of stacked plates and ceramic mugs. It feels fresh, natural, and incredibly peaceful.
Place your potted plant on the very top shelf so its leafy vines have plenty of room to cascade down over the lower shelves. Choose a simple terracotta or unglazed clay pot that matches the warm color palette of your other shelf decor. Pothos plants are incredibly easy to care for and do well in low kitchen light, but make sure to place a small plastic saucer inside the pot to prevent water from ruining your wooden shelves. Avoid fake, plastic plants, as they collect dust quickly and lack the authentic charm of real leaves. Suggested Budget: $10 – $25
9. Matte Ceramic Pitcher with Muted Dried Florals

For a styling element that requires absolutely zero maintenance but always looks beautiful, a simple ceramic pitcher filled with dried florals is a must-have. A matte cream or soft beige pitcher brings a clean, sculptural shape to your shelves, while the dried florals introduce incredibly rich textures. Think fluffy bunny tails, dried wheat stalks, or muted eucalyptus leaves. This combination feels incredibly cozy and brings a gentle, rustic outdoor element inside your home.
I always recommend choosing a pitcher with a wide, comfortable handle and a chalky, matte finish rather than a super shiny glaze. Pack your dried stems relatively tight inside the pitcher so they stand upright rather than flopping over the sides in a messy clump. You can easily find inexpensive dried bunny tails or lavender stems online or at local craft stores. Avoid using bright, artificially dyed dried flowers, as they look unnatural and take away from the calm, warm aesthetic. Suggested Budget: $20 – $50
10. Stacked Linen-Wrapped Ingredient Canisters
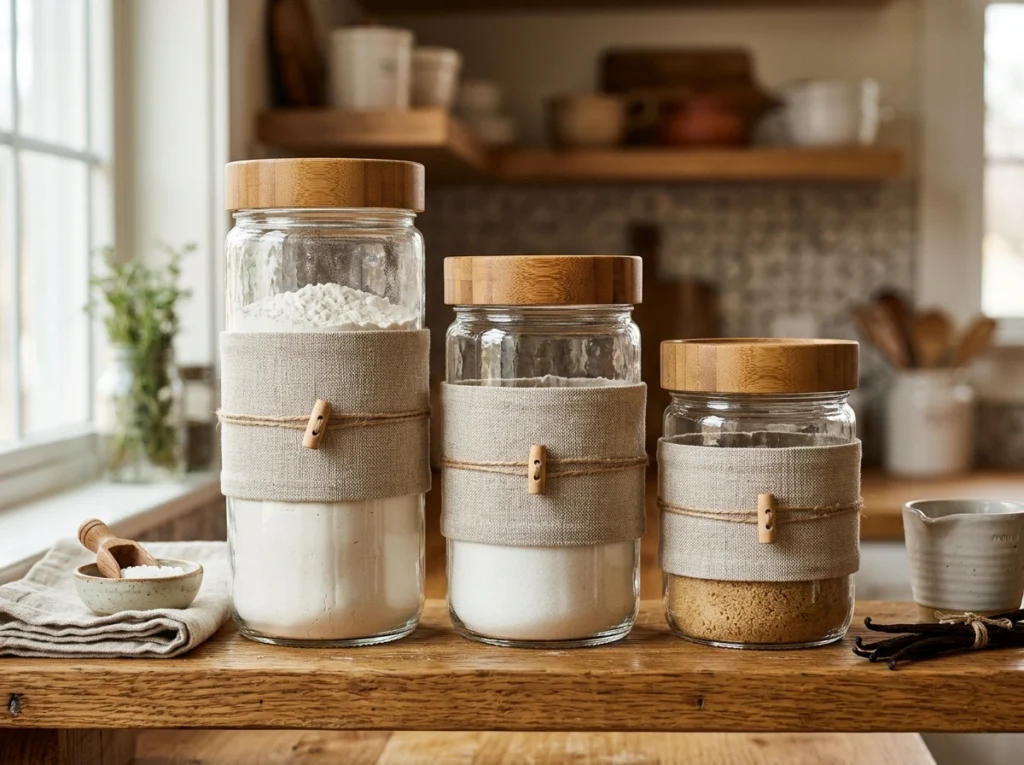
Texture is the absolute key to making a kitchen feel warm and cozy rather than sterile. Using kitchen canisters wrapped in textured, oatmeal-colored linen or handmade paper to store your dry ingredients is a beautiful way to soften your shelves. They add a lovely tactile quality to the space, breaking up the cold surfaces of glass, metal, and ceramic. It makes your baking ingredients look like beautiful design elements rather than cluttered grocery items.
To recreate this look on a budget, you can easily purchase simple glass or plastic canisters and wrap the centers in natural linen ribbon, securing it with a touch of fabric glue. Line three canisters of slightly different heights in a neat row, filling them with flour, sugar, or coffee beans. Opt for canisters with warm bamboo or acacia wood lids to tie the natural wood elements together across your shelving. Avoid using cheap plastic canisters with neon lids, which instantly cheapen the look of your kitchen. Suggested Budget: $15 – $35
11. Warm-Toned Ceramic Salt and Pepper Cellars

It is the tiniest details that often make the biggest impact when you are trying to make a space feel cozy and lived-in. Placing a pair of small, lidded ceramic salt and pepper cellars on a tiny wooden pedestal on your shelf is an incredibly cute and functional choice. What I personally love about this setup is that it keeps your essential seasoning tools right next to the stove while looking like a deliberate, beautiful little styling vignette.
Look for cellars made of speckled clay, warm slate, or olive wood with tiny, matching wooden spoons. Place them side-by-side on a small wooden riser or a marble coaster to give them a designated, important home on your shelf. This works especially well on a lower shelf near your main cooking zone so you can easily grab a pinch of salt while preparing dinner. Avoid using standard, boring glass shaker bottles, which can feel a bit clinical and lack character. Suggested Budget: $15 – $30
12. Framed Miniature Landscape Oil Painting Print
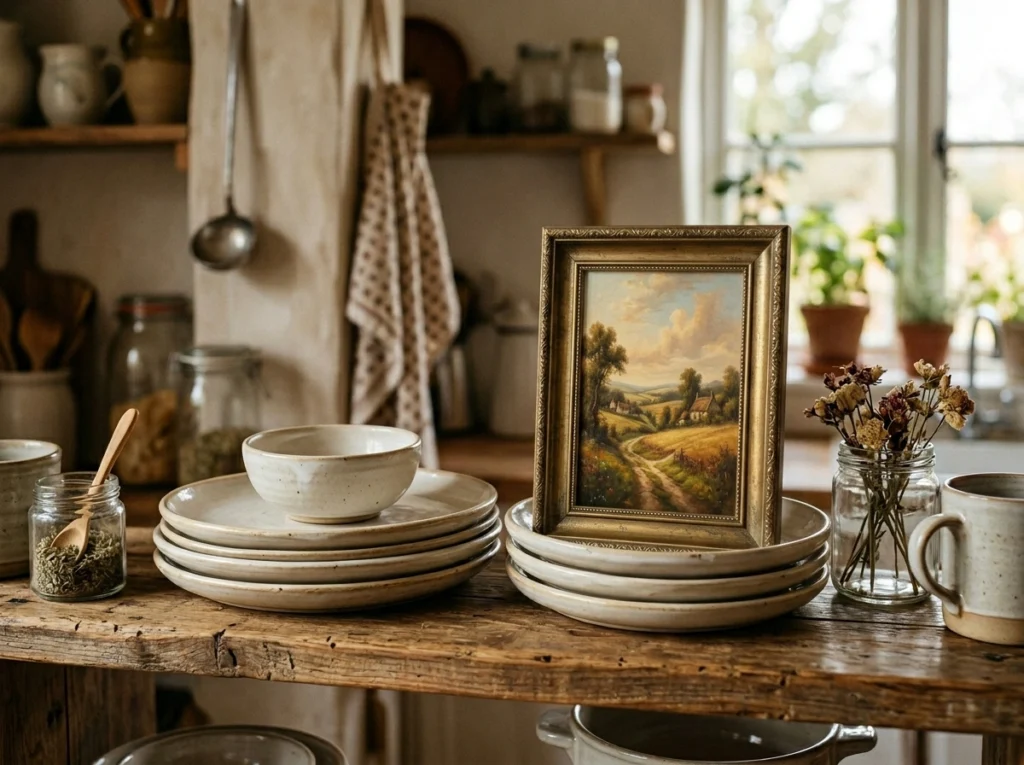
One of the easiest ways to make your kitchen shelves feel like a natural extension of your cozy living space is to treat them like normal display shelves. Leaning a small, framed landscape art print in warm tones against the back wall of your shelf adds instant personality and color. A tiny oil painting featuring a warm sunset, a quiet forest, or a rustic country cottage brings a deeply comforting, artistic energy into the busiest room of the house.
I always recommend searching for digital vintage art prints online, printing them out on textured paper, and placing them in an inexpensive thrifted brass frame. Keep the frame small—around 4×6 or 5×7 inches—so it does not overwhelm the shelf or crowd your practical kitchen items. Nestle the framed art slightly behind a stack of plates or a small glass jar to create a beautiful, layered look with lots of depth. Avoid modern, shiny plastic frames or abstract neon prints that clash with the warm, rustic aesthetic. Suggested Budget: $8 – $25
13. Glass Mason Jars Filled with Earthy Dry Goods
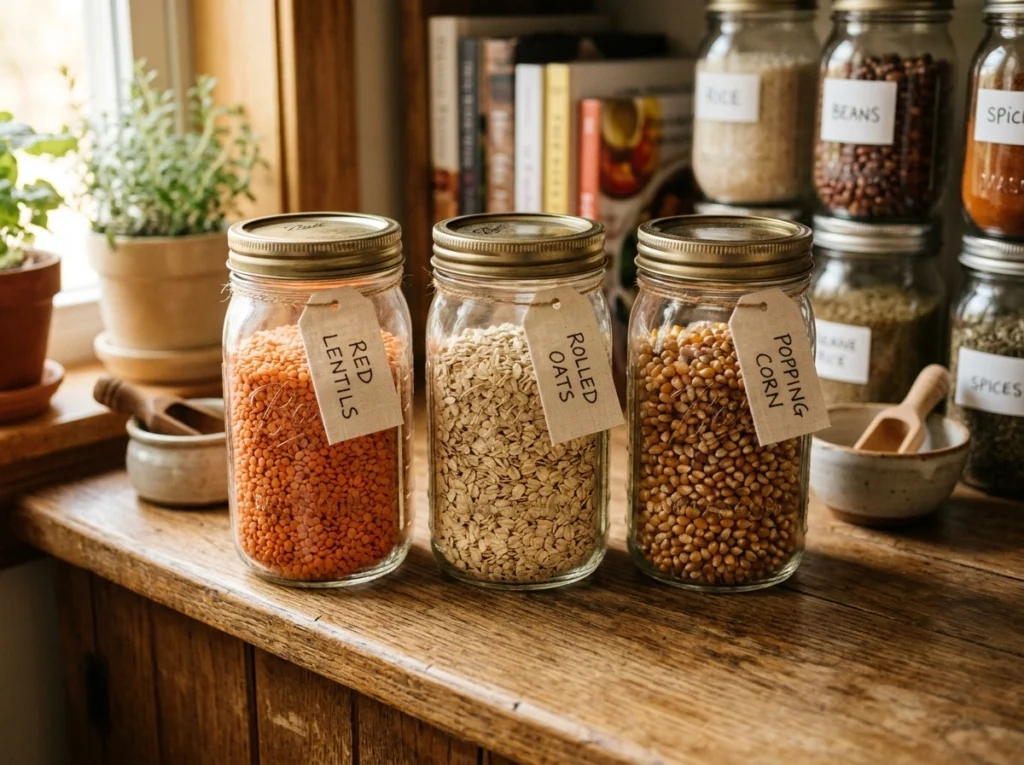
There is something so satisfying and visually warm about seeing your kitchen shelves stocked with real, nutritious food. Storing your dry goods—like red lentils, rolled oats, wild rice, and popping corn—in clear glass mason jars is an incredibly cheap way to bring beautiful, natural colors onto your shelves. The warm oranges, soft creams, and deep browns of the dry ingredients act as a natural color palette that shifts and changes as you cook throughout the month.
To style this effectively, use classic mason jars or wide-mouth glass jars with warm metal or wooden lids instead of ugly plastic ones. Group three or four jars together on a middle shelf, arranging them by ingredient color to create a visually pleasing gradient. Make sure to keep the jars relatively full so they always look abundant and inviting rather than sparse and empty. Avoid leaving giant, colorful cardboard grocery boxes on your open shelves, as they create visual clutter and ruin the cozy aesthetic. Suggested Budget: $10 – $30
14. Classic Brass Tea Kettle on a Warm Wooden Trivet
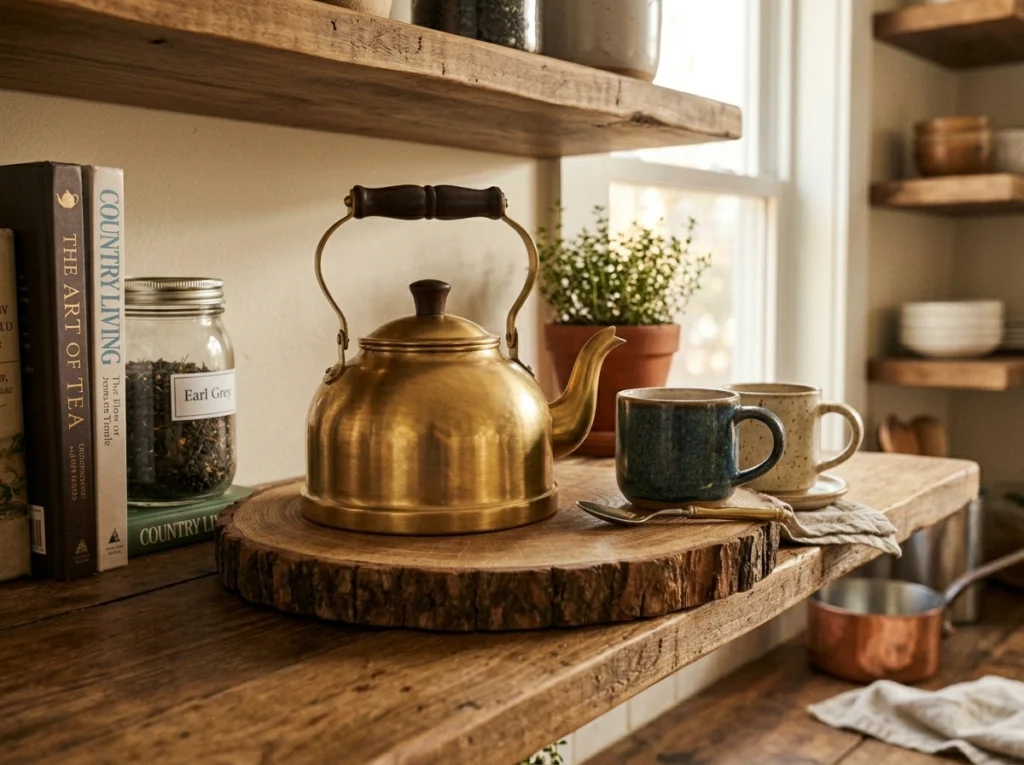
An empty space on your kitchen shelf is the perfect opportunity to display a beautiful piece of stovetop cookware. A classic, brushed brass or copper tea kettle sitting on a chunky wooden trivet instantly evokes the cozy feeling of a warm, rainy afternoon spent sipping hot tea. It adds a lovely touch of glowing metal warmth to your middle shelves while keeping a heavy, daily-use item off your countertops and neatly organized.
To keep this looking beautiful, choose a kettle with a soft, brushed metallic finish or a warm matte enamel coating in cream or forest green. Place it on a thick, round trivet made of sliced wood or woven wool felt balls to protect your shelf surface and add an extra layer of soft texture. This setup works especially well next to your stacked ceramic mugs, making it incredibly easy to grab everything you need for a quick afternoon tea break. Avoid using cheap, highly reflective stainless steel kettles, which can look a bit cold and industrial. Suggested Budget: $35 – $75
15. A Soft Striped Linen Towel Hanging Off the Edge
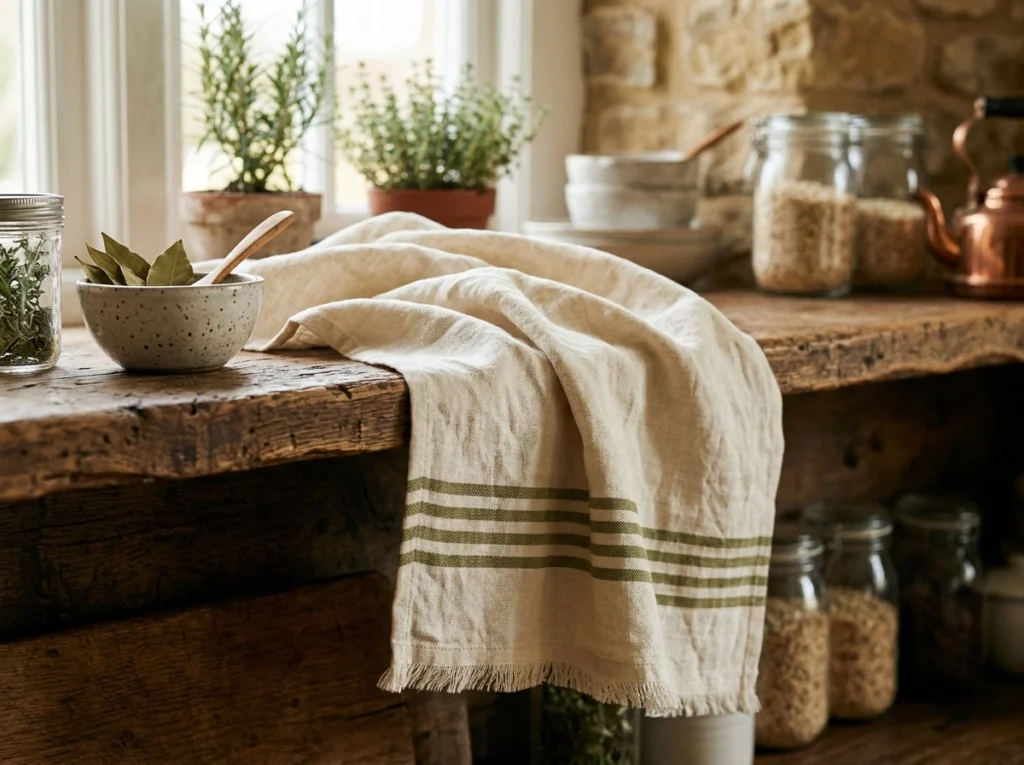
When a kitchen looks too perfect, it can feel cold and uninviting. Adding a soft, striped linen kitchen towel and letting it drape casually over the edge of your bottom shelf is the perfect way to break up the hard, straight lines of the cabinetry. The soft, textured fabric adds instant movement, casual warmth, and a comforting “lived-in” feeling that makes guests feel instantly welcome to pull up a stool and chat while you cook.
Choose a high-quality, pre-washed linen towel in a warm cream shade with simple, muted beige, olive green, or charcoal stripes. Fold it in thirds lengthwise and tuck the back edge under a heavy item on your bottom shelf—like a ceramic crock or a stack of plates—allowing the front half to hang down naturally over the edge of the shelf. Make sure the towel is clean and unwrinkled, but avoid ironing it perfectly flat; the natural, soft crinkles of the linen are exactly what give it its warm, cozy charm. Suggested Budget: $10 – $22
Conclusion
At the end of the day, styling your home should always be about creating a space where you feel completely comfortable, safe, and happy. When implementing these 15 kitchen shelf styling ideas for a warm aesthetic look, remember that confidence and practicality are far more important than achieving rigid perfection. You do not need a massive budget or expensive designer items to make your kitchen feel incredibly cozy; often, all it takes is a few items you already own, rearranged with a bit of styling intention.
Instead of trying to tackle your entire kitchen shelving setup all at once, I highly recommend starting with just one or two simple ideas that stood out to you today. Perhaps you can stack a few of your favorite warm-toned ceramic bowls, or grab some cheap glass jars from your pantry to fill with colorful dry lentils. Over time, you can continue to tweak, layer, and adjust your shelves until they feel like a perfect, cozy reflection of your unique daily life.
Which of these kitchen shelf styling ideas would you actually try in your home first? I would genuinely love to know, so please leave a comment down below and let’s chat!
Frequently Asked Questions
How do I make basic kitchen shelves look more stylish on a budget?
The easiest way to style kitchen shelves on a budget is to use items you already own, like stacking well-loved cookbooks, displaying colorful dried goods in glass jars, or layering old wooden cutting boards against the back wall. You can also hunt for cheap brass frames and ceramic crocks at local thrift stores to add a sense of history and warmth without spending a fortune.
What colors should I use to make my kitchen look warmer?
To create a warm, inviting aesthetic, focus on an earthy, natural color palette. Use plenty of soft creams, sandy beiges, warm terracottas, rich chocolate browns, and muted olive greens, accented with warm metals like brushed brass, bronze, or copper.
How can I keep my open kitchen shelves from looking cluttered?
The secret to avoiding clutter is to use the “rule of thirds” and leave plenty of open space, or “breathing room,” between your decorative items. Group small items together on wooden risers or tuck them away inside matching woven baskets so the overall shelf layout looks clean, organized, and intentional.
What are the best everyday basics to display on open shelving?
I always recommend displaying your absolute most-used items on the lower, easiest-to-reach shelves. This includes your daily ceramic plates and bowls, clear glass drinking cups, coffee mugs, and a stylish crock filled with your favorite wooden cooking spoons.
How do I style open shelves so they are still highly practical?
Keep your daily essentials on the lowest shelf where they are easy to grab and put away, and place purely decorative items, like art prints or cascading plants, on the very top shelf. This ensures your shelves are highly functional for daily cooking while still looking beautifully styled and balanced.