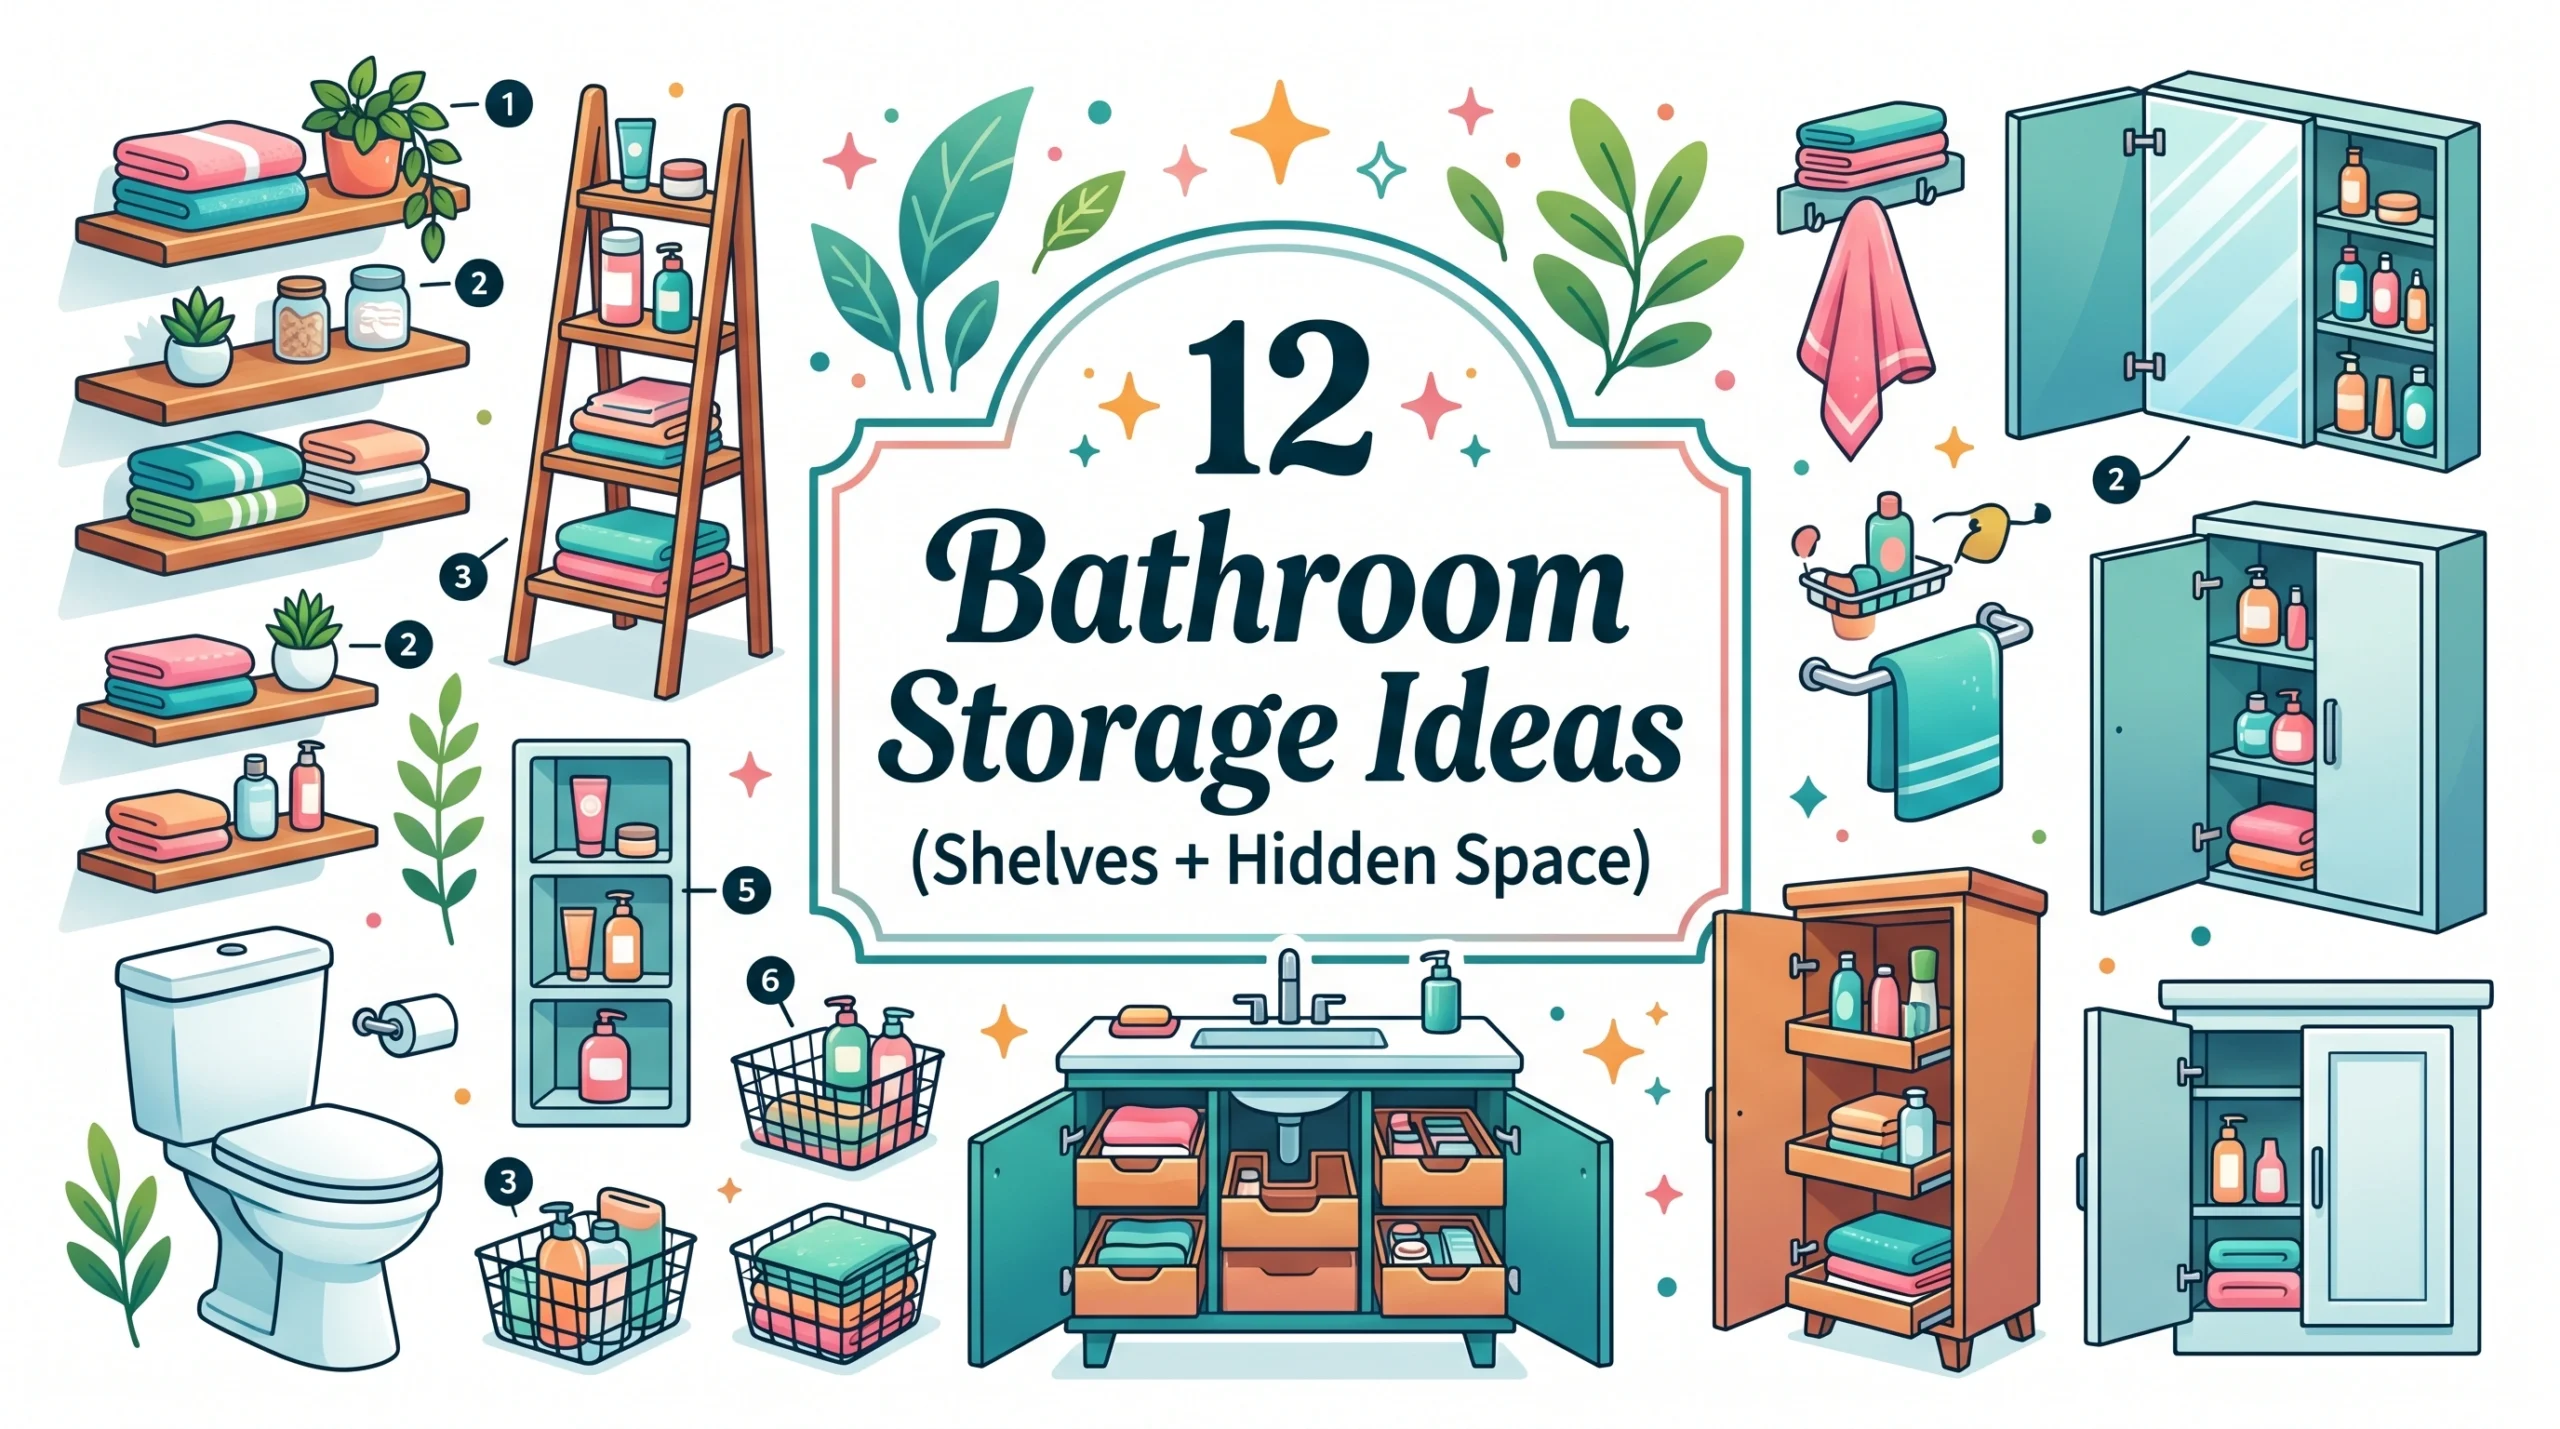
We have all been there: standing in front of the bathroom mirror in the morning, trying to put ourselves together while tripping over bath mats, knocking over hairspray bottles, and searching through cluttered drawers for a clean washcloth. It is hard to start your day with a calm mind when your physical space feels like a staging ground for a minor disaster. A lot of people think they just need more storage bins or a better sorting system, but in my experience, the biggest mistake people make is fighting against a layout that does not match how they actually live.
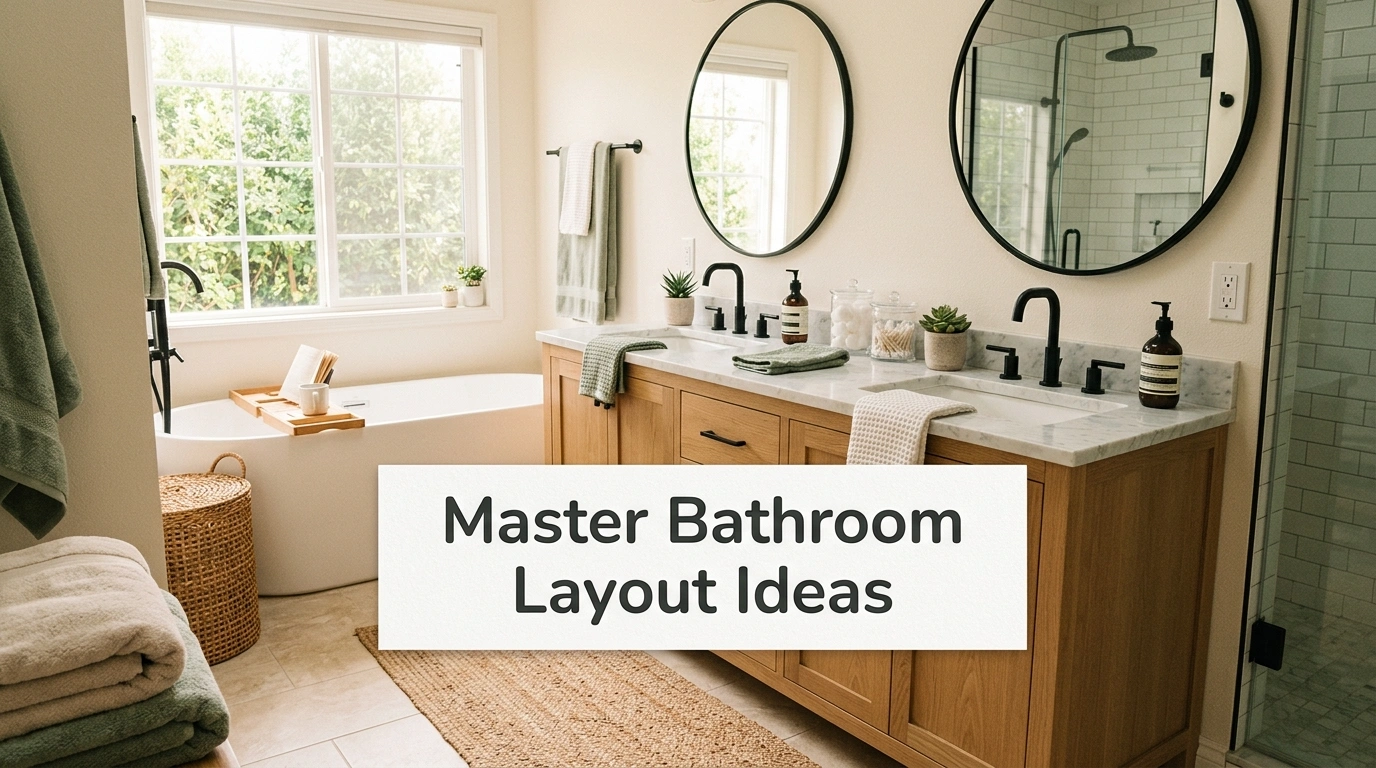
If you want a space that stays clean without constant maintenance, you have to look at the bones of the room. A well-planned master bathroom layout naturally guides where things go, separating your morning rush from your evening wind-down. By making small, strategic changes to where your vanities, showers, and cabinets sit, you can make your daily routine feel smooth and easy. Here are 18 practical master bathroom layout ideas designed to maximize your storage, clear the clutter, and help you feel more put together every single day.
1. The Split Vanity with a Middle Linen Tower
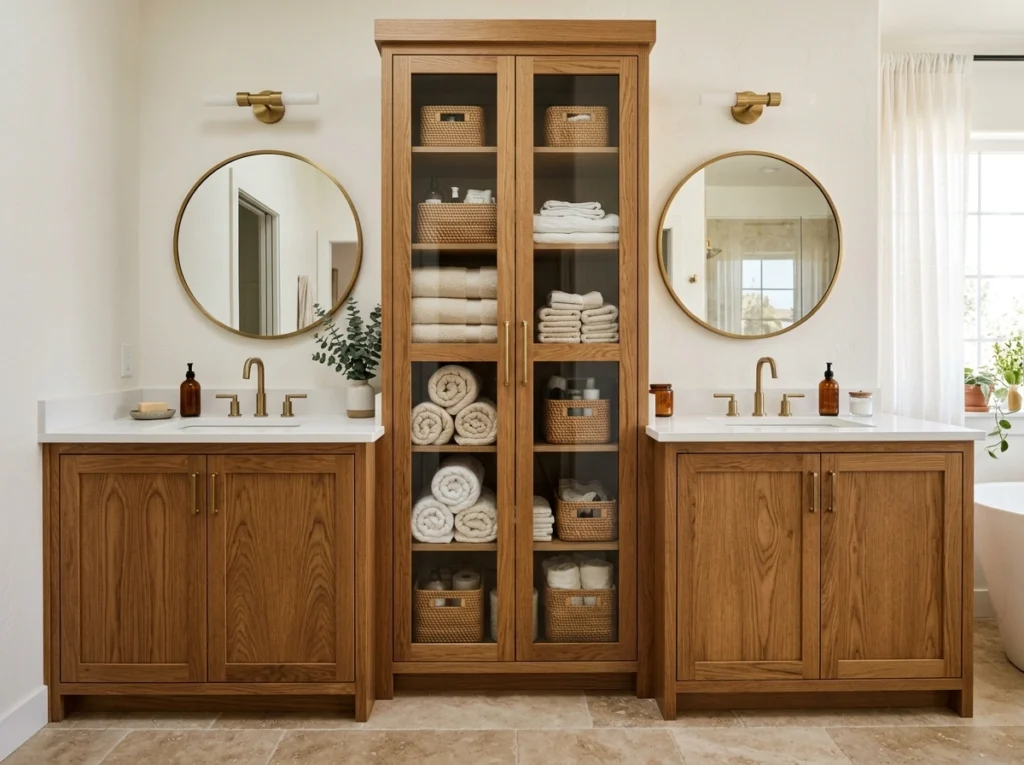
What I personally love about this layout is how it gives two partners completely separate zones without making the room feel choppy. By splitting a long vanity counter into two individual sink stations and placing a tall linen cabinet directly in the center, you create instant visual balance and a physical boundary. The warm wood tones of a central tower break up a massive block of drywall, giving the room a cozy, grounded feel. It turns a chaotic morning rush into a peaceful, structured routine where you never have to bump elbows or share drawer space again.
To recreate this setup, I always recommend starting with a central tower that is at least 15 inches wide and 12 to 15 inches deep. This depth keeps the cabinet flush with your vanity mirror frames while providing plenty of space for rolled towels and daily skincare. A common mistake people make is buying a tower that is too deep, which casts shadows over the sink areas and blocks natural light. For organization, use clear plastic bins on the middle shelves to keep small items from getting lost in the back. A semi-custom tower setup like this typically ranges from $1,200 to $3,500, but you can build a budget version using standard storage units painted to match your cabinets.
2. The Integrated Wet Room with Built-In Wall Niches
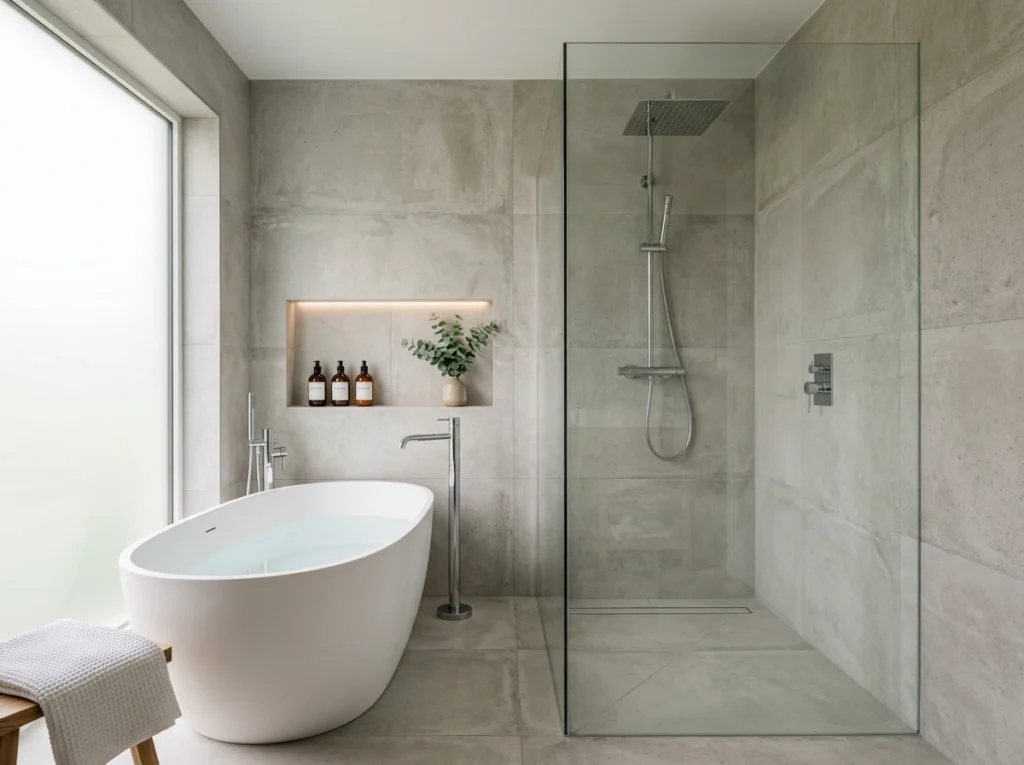
This layout feels incredibly open because it groups your tub and shower together behind a single glass partition. By combining these two wet zones, you free up the rest of the bathroom for smart storage solutions that do not get ruined by humidity. The visual flow of continuous tile, natural stone textures, and soft steam makes the entire room feel like a relaxing retreat rather than a utility space. It is perfect if you want a clean, minimalist look where water stays contained and the rest of the room stays dry and organized.
The key to keeping a wet room organized is building deep, recessed wall niches directly into the shower and tub walls during framing. A lot of people overlook this detail, but it completely eliminates the need for plastic shower caddies or bottles sitting on the floor. I always recommend making your niches at least 12 inches tall and 4 inches deep so they easily fit large shampoo pump bottles. Use a contrasting tile inside the niche to add a bit of personality, and make sure the bottom shelf slopes slightly forward so water does not pool. While building a full wet room is a larger investment—typically costing between $8,000 and $15,000—it drastically cuts down on daily cleaning and keeps your shower clutter hidden out of sight.
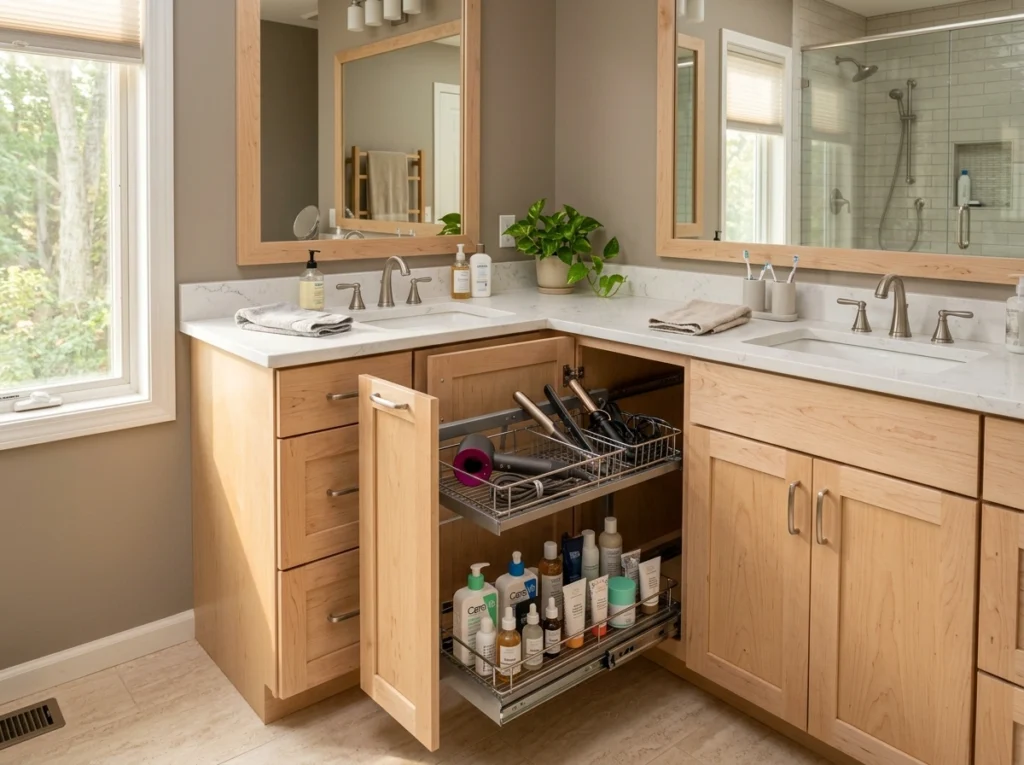
3. The L-Shaped Corner Vanity with Pull-Out Organizers
If you have a corner layout that feels awkward or underutilized, an L-shaped vanity is a brilliant way to maximize your counter space. This design fits snugly into the corner of the room, providing two distinct working areas while leaving the center of the bathroom wide open for easy movement. The mood is highly functional but welcoming, especially when styled with brass hardware, soft hand towels, and small potted plants. It is an excellent layout for medium-sized bathrooms where you want the luxury of two sinks but do not have one long, unbroken wall to put them on.
The main challenge with an L-shaped vanity is the deep corner cabinet, which often becomes a graveyard for half-used lotion bottles and old hair dryers. To fix this, install a heavy-duty corner lazy Susan or a pull-out “blind corner” shelf system during installation. I always recommend using pull-out metal wire baskets under each sink to store extra toilet paper, cleaning supplies, and styling tools. This keeps your countertops completely bare except for a soap dispenser and a small tray for jewelry. Expect to spend around $2,000 to $5,000 for a quality corner vanity setup, but the massive increase in usable storage makes it worth every penny.
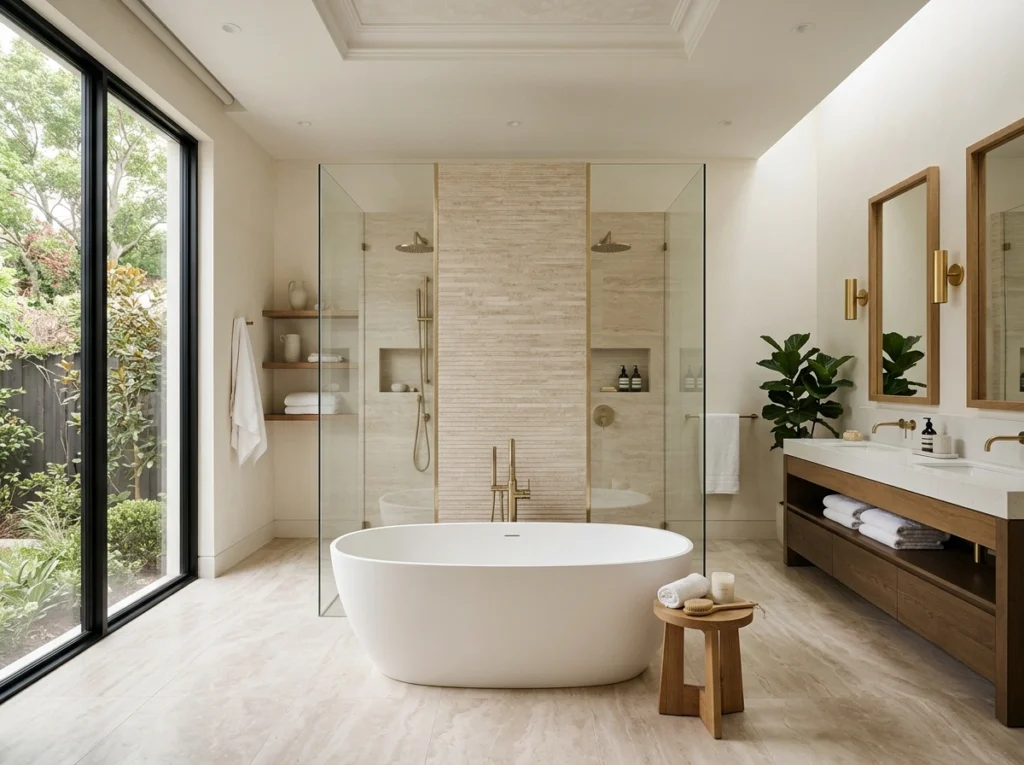
4. The T-Shaped Layout with Center Tub and Walk-Behind Shower
For larger bathrooms, a T-shaped layout offers a dramatic, balanced design that naturally organizes different zones. In this setup, a freestanding tub sits directly in the center of the back wall, acting as a visual anchor, while a spacious shower wraps around behind a partition wall. It feels highly intentional and luxurious, giving you a dedicated wet zone on one side of the room and keeping your dry vanity areas clean and calm. The flow of movement around the central tub is smooth, making the room feel like a high-end spa where every activity has its own dedicated space.
When planning this layout, use the backside of the partition wall facing the shower to build in recessed storage shelves for soap, sponges, and towels. This keeps the front view of your freestanding tub completely clean and uncluttered. A common mistake here is not leaving enough clearance around the tub; you want at least 18 inches of walking space on all sides to make cleaning and moving around easy. This layout works best in rooms that are at least 10 by 12 feet and generally requires professional plumbing rerouting, which can cost anywhere from $10,000 to $20,000, but it creates a breathtaking centerpiece that stays organized with minimal effort.
5. The Pocket Door Private Toilet Closet with Floating Shelving
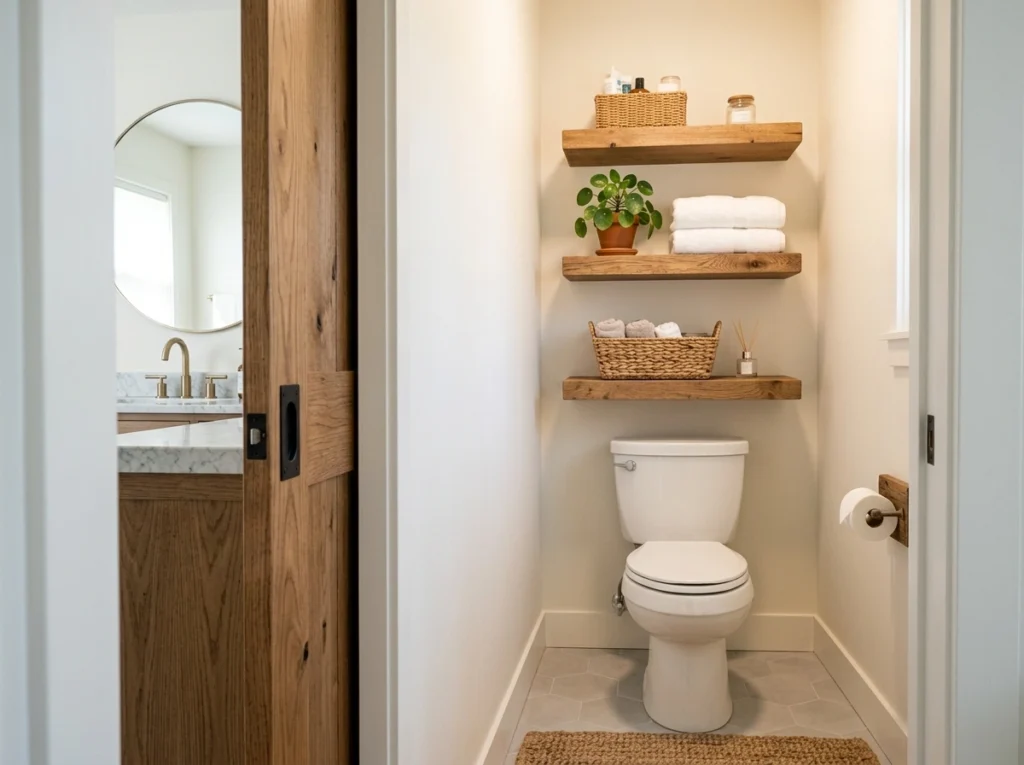
There is nothing worse than having to wait to use the sink because someone else is using the toilet. A private water closet layout solves this by placing the toilet behind a sliding pocket door, keeping it hidden but accessible. This simple partition changes the entire feel of a shared master bathroom, making the main sink and bath area feel much cleaner, more spacious, and more organized. It provides a peaceful boundary that keeps the utility side of the bathroom separate from your personal grooming zones.
Inside the private toilet closet, the biggest mistake people make is leaving the wall space blank. I always recommend starting with three deep wooden floating shelves mounted directly above the toilet. This gives you a natural place to store extra toilet paper in woven baskets, display a few favorite books, and keep fresh hand towels within arm’s reach. Use a sliding pocket door instead of a traditional swinging door to save precious floor space and keep the transition seamless. Adding a pocket door wall and shelving is a relatively simple upgrade, typically costing between $800 and $2,000, and it vastly improves the daily flow of a shared home.
6. The Single-Wall Linear Layout with Floor-to-Ceiling Cabinets
If you are working with a long, narrow master bathroom, a single-wall linear layout is your best friend. By keeping your sinks, vanity, and toilet along one wall, you leave the opposite wall completely open for smooth walking traffic. To make this setup work for storage, you run your cabinetry all the way from the floor to the ceiling at one end of the wall. This gives you a massive, built-in storage unit that mimics the look of a high-end kitchen pantry, keeping your towels, linens, and bulk bathroom supplies neatly behind closed doors.
To keep a linear layout from feeling like a dark hallway, use light-colored cabinet doors with vertical groove details to draw the eye upward. Inside your floor-to-ceiling cabinets, organize your shelves by frequency of use: daily skincare at eye level, clean towels at waist level, and seasonal items or extra toilet paper on the very top shelves. I always recommend using pull-out wooden drawers in the lower section so you do not have to get on your hands and knees to find things. A custom linear cabinet wall can cost between $3,000 and $6,000, but it completely eliminates the need for extra dressers or storage carts elsewhere in your home.
7. The Back-to-Back Vanity Island Layout
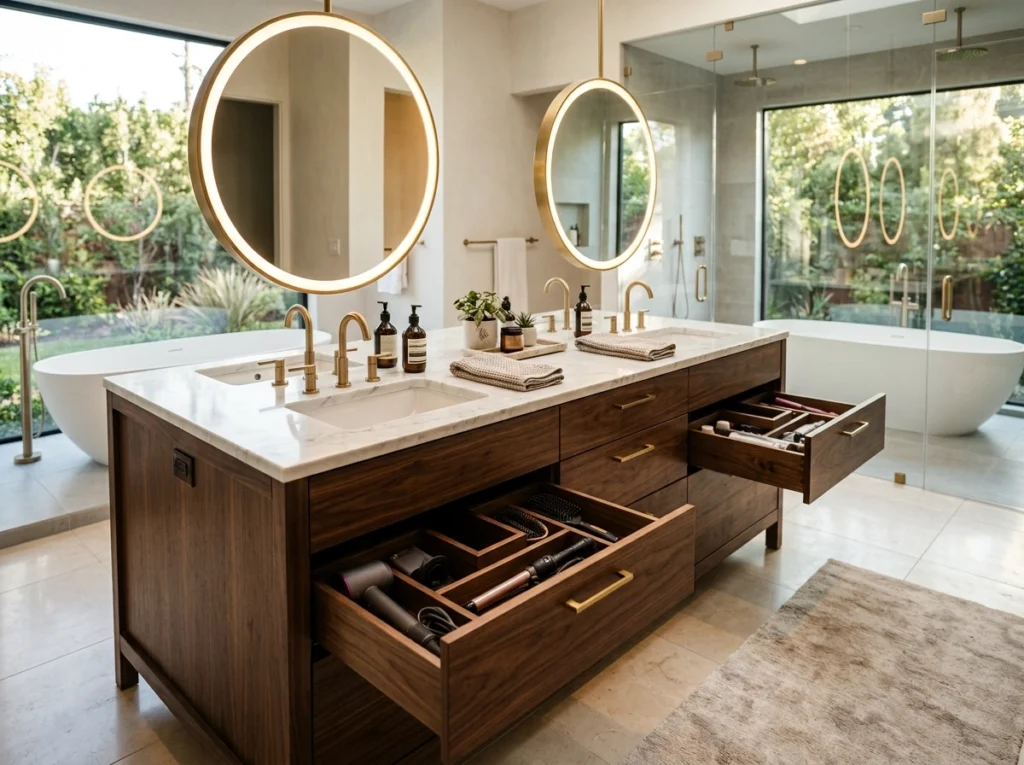
This layout is a game-changer for large, open-concept master suites. Instead of placing your vanities against the wall, you build a double-sided vanity island right in the center of the room, with sinks facing opposite directions. It feels incredibly modern and social, creating a natural flow around the room while giving each person their own distinct side of the counter. The island becomes the structural hub of the bathroom, leaving the outer walls free for large windows, a freestanding tub, or a massive walk-in shower.
Because the vanity island is open on all sides, keeping the countertops clear is absolutely essential. I always recommend building deep drawers directly into the center of the island rather than standard cabinets with doors. Drawers allow you to look straight down at your organized items rather than rummaging through a dark cabinet. Install power outlets inside the drawers so you can keep your hair dryer, straightener, and electric toothbrush plugged in and hidden out of sight. A custom vanity island requires under-floor plumbing, which typically brings the total project cost to $6,000 to $12,000, but it offers unparalleled storage and a highly unique look.
8. The Window-Seat Storage Bench Layout
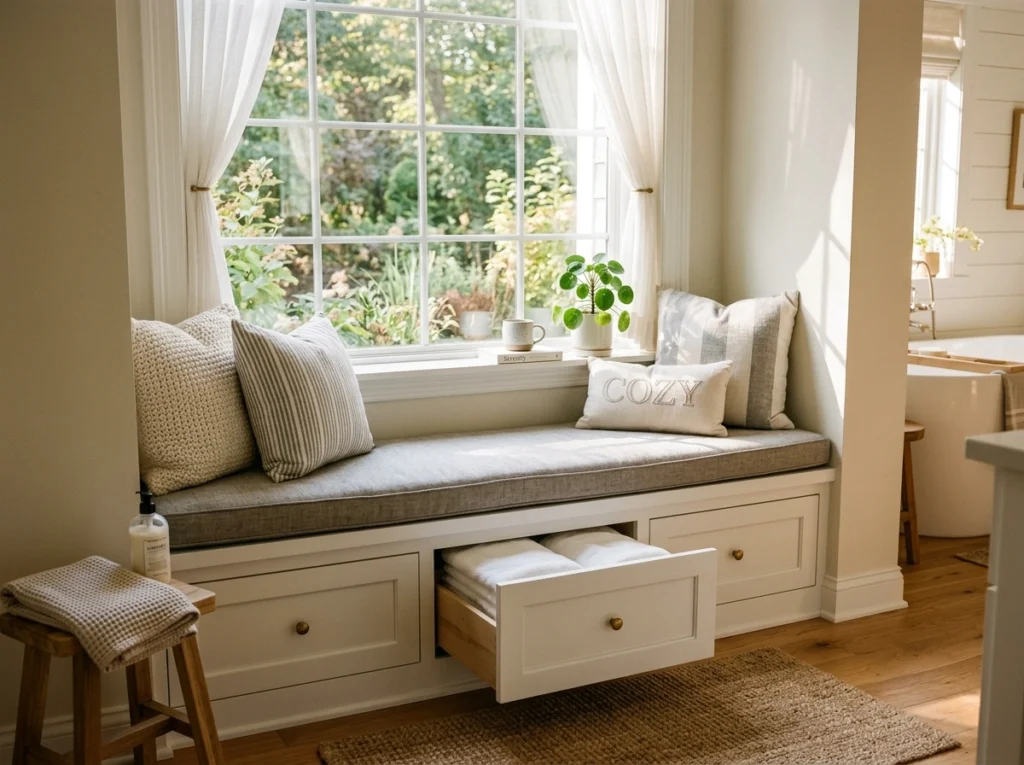
If you are lucky enough to have a large window in your master bathroom, building a low storage bench underneath it is a fantastic way to add warmth and utility. This layout creates a cozy spot to sit while you put on lotion or dry off, turning an empty alcove into a functional design feature. The mix of soft fabric cushions, natural wood, and bright morning light makes the bathroom feel less like a clinical utility room and more like a comfortable extension of your bedroom.
To maximize this layout, make the bench seat lift up on hinges or install deep drawers on the front face of the bench. This is the perfect spot to store clean bath mats, extra bath towels, or even a hidden laundry hamper to keep dirty clothes off the floor. I always recommend using a moisture-resistant fabric like outdoor canvas or faux leather for the bench cushion so it does not hold onto humidity. A custom-built window bench with storage typically costs between $600 and $1,500, making it an affordable way to add storage and a touch of comfort to your space.
9. The Walk-Through Closet to Master Bath Flow
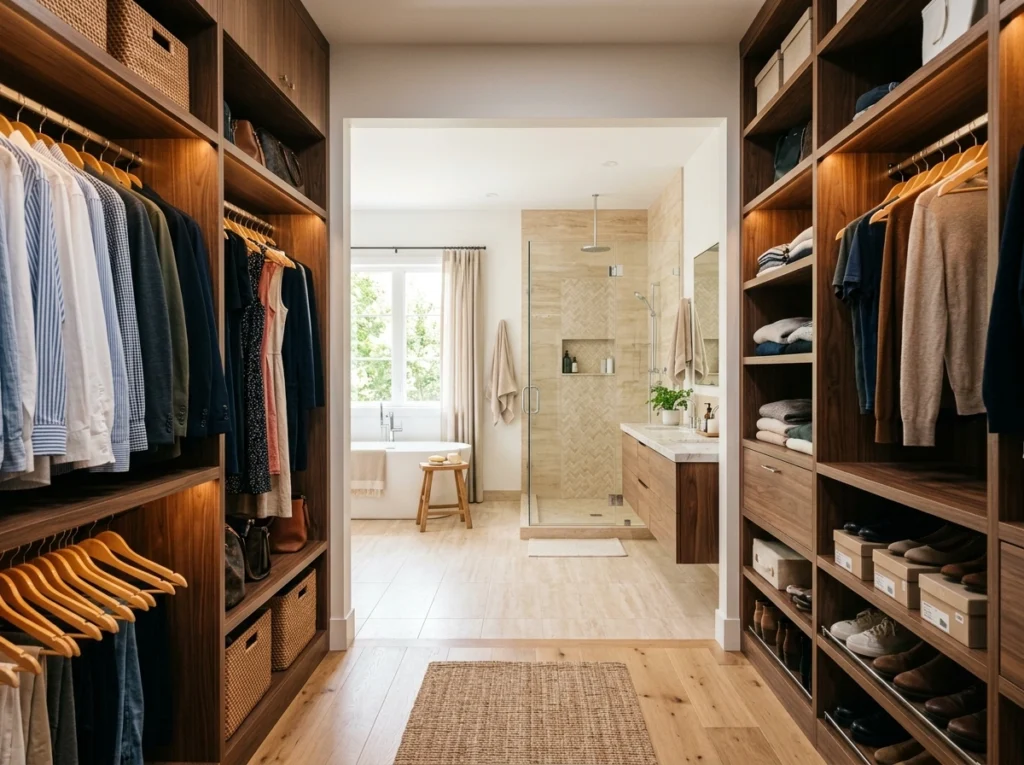
This layout creates a smooth, logical connection between your bedroom, your walk-in closet, and your master bathroom. By placing your closet as the transition zone between your sleeping area and your bathing area, you create a highly efficient morning routine. You can step straight from the shower into your closet to get dressed without ever having to track water back into the bedroom. The feel is highly organized, private, and streamlined, keeping your clothes and bathroom routines closely connected but physically separate.
To make this flow work without damaging your clothes, you must install a high-powered, quiet exhaust fan in the bathroom to pull moisture away from the closet. I always recommend using a glass door or a pocket door between the bathroom and the closet to block steam while keeping the light flowing. Keep your laundry hampers located right at the entrance of the closet closest to the bathroom so wet towels can be dropped in immediately. Setting up this transition layout works best during a full remodel or new build, with costs varying wildly depending on closet cabinetry, but the daily convenience is hard to beat.
10. The Corner Shower with Floating Dual Vanities
For compact master bathrooms where every inch counts, placing a glass corner shower opposite a pair of floating dual vanities is an excellent way to save space. By raising your vanity cabinets off the floor, you expose more tile, which immediately tricks the brain into thinking the room is much larger than it actually is. The clean, floating lines give the bathroom a light, breezy feeling, while the glass shower doors keep sightlines clear and open.
The secret to organizing a floating vanity layout is using the empty floor space underneath the cabinets wisely. I always recommend placing two matching woven baskets under the sinks to hold rolled hand towels or daily laundry. Inside the shallow drawers of the floating vanity, use shallow wooden organizer trays to keep makeup and grooming tools in place. Avoid storing heavy items in floating vanities to prevent wall strain over time. A pair of quality floating vanities and a glass corner shower typically cost between $3,500 and $7,000, providing a high-end look for smaller spaces.
11. The Galley Bathroom with Hidden Appliance Garages

Inspired by efficient kitchen designs, a galley-style master bathroom features parallel counters and fixtures facing each other across a central walkway. This layout is incredibly efficient, putting your sink and vanity on one side of the room and your tub, shower, and toilet on the other. It keeps everything within arm’s reach while you stand in the center, making your daily preparation fast and straightforward. The mood is clean, balanced, and highly organized, especially when you use consistent materials on both sides of the room.
In a galley layout, counter space can sometimes feel tight, which is why I always recommend building a “hidden appliance garage” at the end of your vanity counter. This is a small cabinet that sits directly on the countertop with a roll-up or pocket door, hiding your hair tools, electric toothbrushes, and chargers while keeping them plugged in. A lot of people overlook this detail, but keeping cords off your counters instantly makes the entire room look clean and put together. Installing custom galley cabinetry with built-in appliance storage ranges from $2,500 to $5,500, offering excellent daily utility.
12. The Freestanding Tub with Surrounding Wooden Ledges
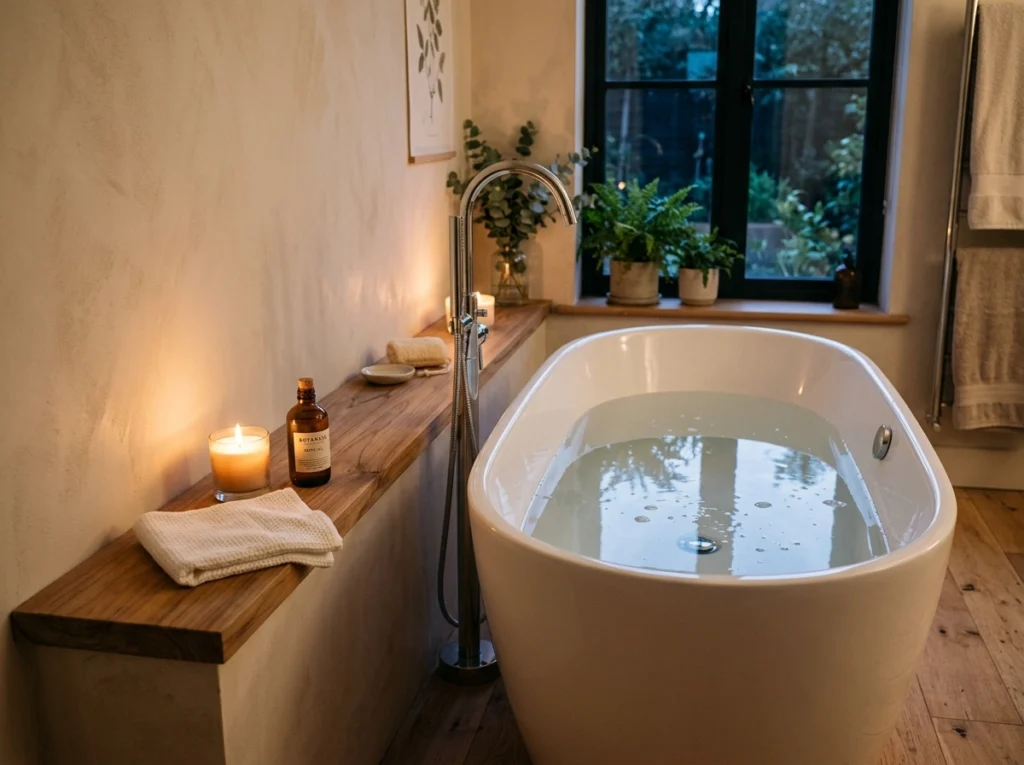
A freestanding tub is a beautiful centerpiece, but it often lacks practical storage for soap, bath salts, and a glass of water. This layout solves that problem by building a low, custom wooden ledge or “half-wall” directly behind and along one side of the tub. The rich wood texture against clean white porcelain creates a warm, inviting contrast, making your bathing area feel incredibly cozy and structured. It turns a standard bath into an organized, relaxing experience where everything you need is right at your fingertips.
When building the ledge, make sure it is topped with a waterproof material like quartz, teak, or treated cedar to prevent water damage from splashes. I always recommend making the ledge about 4 to 6 inches wide—just enough to hold a candle, a book, and a bottle of bath oil without looking cluttered. This completely avoids the common mistake of having to reach down to the floor for your soap or balancing shampoo bottles on the curved edge of the tub. Adding a custom tub ledge is a simple project that costs between $400 and $1,200, but it completely changes how you use your bath.
13. The Half-Wall Privacy Partition with Glass Shelving
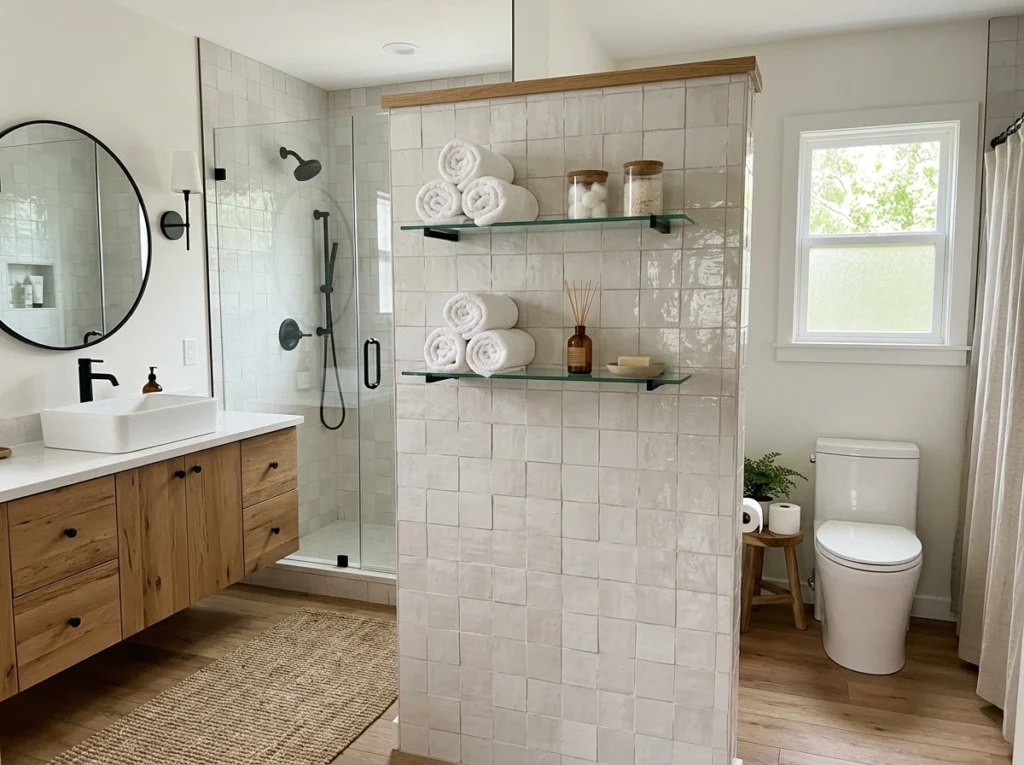
If you want to separate your toilet or shower from the rest of the bathroom without blocking natural light, a half-wall partition is a smart layout choice. This wall stands about 4 feet tall, hiding the toilet from view when you walk into the room, but opens up with clear glass on the top half. This simple architectural detail defines different zones in the room while keeping the space feeling bright, open, and incredibly organized.
To turn this partition wall into a storage powerhouse, install floating glass shelves on the vanity-facing side of the wall. This is a perfect place to stack clean washcloths, display small jars of bath salts, or place decorative items that bring a bit of life to the room. I always recommend using matte black or brass brackets to mount the shelves, matching the metal finishes to your main sink faucets. Building a half-wall with shelves is a highly cost-effective update, typically running between $500 and $1,500, and it adds instant structure to any open bathroom plan.
14. The Under-Eaves Attic Bathroom with Low Storage Drawers
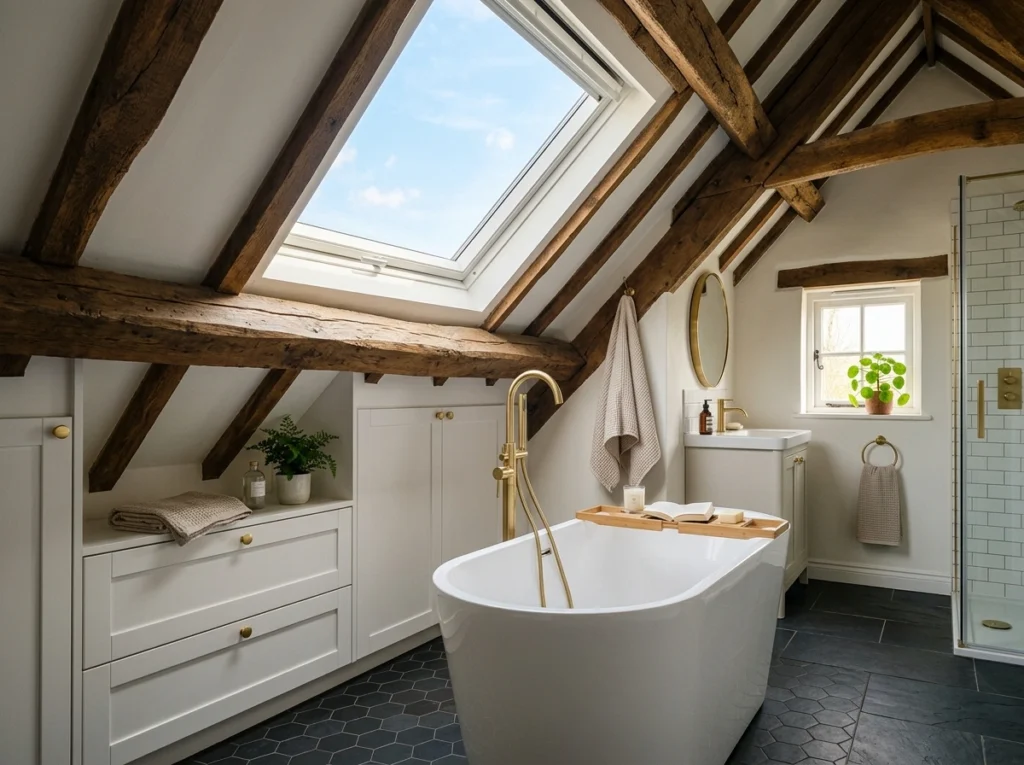
Converting an attic space into a master bathroom is a wonderful way to add value to your home, but dealing with sloped ceilings can be a puzzle. This layout embraces the unique cozy shape of the roof by placing low, custom-built drawer units directly under the lowest parts of the sloped walls. This turns what would be useless, dead space into a massive amount of hidden storage, leaving the taller parts of the room free for your shower and vanity. The result is a unique, cabin-like retreat that feels incredibly intentional and warm.
Because these under-eaves drawers are low to the ground, use smooth, soft-close drawer glides so you can easily pull them open with your foot or a gentle touch. Store items you do not need every day here, such as seasonal blankets, extra towels, bulk toilet paper, and travel toiletries. I always recommend painting the drawer fronts the same color as the walls so they blend in and make the small attic space feel larger. Custom attic storage cabinetry can run between $1,500 and $4,000, but it is the absolute best way to make a sloped room highly functional.
15. The Walk-In Pantry-Style Linen Closet Layout

If you have a corner of your master bathroom that feels empty, turning it into a dedicated walk-in linen closet is a massive upgrade. Unlike a standard shallow closet, a walk-in style allows you to step inside and see all your supplies beautifully arranged on deep, open shelves. It brings an incredible sense of order and calm to your home, ensuring you never have to search through dark cabinets for a clean sheet or a fresh bottle of soap again.
To organize this closet, use large, matching fabric or wire baskets on the lower shelves to hold dirty laundry, extra toilet paper, and beach towels. Keep your daily bath sheets folded at chest height, and use smaller labeled bins for medicine, first aid, and travel toiletries on the upper shelves. I always recommend leaving a small section of wall space open to hang a broom, a small dustpan, or a laundry steamer. Building a small walk-in closet space with basic wooden shelving is a straightforward project, typically costing between $1,000 and $3,000, and it provides enough storage to clear clutter from your entire master suite.
16. The European Wet Room Layout with Minimal Wall Hooks
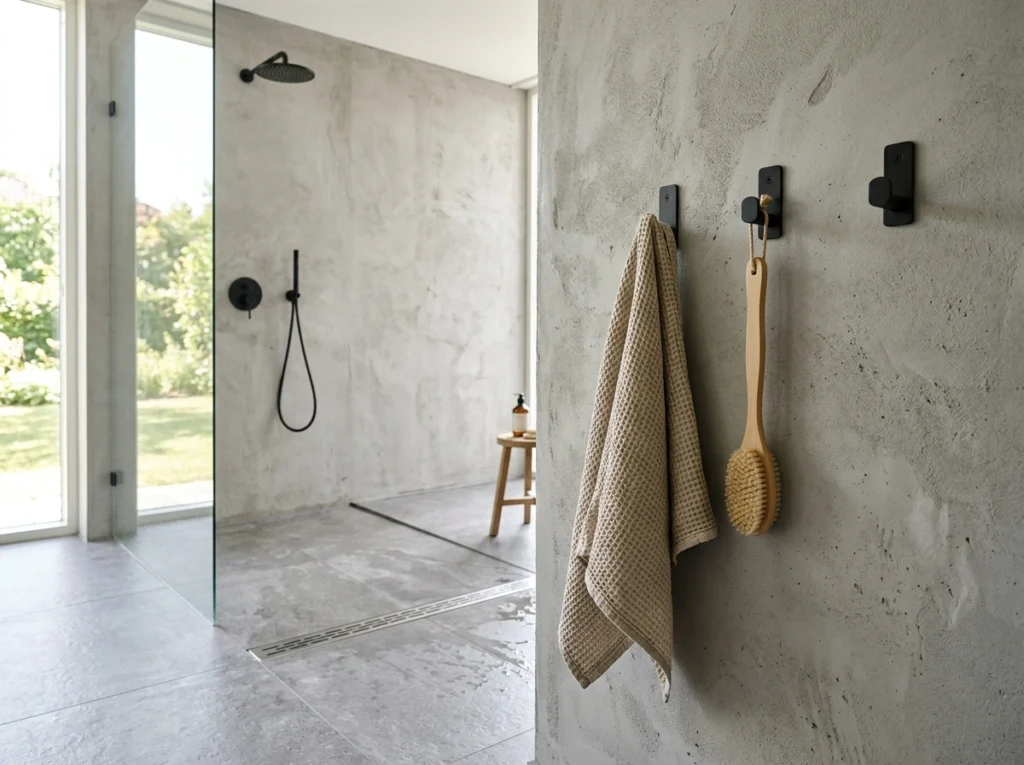
For a modern, low-maintenance home, a European-style wet room is the ultimate layout. In this design, the entire bathroom floor is waterproofed and sloped toward a central drain, meaning there are no bulky shower curbs or glass enclosures to clean. It creates an incredibly clean, open, and spacious environment where water can flow freely. The look is simple, functional, and relaxed, making daily cleanup as easy as spraying down the tile floors.
Without a traditional shower door or vanity cabinet to hang things on, wall organization is key in a European wet room. I always recommend mounting a long row of heavy-duty matte black hooks along the dry wall opposite the shower area. This gives you a dedicated place to hang towels, bathrobes, and scrub brushes where they can air dry quickly without touching the floor. Use floating, wall-mounted sinks with exposed plumbing pipes to keep the floor completely clear and easy to wipe down. Waterproofing a full wet room floor requires professional installation and high-quality materials, typically costing $7,000 to $12,000, but it offers a lifetime of easy, clutter-free living.
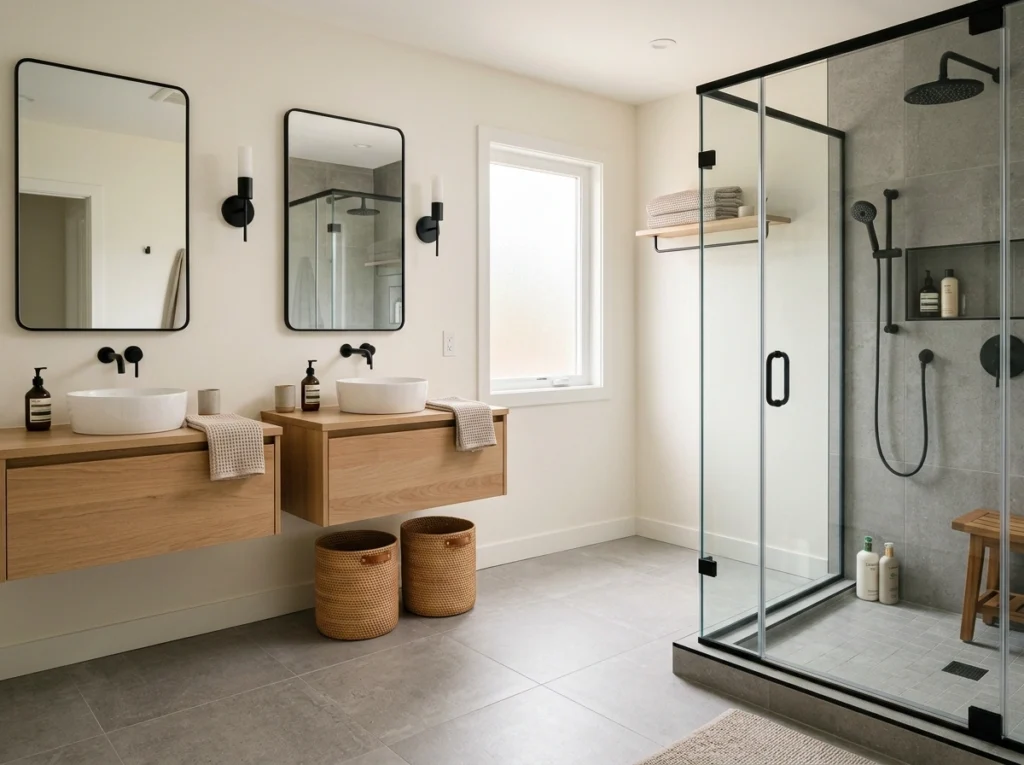
17. The Parallel Dual-Vanity Layout with Under-Bench Hamper
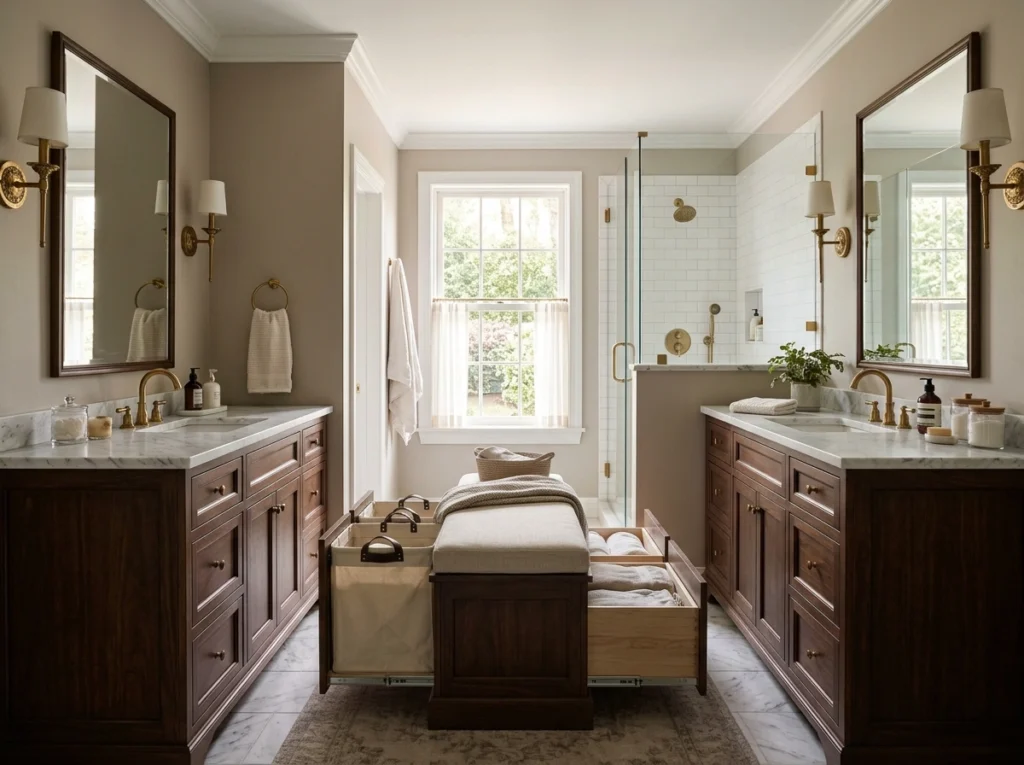
This layout features two identical vanities facing each other on opposite walls, with a wide walkway running down the center. This design is perfect for couples who want absolute privacy and space during their morning routines, as you are standing back-to-back rather than side-by-side. The symmetry of parallel vanities brings a beautiful, organized structure to the room, making it feel balanced, spacious, and highly professional.
To connect the two vanity zones, place a low, upholstered storage bench in the center of the walkway. This bench not only gives you a place to sit while putting on shoes but can also house a double-sided pull-out laundry hamper underneath. I always recommend using a hamper with removable canvas liner bags so you can easily carry dirty clothes straight to the laundry room. This keeps dirty clothes completely off the bathroom floor and hidden out of sight, maintaining the clean lines of your parallel layout. Expect to spend around $3,000 to $6,000 for this dual-vanity setup, which offers incredible personal space and storage.
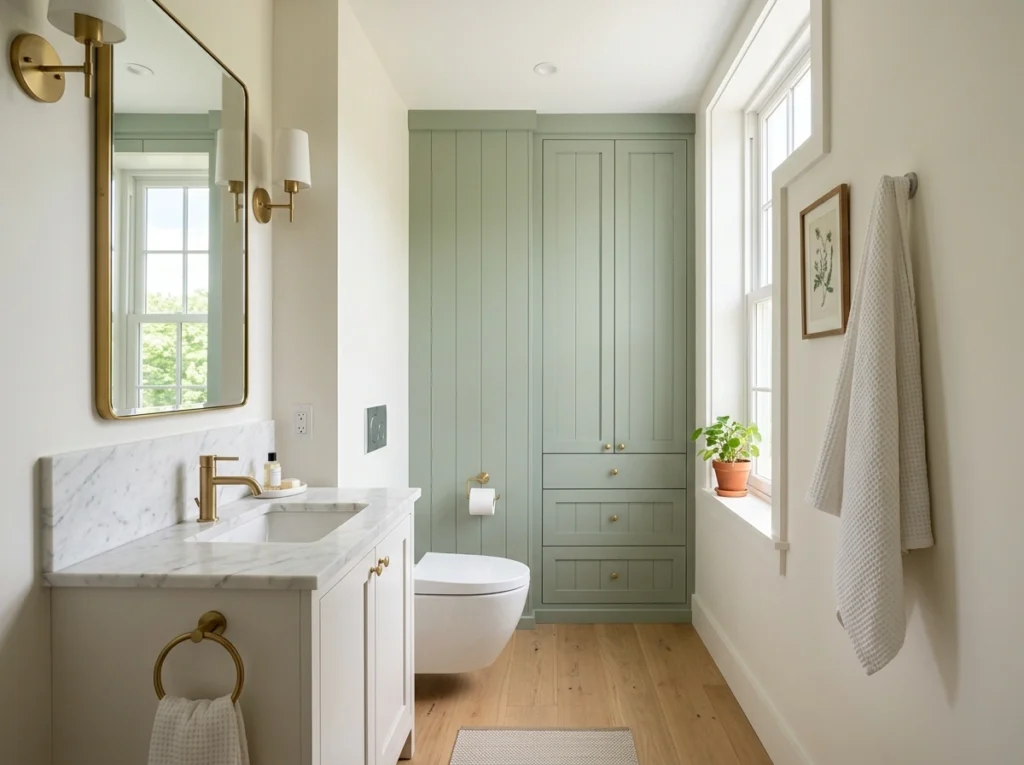
18. The Compact Layout with Recessed Over-Toilet Cabinets
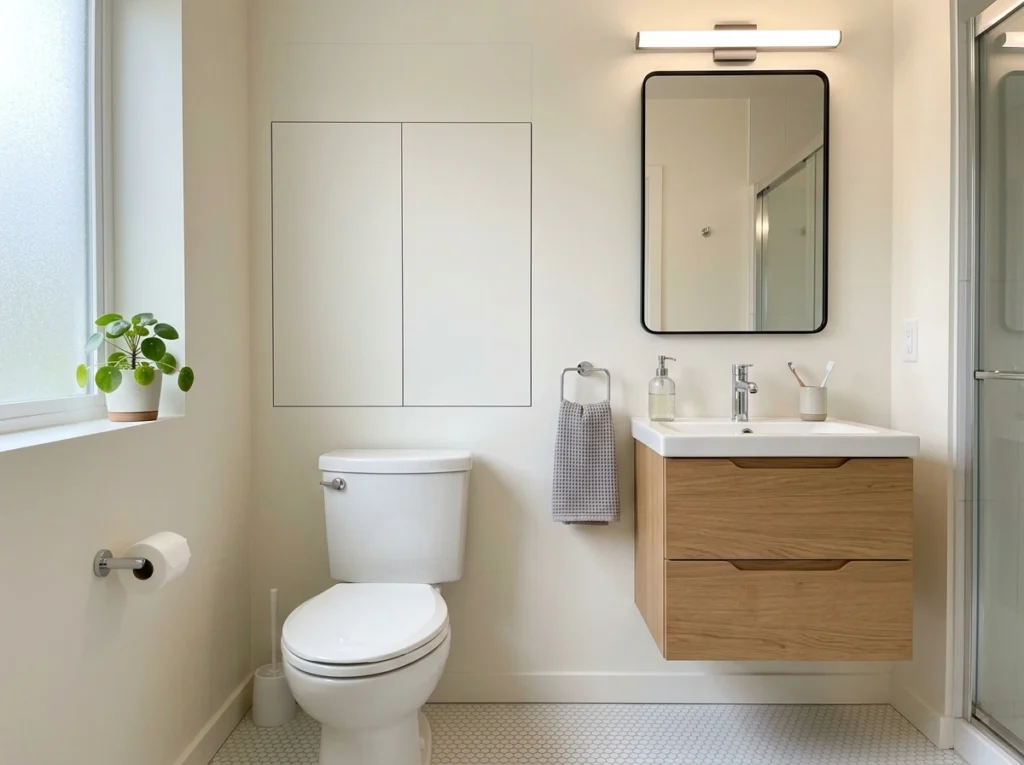
You do not need a massive room to have an organized master bathroom. This layout is designed for smaller spaces, focusing on maximizing the vertical wall space you already have. By placing a compact vanity next to the toilet, you keep your plumbing lines concentrated in one area. To add massive storage without taking up valuable floor space, you build a custom cabinet directly into the wall stud cavities above the toilet, keeping the cabinet doors flush with the drywall.
A common mistake in small bathrooms is hanging bulky, heavy cabinets over the toilet, which can make the space feel cramped and dark. By recessing the cabinet into the wall studs, you gain about 4 inches of deep storage space without losing any physical room. This is the perfect spot to store medicine, makeup, extra toilet paper, and daily toiletries. I always recommend using touch-latch cabinet doors without handles to keep the wall looking completely flat, clean, and modern. This clever, space-saving update is highly affordable, typically costing between $300 and $800, and it makes even the smallest bathroom feel neat and functional.
Conclusion
At the end of the day, an organized master bathroom is not about having a space that looks like a sterile showroom. It is about creating a layout that supports your daily life, reduces your morning stress, and makes your evening wind-down a little more peaceful. You do not need a massive budget or a giant room to make a difference.
If you are feeling overwhelmed by clutter, I always recommend starting with just one or two small ideas first. Whether that means installing a few floating shelves above your toilet, adding some pull-out organizers under your sink, or planning a future vanity split, those small steps will quickly add up to a much more functional home. Take your time, focus on what your daily routine actually needs, and build a space that feels comfortable and organized for you.
Which of these bathroom layout ideas would you actually try first in your own home? I would genuinely love to know!
FAQ Section
How do I make a small master bathroom layout look more organized?
The best way to organize a small bathroom is to get everything off the floor by using floating vanities and wall-mounted storage shelves. Utilizing the vertical space above your toilet or installing recessed cabinets inside your wall studs adds massive storage without taking up precious walking space.
What is the most functional layout for a shared master bathroom?
A split-vanity layout with a central storage tower or a parallel double-vanity setup is highly functional for couples. These designs give each person their own sink, mirror, and drawer storage, preventing morning arguments and keeping personal items neatly separated.
How can I add storage to my bathroom without buying expensive cabinets?
You can easily add affordable storage by installing simple wooden floating shelves on empty walls or placing matching woven baskets under your vanity. Using cheap clear plastic bins inside your existing drawers is another quick way to organize small items without spending a fortune.
Where should I place my laundry hamper in a master bathroom layout?
In my experience, the best place for a laundry hamper is tucked inside a deep vanity drawer, hidden under a window-seat bench, or placed right at the entrance of your walk-in closet. Keeping your hamper off the open floor prevents dirty clothes from piling up and ruining the clean look of your room.
What is a wet room layout and does it help with bathroom organization?
A wet room layout groups your shower and tub behind a single glass barrier, waterproofing the entire zone. This helps with organization because it keeps all water, steam, and shower clutter contained in one easy-to-clean area, leaving the rest of the bathroom dry and tidy.